Einleitung
Diese Anleitung zeigt, wie der Akku im MacBook Air (M1) von Ende 2020 ausgetauscht werden kann.
Um das Risiko eines Brandschadens zu verringern, solltest du dein MacBook anschalten und den Akku vor Reparaturbeginn ganz leer werden lassen. Ein Lithium-Ionen Akku kann sehr gefährlich werden, wenn er versehentlich angestochen wird. Wenn dein Akku aufgebläht ist, musst du besondere Vorsichtsmaßnahmen treffen.
Bei dieser Reparatur müssen beide Lautsprecher ausgebaut werden. Damit sie später wieder ohne Vibrationen oder Klappern funktionieren, musst du sie mit neuen Klebestreifen befestigen.
Was du brauchst
-
In diesem Schritt verwendetes Werkzeug:Magnetic Project Mat$19.95
-
Wenn dein MacBook unter BigSur v11.1 oder einer späteren Version läuft, lässt sich AutoBoot möglicherweise nicht stilllegen. Arbeite zuerst normal weiter, trenne aber den Akku sofort ab, wenn du ins Innere des Gerätes hinein gekommen bist.
-
Entferne folgende P5 Schrauben:
-
Zwei 7,9 mm Schrauben
-
Zwei 7,3 mm Schrauben
-
Sechs 2,6 mm Schrauben
-
-
-
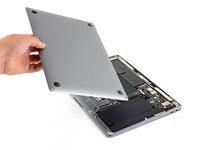
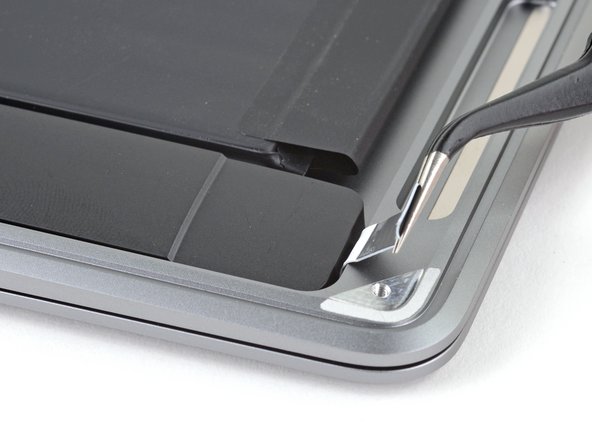
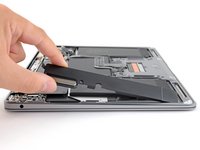
Zwänge deine Finger zwischen das Display und das Gehäuseunterteil und ziehe nach oben, so dass sich das Gehäuseunterteil vom Air ablöst.
-
Entferne das untere Gehäuse.
-
Setze es passend auf und drücke fest darauf, damit die beiden darunter versteckten Rasten einschnappen. Du solltest das hören und spüren können.
-
-
-
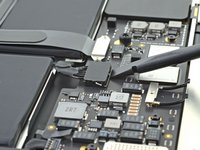
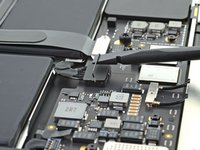
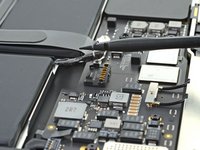
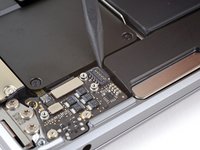
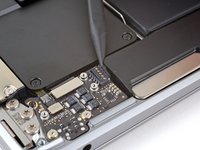
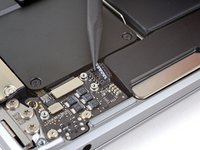
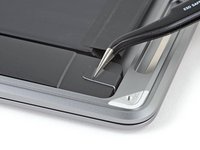
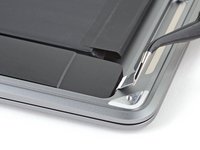
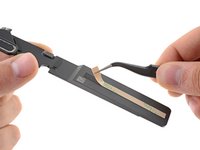
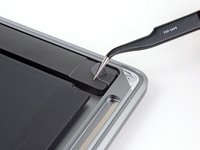
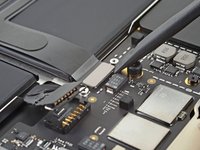
Heble den metallenen Sicherungsbügel am Akkustecker mit dem flachen Ende des Spudgers hoch und entriegelt den Akkustecker.
-
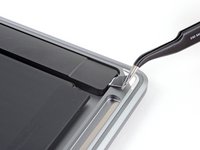
Ziehe den Sicherungsbügel senkrecht nach oben, damit der Akkustecker aus seinem Anschluss auf dem Logic Board herauskommt.
-
Drücke, falls nötig, zuerst die hintere Seite mit den Kabeln fest, dann die vordere Seite des Steckers.
If having difficulty in flipping the bar up, place the machine vertical and not that there is a small “locking nib” that the bar has to clear. You may have to give the bar honest persuasion to clear the nib.
The bar can lock backwards making it very hard to even see let alone move. Great care is needed to shift it. I had to use two thumbnails, one on each side, then once flipped forward it takes more push than I expected to clip it in place. Ensure the plug is fully seated first !
As others commented, it can be hard to click the battery connector back into place. First make sure the bar is not underneath the connector. Then, turning the computer so the connector pins are facing you (LCD hinge end closer to you) can also make it easier to position the connector on top and then click it into place.
Some replacement batteries have a retainer bar that differs from OEM batteries. I had to swap the retainer bar to properly secure it under the "locking nib" to ensure it didn't release on its own (before it could freely swing).
-
-
-
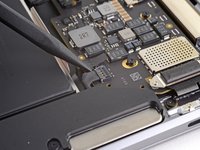
Entferne die drei 1,4 mm Torx T3 Schrauben, mit denen die Steckerabdeckung der Audioplatine befestigt ist.
-
-
-
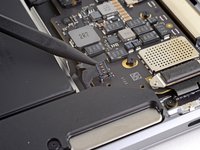
Schiebe die Spudgerspitze unter das Kabel zum rechten Lautsprecher und heble senkrecht nach oben, so dass es von der Audioplatine abgetrennt wird.
Be careful. I replaced the battery twice (first one was 3rd party crappy one). The second time, I pulled the socket off. The directions should say that there is a socket sodered onto the board and the connector has to come out of the socket. The three images did not help me see what to do
-
-
-
Entferne die 4,2 mm Torx T3 Schraube, mit der der rechte Lautsprecher am Gehäuse befestigt ist.
-
-
In diesem Schritt verwendetes Werkzeug:Tweezers$4.99
-
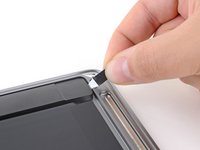
Ziehe die schwarze Zuglasche am elastischen Klebestreifen des Lautsprechers mit einer Pinzette zurück, bis du sie mit den Fingern greifen kannst.
-
-
-
-
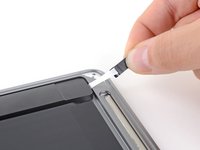
Fasse die Zuglasche an und ziehe sie langsam und behutsam unter dem rechten Lautsprecher hervor.
-
Ziehe solange am Klebestreifen, bis er ganz unter dem Lautsprecher herausgekommen ist.
-
Erwärme den Lautsprecher, damit der Kleber darunter weich wird.
-
Schiebe vorsichtig einen Spudger oder ein Plektrum unter den Lautsprecher und trenne den Kleber auf.
Pulling the adhesive is a delicate balance between strength and speed. It is important to pull as slowly as possible, with a decent force but not to break it. You can also pull a bit and then relax and wait for the adhesive to pull itself out from under the speaker. Then repeat the short pull and wait.
Even with the above, my adhesives broke each time. A hairdryer can help warm the speaker (and the adhesive under it), but don’t warm the battery next to it too much. Once hot, slowly move the spudger under the speaker and loosen it gradually. It will eventually come off in one piece.
-
-
In diesem Schritt verwendetes Werkzeug:Tesa 61395 Tape$5.99
-
Entferne den rechten Lautsprecher.
-
-
-
Schiebe die Spudgerspitze unter das Kabel zum linken Lautsprecher und heble senkrecht nach oben, so dass es vom Logic Board abgetrennt wird.
-
-
-
Entferne die 4,2 mm Torx T3 Schraube, mit der der linke Lautsprecher am Gehäuse befestigt ist.
-
-
In diesem Schritt verwendetes Werkzeug:Tweezers$4.99
-
Ziehe die schwarze Zuglasche am elastischen Klebestreifen des Lautsprechers mit einer Pinzette zurück, bis du sie mit den Fingern greifen kannst.
-
-
-
Fasse die Zuglasche an und ziehe sie langsam und behutsam unter dem rechten Lautsprecher hervor.
-
Ziehe solange am Klebestreifen, bis er ganz unter dem Lautsprecher herausgekommen ist.
-
Erwärme den Lautsprecher, damit der Kleber darunter weich wird.
-
Schiebe vorsichtig einen Spudger oder ein Plektrum unter den Lautsprecher und trenne den Kleber auf.
-
-
In diesem Schritt verwendetes Werkzeug:Tesa 61395 Tape$5.99
-
Entferne den linken Lautsprecher.
-
-
-
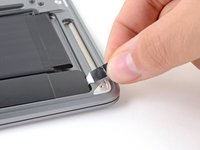
Entferne die beiden 1,4 mm Torx T3 Schrauben, mit denen die Abdeckung des Trackpadkabels befestigt ist.
-
-
-
Heble den Stecker am Trackpadkabel mit dem flachen Ende des Spudgers hoch und löse ihn aus seinem Anschluss heraus.
-
-
In diesem Schritt verwendetes Werkzeug:iFixit Opening Picks (Set of 6)$4.99
-
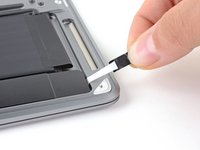
Löse das Trackpadkabel behutsam vom Akku ab.
-
-
-
Entferne die beiden 2,6 mm Torx T3 Schrauben, mit denen die Akkuhalterung am Gehäuse befestigt ist.
I think I lost these two battery tray screws somehow, but they don't seem super critical. Any way to get replacements?
-
-
In diesem Schritt verwendetes Werkzeug:Tweezers$4.99
-
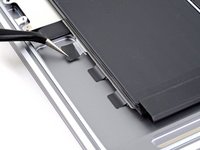
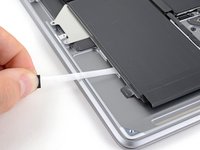
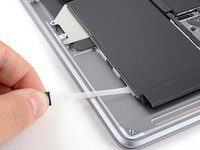
Ziehe drei schwarze Zuglaschen an den elastischen Klebestreifen auf der linken Seite des MacBooks mit einer Pinzette zurück, bis du sie mit den Fingern greifen kannst.
-
-
-
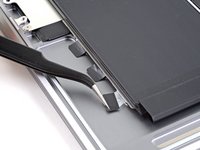
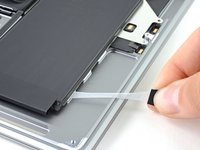
Fasse eine der Zuglaschen und ziehe den Klebestreifen langsam und sorgfältig unter dem Akku hervor.
-
Ziehe den Klebestreifen ganz unter dem Akku heraus.
-
Wiederhole alles für die anderen beiden Klebestreifen.
What happens if you don't put this tape back the way it was? Can it cause the battery to have any sort of issue?
I dont know but Im doing the same thing. On mine its in there pretty good without any tape. The two screws are holding it in place so as long as its not flapping around I cant see an issue. Its a used battery so I dont want to tape it back in.
Can I replace the strips under the battery with the same suggested adhesive tape (Tesa 61395) as the speakers?
-
-
In diesem Schritt verwendetes Werkzeug:Plastic Cards$2.99
-
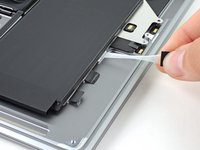
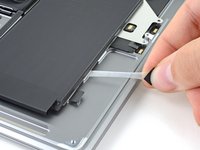
Wiederhole das Ganze an der rechten Seite und entferne alle drei Klebestreifen.
-
-
-
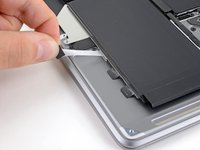
Entferne die Akkueinheit.
-
Lade ihn auf 100%, lasse das Ladegerät noch mindestens zwei weitere Stunden angeschlossen.
-
Trenne das Ladegerät ab und nutze das Gerät normal, bis der Akku leer ist.
-
Wenn die Akkuwarnung erscheint, dann speichere ab und lasse deinen Laptop weiter laufen, bis er wegen niedrigem Akkustand ausgeht.
-
Warte mindestens fünf Stunden, lade dann den Laptop ohne Unterbrechung auf 100% auf.
On boot after reinstallation, the fans go crazy during the Apple logo/progress bar, and the bar is very slow. Machine unuseable. I've reset SMC to no avail. Any other ideas?
Solved my own problem: I didn't have the battery connector pushed in far enough. Its edge really sits flush with the containing latch, though it isn't really obvious from the way it connects.
matt -
Matt, glad to hear you got it sorted! Thanks for giving an update on your comment—connectors can be tricky! Hopefully it helps other users that have the same problem in the future. Happy fixing!
-


Vergleiche dein Ersatzteil mit dem Originalteil — möglicherweise musst du fehlende Bauteile übertragen oder Schutzfolien vom Neuteil abziehen, bevor du es einbauen kannst.
Um dein Gerät wieder zusammenbauen, folge den Schritten in umgekehrter Reihenfolge.
Es kann sein, dass das Laptop sich nach der Reparatur nicht gleich anschalten lässt. Schließe es dann erst an das Netzteil an.
Entsorge deinen Elektromüll fachgerecht.
Hat die Reparatur doch nicht den richtigen Erfolg gebracht? Frage in unserem Forum nach Hilfe.
Rückgängig: Ich habe diese Anleitung nicht absolviert.
67 weitere Personen haben diese Anleitung absolviert.
Besonderer Dank geht an diese Übersetzer:innen:
100%

Diese Übersetzer:innen helfen uns, die Welt zu reparieren! Wie kann ich mithelfen?
Hier starten ›


27 Kommentare
You’ve gotta be kidding me…
Hard to believe, but true.. this is an improvement from a couple generations ago, when you had to disassemble the entire computer or futz about with isopropyl alcohol and credit cards (or dental floss) to remove swollen but still glued in batteries. If this has you feeling overwhelmed, go look at the 74-step guide for the 2015 15” MacBook Pro Battery Replacement.
I concur with that. Made the fix for a Macbook Pro 13" 2014 some times ago and it looks really more difficult and stressing, especially with potentially destructive steps. I felt a bit lucky that it worked fine after that and since then...
Ok I have the battery out but where do you buy replacement adhesive strips? Everywhere I look they say they are for iphones or generic lcd repair. I had to take the battery out for other reasons and want to put the same battery back in.
Stephen, the linked adhesive is a generic solution & should work just fine. Apple-specific adhesives are sometimes hard to source. You could also cut and adapt stretch-release adhesive strips to fit. Best of luck on your repair!
Might as well go to apple themselves and get the battery replaced for 129...
What is the price of a replacement with the battery included?
Does anyone know for sure if the Macbook Air M1 will turn on with the battery disconnected, only with the power connected? Not sure if my motherboard is broken or only battery.
I have the same question. My macbook air won't turn on even with battery disconnected and power connected. would love an answer
Kiradon -
Does the battery capacity show 100% after replacing the battery in System Preferences?
I had Air 2015 and changing battery was as simple as possible. No unscrewing speakers, no adhesive strips removing. Just FIVE easy steps.
дякую! ця інструкція врятувала мені бюджет.
Great guide! Completed in about an hour. The Fix Kit DOES include at card adhesion/tape so there is no need to purchase that separately.
What if you don't use the adhesives when you reassemble?
Would it really be much of an issue?
Had two new MBA 2020 to replace the batteries (leftover machines from an insane phone company discount, still in their original sealed boxes), the 1st was done in 65 min. the 2nd in 30 min.) - thank you very much for this guide !
Bonjour @daniel57 orientez-vous à l'adhésif présent d'origine dans votre MacBook. Si vous n'y avez plus accès, pouvez-vous me dire quelle pièce vous souhaitez recoller s'il vous plaît ?
Bjr Claire,
merci pour votre retour, je change la batterie et il y a plusieurs pièces qui nécessitent du double face.
je vais prendre du 10 mm et le retailler au besoin.
cordialement,
Daniel
@daniel57 Avec plaisir et bonne réparation à vous :)
Vielen Dank, hat sehr gut funktioniert. Etwa eine reichliche halbe Stunde brauchte ich.
ONLY 24 steps! ON a slightly older Macbook Pro it's over 60 and the battery is glued down.
Apple clearly hates its own technicians. Why this should take more than 5 minutes is beyond me.
30 minutes? More like 3+ hours. I am sure if you have everything set up perfectly, have done this a dozen times, and rush at a risk of damaging jeweler sized parts, you could do it within an hour. But if you want to be sure everything is done correctly, slow steady and leisurely is the right way to go.
I did the job today, took about an hour, all good. The battery shows 100% max capacity and Battery Condition "Normal" after replacement.
I highly recommend making a little paper template to organize your screws as they come out so you don't lose them!
ESD safe mat, plugged into ground, with a wrist strap, also grounded, are the best best to protect the logic board.
Robin Ray - Antwort
Re-Assembly Tip: Before putting the screws back in, snap the lower case on and test to make sure the MacBook powers up. When I first re-assembled, I became very nervous I did something wrong because it would not power on. It turns out I just needed to plug the laptop into a power source for it to power up (despite having a good charge before disassembly). It was the perfect way to test the new USB-C ports!
Austin - Antwort
Big points to this one, especially for mentioning needing to plug the laptop in. The bottom case needs to be screwed in and laptop needs to be plugged in before it will boot.
Bayden Yazalina -
Wiha 4PL driver for these screws.
Greg Worrel - Antwort
Printing out all the images from this Ifixit guide prior to starting and using duct tape help me keep track of screws.
raju midjdeya - Antwort
This Guide has a high chance of not working if an aftermarket display is used as MAC serialization was introduced post ~2023. Likely you will need an original MAC screen replacement and to serialize the display for it to work.
Tron Computers - Antwort