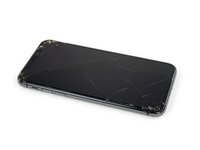
Einleitung
Benutze diese Anleitung, um den Ohrhörer-Lautsprecher zu ersetzen, ohne Face-ID zu verlieren.
Der Ohrhörer-Lautsprecher ist nur durch zwei kleine Lötpunkte an die Frontsensor-Baugruppe angeschlossen. Dadurch, dass du den Lötkolben nur kurz anwendest (Erfahrung mit Elektroniklöten ist Voraussetzung!), wird deine Sensor-Baugruppe nicht beeinträchtigt, Face-ID bleibt voll funktional.
Die Sensor-Baugruppe musst du nicht entfernen, somit ist es einfacher, als die komplette iPhone X Ohrhörer-Lautsprecher und Frontsensor-Baugruppe zu ersetzen.
Diese Anleitung wurde angeregt durch ein YouTube video von Tech MD Youtube wo dieser einfachere Weg erklärt wird.
Was du brauchst
-
-
Schalte dein iPhone aus, bevor du daran arbeitest.
-
Drehe die beiden 6,9 mm langen Pentalobe Schrauben an der unteren Kante heraus.
-
-
-
Zeichne mit einem Permanentmarker 3 mm von der Spitze des Plektrums entfernt einen Strich.
Got to step 2 and realized the fix kit doesn't include an opening pick! Looks like a guitar pick, and I have those lying around. Is that expected? Looks like the pick is used in many steps below. There's a little blue crowbar that isn't mentioned in the instructions. Perhaps that replaces the opening pick?
Hi! I can't see which guide you were using when writing this comment. Can you reply here with which guide and fix kit you used?
I see you posted this in Meta. I hope it's resolved soon! In the meantime, a guitar pick may work well enough for your repair.
what fix kit?
My fix kit didn't include an opening pick either
My AliExpress refurbished screen came with a pick that has a coin-like circle that pops out, so no modification was necessary
It's not an Ifixit KIT if it doesn't include everything. You'll need to order the opening pic separately. Or head to Walmart like myself and look for guitar pics. Hopefully, this will work just as well.
No pick in mine as well. It’s really not clear that you have to order this separately when ordering an IPhone SE 202/2022 screen repair kit. Is this the case?
Frustrated, I ordered a compact package where everything was encapsulated. Useless suction tools could not separate the screen. If it is unable to decouple the screen, then why sucking suction tools you have provided.
For my kit the triangle pick was stuck inside the box with the screen not with the other tools maybe it's also there for you
Y’all are getting far, FAR too detailed with some of this stuff…. Measuring and marking the pick that you won’t actually use to open the device?!? lol that’s kinda funny. Just heat it up, grab a spudger, and the back just pops right off! The iFixit tech need to stick to the KISS method more often, you know KEEP IT SIMPLE STUPID!!! Like l, for reals, I’ve been doing this stuff for YEARS and using iFixit guides regularly and this is just ridiculous at this point!
Will the phone still work if the sensor assembly on the back of the screen is damaged?
-
-
-
Überdecke die Glasscheibe des Displays komplett mit überlappenden Streifen von durchsichtigem Paketband.
-
Wenn das Glas so stark zerbrochen ist, dass der Saugheber in den nächsten Schritten nicht gut haftet, dann versuche ein starkes Klebeband ("Panzerband") zu einem Griff zu falten und so auf die Scheibe zu kleben, dass du sie damit hochziehen kannst.
-
-
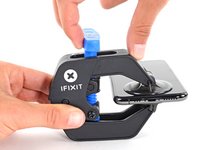
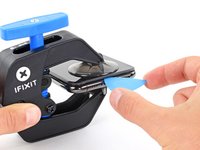
In diesem Schritt verwendetes Werkzeug:Clampy - Anti-Clamp$24.95
-
Drücke den blauen Griff zurück, damit die Arme der Anti-Clamp frei beweglich werden.
-
Schiebe die Arme entweder über die linke oder die rechte Kante des iPhones.
-
Bringe die Saugheber nahe an der Unterkante des Displays an, einen auf der Vorderseite, den anderen auf der Rückseite.
-
Drücke die Saugheber zusammen, so dass sie auf den Oberflächen haften.
-
-
-
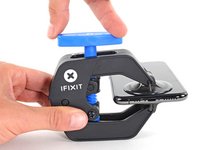
Drücke den blauen Griff vorwärts, um die Arme wieder zu verriegeln.
-
Drehe den Griff eine volle Umdrehung im Uhrzeigersinn, oder bis du merkst, dass sich die Saugheber dehnen.
-
Achte darauf, dass sich die Saugheber weiterhin gegenüber stehen. Wenn sie sich nicht mehr gegenüber stehen, dann löse die Saugheber ein wenig ab und schiebe sie in die richtige Position.
-
-
-
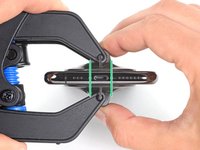
Führe einen erwärmten iOpener durch die Arme der Anti-Clamp.
-
Forme den iOpener so, dass er auf der Unterkante des iPhones liegt.
-
Warte eine Minute, damit sich der Kleber lösen und ein Spalt entstehen kann.
-
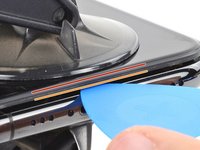
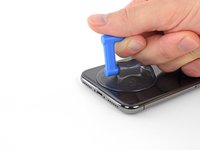
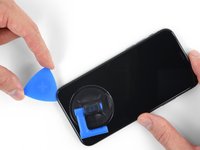
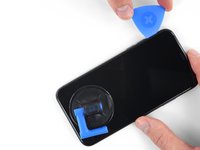
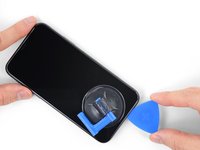
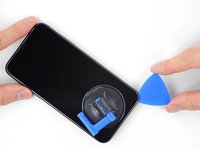
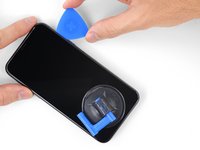
Setze ein Plektrum in den Spalt unter das Display und der Kunstoffblende ein, nicht unter das Display selbst.
-
Überspringe die nächsten drei Schritte.
DO NOT separate the glass from the plastic bumper or rim around it. These instructions don't clarify that the pick has to be inserted between the plastic rim and the metal body. It is likely that the glass will lift slightly off the plastic surround before the plastic will lift out of the metal body. I had success sliding a card or pick back and forth along the bottom edge of the plastic rim while pulling on the suction cup. Eventually there was a space large enough for the pick to go under the plastic rim.
Thanks for pointing this out! I'll revise this step to clarify this point.
-
-
-
Benutze einen Haartrockner/Fön, ein Heißluftgebläse oder bereite unseren iOpener vor. Erwärme damit die Unterkante des iPhones etwa eine Minute lang, um den Kleber darunter aufzuweichen.
General tip regarding heating necessary to remove adhesive:
consider using a heated tip of a small screwdriver or metal spudger (not the one made of plastic, provided in kit), rather than to heat the device itself.
You then need to be careful about the temp of the tool which if hot enough can melt plastic components or harm them. Keeping the heat source (heat gun) far enough away from the object that you’ll eventually melt the glue but would be much harder to melt components. I try to keep 4” or 5” gap between the source & object
Thanks for the info. Could a air convector do the job
If you have a 3d printer, heat the bed to 80c and put the phone screen side down on it for 30 secs
thaks for this advise, I was looking for this as I dont have a heat gun haha, nice hack
-
-
-
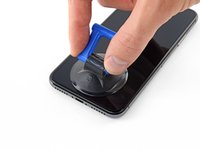
Wenn du einen einzelnen Saugheber benutzt, dann setze ihn am unteren Rand des iPhone auf, wobei du den gebogenen Teil des Bildschirms vermeiden musst.
If you were using some form of screen protector, it may come off first as soon as you pull on the suction cup. Do not be alarmed. That is normal behavior.
3m VSB double stick tape will stick to the screen when the suction cups fail (see my comment on step 1)
-
-
-
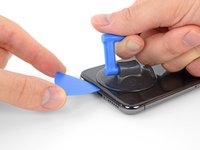
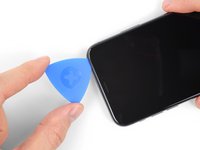
Ziehe fest und gleichmäßig am Saugheber und erzeuge dadurch einen kleinen Spalt zwischen Display und Rahmen.
-
Setze ein Plektrum in den Spalt unter der Kunstoffblende am Display ein, nicht am Display selbst.
In addition to safety goggles, I would recommend you also wear good gloves to avoid getting cut with the glass as you try to pry it open.
The top about applying more heat and gently rocking the screen up and down to weaken the adhesive did the trick for me. Thank you!
There needs to be more clarity on where to shove the opening pick into. There is actually two openings that the pry tool can be forced into: one below the black plastic bezel, and one above the black plastic bezel. When I heated my screen with a warming pad and pulled up the suction cup, it actually pried apart above the black plastic bezel which removed the touch screen from the display panel. With this being the first newer iPhone I'd opened since the 3GS, I didn't realize that I was opening the wrong opening as the directions only mentioned one opening and did not warn of this. I was pretty disappointed in the lack of mentioning this, as I was taking my time and following it to the tee. As a result, it destroyed my original iPhone screen.
DO NOT separate the glass from the plastic bumper or rim around it. As someone else noted, these instructions don't clarify that the pick has to be inserted between the plastic rim and the metal body of the phone. When pulling upwards with the suction cup, it is likely that the glass will lift slightly off the plastic surround before the plastic will lift out of the metal body. I had success sliding a card or pick back and forth along the bottom edge of the plastic rim while pulling on the suction cup. Eventually there was a space large enough for the pick to go under the plastic rim.
Thank you for pointing this out! I've updated the step to reflect this.
The suction cup doesn't work at all... The minimum force I apply to lift it up, it comes off completely. This is very frustrating!!!
-
-
-
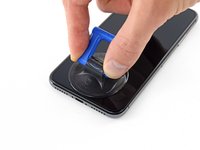
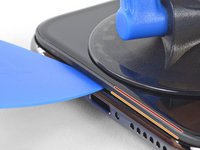
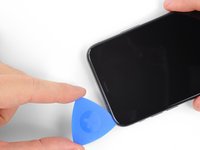
Schiebe das Plektrum um die linke untere Ecke und am linken Rand des iPhone hoch, zerschneide damit den Kleber, der das Display festhält.
-
-
Wouldn’t it be better to put this part BEFORE the step where you have to pry open the phone?
-
-
-
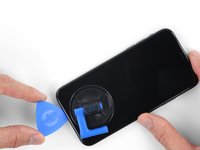
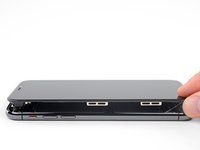
Setze da Plektrum wieder an der Unterkante des iPhone ein und schiebe es die rechte Seite hoch, um den Kleber darunter aufzutrennen.
If you have flat feeler gauges (for adjusting engine valve tappet clearance, ignition points … old school) the .003” thick gauge goes right in. Work your way up in thickness until you can get the pic or supplied pry tool in. Don’t insert metal feeler gauge in too far, just enough to hold crack open. I didn’t need to use the suction cup. I used a hot/cold gel pack heated in microwave to heat edges to soften glue a bit. Made sure it wasn’t so hot I couldn’t stand it on my skin.
-
-
-
Schiebe das Plektrum um die obere Ecke des Displays herum und ziehe gleichzeitig vorsichtig das Display mit wackelnden Bewegungen herunter in Richtung des Lightninganschlusses.
-
-
-
Öffne das iPhone, indem du das Display von der linken Seite her hochklappst, wie die Seite eines Buches.
-
Lehne das Display gegen einen Gegenstand, damit es abgestützt ist, wenn du daran arbeitest.
My phone came apart in a different way and looks not right the little box at the top of the display as actually bolted to the top of the frame body I think something went really wrong when I opened it.
It opens like a book but be careful not to open it all the way — only as far as shown in the photo. Otherwise it will strain the thin cable that connects the sensor module and then no more FaceID for you (or, as it turns out me). This could have been made more explicit in the instructions.
It opens like a book but be careful not to open it all the way … the small stainless steel tabs that hold the screen around the metal frame, that are on the bend place (right side of the phone)… are tend to bend, you can straighten them back to 90 deg. but the plastic base that they are on? very fragile- watch out not to break the plastic bezel … it may come apart of the glass.
Advice for re-assembly: Before closing up the phone with the seal, check if phone is powering up again and speaker, mic and sensors are still working. If done this check even before installing the board connector bracket in Step 13.
-
-
In diesem Schritt verwendetes Werkzeug:Magnetic Project Mat$19.95
-
Entferne fünf Y000 Schrauben, welche die Halterung des Verbinders des Logic Board befestigen:
-
Drei 1,1 mm Schrauben
-
Eine 3,1 mm Schraube
-
Eine 3,7 mm Schraube
One thing I found helpful for replacing the screws was to use only the 000screwdriver tip, without the handle. This way, the tip isn’t magnetized and the screw doesn’t tend to ‘roll’ off the screwdriver tip (the screw has almost no mass, so the head (largest surface) is pulled around to the side of the screwdriver tip when magnetized).
Rich May 23, 2020
My 3.1mm screw had a stripped head, could not remove it. (Factory defect, this iPhone was never opened)
So I had to give up removing the display assembly, and jumped directly to battery replacement, Step 20.
That was tricky as I had to keep the display at 90º with a risk of breaking display connectors, but hopefully the replacement went well.
I would not recommend to do this but to follow the guide, but, in case someone encounters a similar issue, that could help!
Be careful on reassembly. Keep the screen supported and not moving. I had difficulty getting the screws in and ended up ruining the screen connectivity at the back of the screen where the ribbon cables go in near the center. I was trying to hand hold the screen and it ended up moving around too much.
To keep track of the screws, I copy the photos showing their places, then arrange these photos on document in Pages, print it. Next I apply two sided sticky tape (the roll-on type). So all screws have their corresponding places …
-
-
-
Entferne die Halterung.
I tested it, then proceeded to close up the device without the bracket. Do I need to reopen and install? All connections are good?
The bracket helps those many connectors underneath maintain good contact. Probably in the short term nothing bad will happen, but I’d hang onto the bracket and reinstall it when convenient.
Agree with Jeff
cgtyoder -
for me, the replacement battery was completely dead, small panic when the power-on button was pressed, but quickly realised that this was the situation, and now watching the phone take a power cycle.
Before clicking the screen assembly back, I tried to test the iPhone by pushing the start button, but nothing happened. After taking off the bracket, reseating the plugs I tried again - nothing happened! Then I plugged in the charging cable connected with the iMac, and it started immediately. So if the phone does not start using the startup button, it might just be a glitch when reconnecting the battery.
-
-
-
Hebele den Akkustecker mit einem sauberen Fingernagel oder einem Spudger aus seinem Sockel auf dem Logic Board.
-
Biege den Stecker etwas weg vom Logic Board, damit er nicht versehentlich einen Kontakt zum Sockel herstellen kann. Dadurch würde das iPhone während der Reparatur mit Strom versorgt werden.
cosa può succedere se non si disconnette la scheda logica'?
note: be careful not to crush or puncture your battery at this step!! I gave mine a minor dent, which I hope wont be a problem.. but something to keep in mind for fxlks in the future!
Thanks, already did it)
-
-
-
Löse den Verbinder der Sensoreinheit des Frontpanels mit der Spudgerspitze oder dem Fingernagel.
-
-
-
Löse den Verbinder des Kabels zum OLED Panel mit der Spudgerspitze oder dem Fingernagel.
Snap ‘em in like little Legos.
-
-
-
Hebele den Verbinder des Touchscreen Kabels mit der Spudgerspitze aus seinem Sockel.
This was probably the hardest part other than trying to get the screen off with the crappy suction cups. I re-installed the bracket only the find out that the touch screen would not respond to touch. Had to remove the five screws, remove the bracket and reseat the recessed screen connector. Reseating the bracket took another 10+ minutes. I carefully used the angled forceps to grab the cable and align the connector being careful not to damage the cable.
Once you have the connector seated, I would reconnect the battery, power on the phone, and check the touch screen response before re-installing the bracket (step 13).
Yeah, this was probably the trickiest part of the reassembly. The power connector cable kept getting in the way so I moved it carefully but fully out of the way. Then it was a matter of fiddling around with it a bit and being careful not to force it on.
I was positive that I had messed something up, I had powered up the phone to test three different times and everything seemed find except there was no touch at all. On my fourth attempt, I carefully examined everything for dust and debris (blowing gently), and I did notice that a corner of the connector (more like part of the ribbon) was bent slightly, and I straightened it. I don't know if it was the ribbon or some tiny debris, but after reseating a fourth time, it worked.
Very important part of the tutorial. Be careful and patience! In my case the screen and camera didn't respond after assemble, so I tried again to reconnect the connector like tutorial said and it worked well. Now my iPhone feel like a new one 💪🏼
-
-
-
Hebe das Kabel vorsichtig an, bis es sich ablöst.
It is part of the face id part so yes. This is the ear piece too so if the ribbon tears there is a chance the ear piece will stop working as well.
Be super careful handling this ribbon particularly. I did a battery install and, when I was done, I had a phone with a new battery and no Face ID. That’s a $300 Apple repair, and no 3rd party shop will touch it. I believe the ribbon lays vertically (i.e., perpendicular to the “floor” of the phone, against the side edge of the battery. During the re-install, I must have forced the ribbon into position after seating the connector, causing fatal flexing of the ribbon. (Don’t know this for sure, but I see another comment saying that this cable is part of Face ID.) Anyway, bottom line: BE CAREFUL REMOVING AND REINSTALLING THIS RIBBON!
My flex cable was more than lightly adhered in place. I needed to use a guitar pic or similar to help encourage adhesive to separate. I wouldn’t pull too hard like shown in pictures unless you had just the right grip on the ribbon cable so as to avoid damaging flex cable. See note above (5/31/20)
Bizarre — it turns out my whole front panel sensor assembly came entire off of the front screen and is stuck to the logic board.
I also found the glue quite recluctant to release so I applied a second or two of heat using the wife's hair dryer which softened it and the cable lifted much easier then. Be careful not to apply too much heat though which could then impact other internal components.
Cho ít cồn 90° vào để mềm keo dễ tháo
my iphone x doesn't have a front panel sensor? in fact, it looks completely different than the picture???
@kennethmcleod, most likely you've separated the screen frame from the screen itself. We see this most commonly when people neglect to remove the pentalobe screws next to the charging port. Usually the cure is to take out those screws, then repeat the screen removal process on the frame that's still attached to the phone.
You don't need to disconnect the front sensor to change the screen. Just leave it connected and remove from the screen side.
I have damaged the front panel sensor assembly flex cable. Does it carry multiple channels of info or is it just one solid piece that can be soldered back together? If not, will the phone still work except Face ID?
-
-
-
Entferne die Displayeinheit.
I tried this and broke the cable can it still repair
CAUTION:
Removing the Taptic Engine or Speaker in next step is optional and the guide continues as this was per se needed.
Unnecessary work and also If you remove the speaker you lose the adhesive gasket and this is not included in the scope of delivery of the "Battery replacement" offering.
So do not remove and avoid losing waterproofing.
Just to confirm the face id is not affected when replacing the earpiece assembly? Am I correct
Sorry for the late response, but you are NOT correct. Replacing the earpiece speaker assembly will result in the loss of Face ID functionality. That's the whole assembly, including the speaker, dot projector and flood illuminator. If you unsolder the speaker from the assembly, that can be replaced by itself without losing Face ID, but any other part will cause it to quit working.
-
-
-
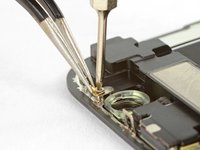
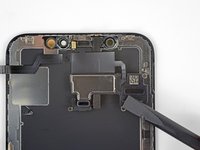
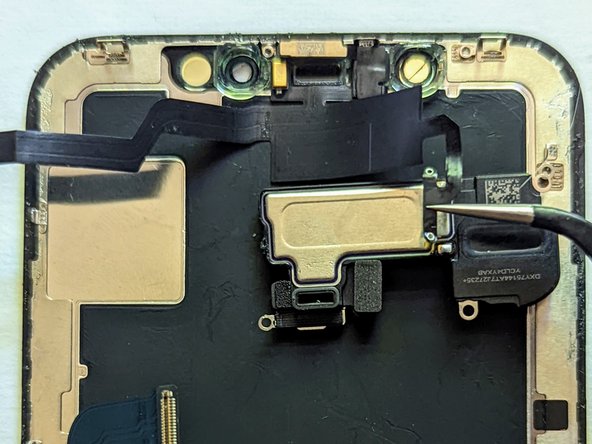
Auf der Rückseite der Displayeinheit nahe beim Anschluss der Infrarotkamera befindet sich eine 1,2 mm Y000-Schraube. Drehe sie heraus.
-
-
-
Unter der eben entfernten Schraube befindet sich eine kleine Erdungsöse. Wenn sie nicht zusammen mit der Schraube herausgekommen ist, dann entferne sie jetzt.
-
-
-
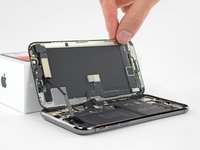
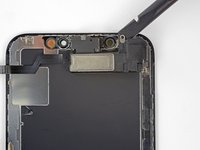
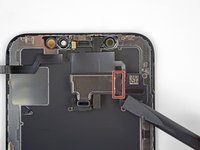
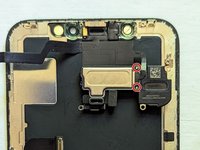
Entferne zwei weitere Y000-Schrauben, mit denen die Lautsprecher -/Sensoreinheit befestigt ist:
-
Eine 1,6 mm Schraube
-
Eine 1,3 mm Schraube
-
-
-
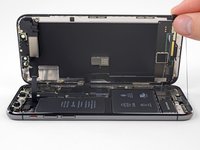
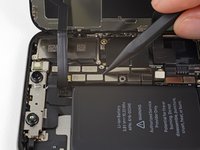
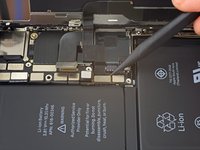
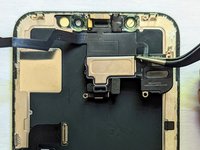
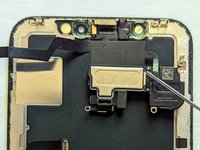
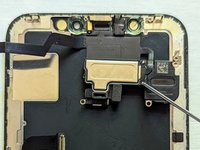
Heble vorsichtig mit einem Spudger unter der Oberkante der Lautsprechereinheit und klappe sie nach unten von der Oberkante des Displays weg.
-
-
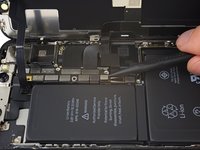
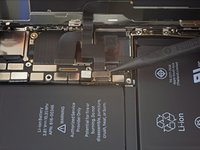
In diesem Schritt verwendetes Werkzeug:Tweezers$4.99
-
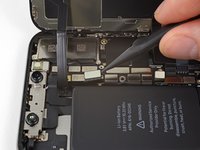
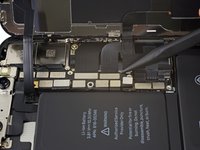
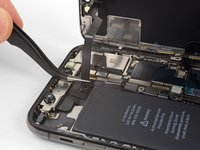
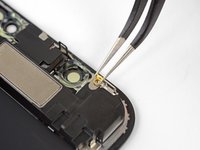
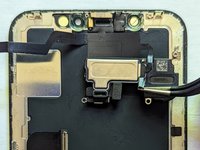
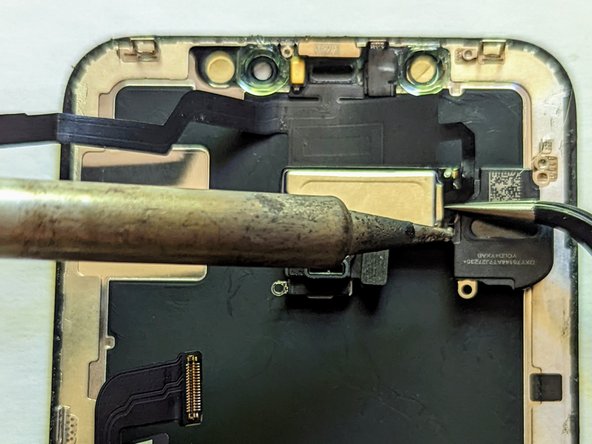
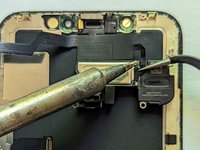
Drücke das Flachbandkabel mit einer Pinzette nach unten und erhitze gleichzeitig die erste Lötstelle. Sobald das Lötzinn flüssig ist, ziehe die Lötspitze weg. Hebe das Flachbandkabel nach oben, so dass es sich beim Abkühlen des Lötzinns nicht wieder verbindet.
-
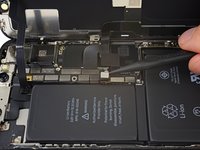
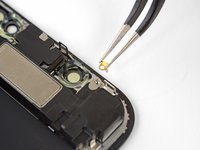
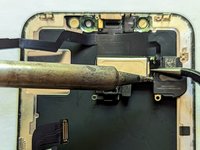
Wiederhole an der zweiten Lötstelle.
-


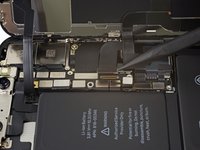


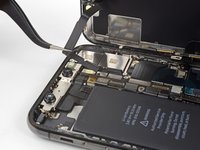


Um dein Gerät wieder zusammenzubauen, folge den Schritten dieser Anleitung in umgekehrter Reihenfolge.
Um dein Gerät wieder zusammenzubauen, folge den Schritten dieser Anleitung in umgekehrter Reihenfolge.
Rückgängig: Ich habe diese Anleitung nicht absolviert.
16 weitere Personen haben diese Anleitung absolviert.
Besonderer Dank geht an diese Übersetzer:innen:
100%

Diese Übersetzer:innen helfen uns, die Welt zu reparieren! Wie kann ich mithelfen?
Hier starten ›

Team

4 Kommentare
Awesome!
THis will work for iphone XS? I've had two aftermarket screens put in my XS and los teh face Id after the first new screen. I STILL have my ORIGINAL screen so that means I can fix the face id buy swapping this over??
@jason_b I responded to your comment on the question where you posted.
Earpiece Replacement and Face ID Functionality - iPhone 11 Pro Max - iFixit
Can Face ID be repaired again after damaged when repairing speaker
I can't give you a definitive answer because it depends on the kind of damage, but there is a chance it could be repaired. However, those kind of repairs require quite specialized microsoldering expertise that not all repair shops are capable of. Some repairs can be done by moving components from one flex cable to a new one, or in some cases the flex can be repaired if that's what's wrong.
If you're unable to locate a shop that has the expertise to do that kind of repair, then the only other choice you have would be to pay Apple to replace the screen. Their replacements come with the earpiece speaker assembly, and when they do the work they'll pair it to your phone so Face ID will work again. Some people can use the Apple self repair program, but unfortunately the iPhone 12 is the oldest phone they support with the program so that won't work for you.
There are 6.81mm long screws!
Daniel - Antwort
One of the pentalobe screws is stripped :( - suggestions for how to get it out?
cgtyoder - Antwort
same situation here
kaunomarcius - Antwort
Same issue for me too, how do I get the stripped screw out?
patronics - Antwort
Update: I was able to get the “stripped” screw out using another Pentalobe-2 screwdriver bit from another company. It seems it wasn’t the screw, but the screw driver that was actually stripped. Hence why the other screwdriver kit I got came with 3 of this bit, I suppose.
patronics - Antwort
I ended up going to a jewelry store, and they drilled down into the screw, with of course an incredibly tiny bit. That allowed me to insert the P2 driver, and I was able to unscrew it at that point. Good luck!
cgtyoder - Antwort
Same issue with the stripping. The tip of the iFixit P2 head in my $70 kit just ground off on the first screw and that was that. Not much you can do.
Kyle Harris - Antwort
yes correct the same happened to me, the screws were perfect shaped never been open and as soon as i used the P2 it stripped the screws, seems like the P2 is slightly smaller but Dremel kit with a very small drill bits and precise knife tool is the way to go.
Dulce Vidal - Antwort
This step in automatically followed through, without any thought. Why remove these screws? Can anybody explain? The Screen is detachable all the same, with them well screwed in…
Uri - Antwort
These screws attach to a plate that’s part of the screen half of the phone. If you succeed in detaching the screen without removing those, it would seem reasonable that you will have damaged that plate or its ability to keep the two halves together.
Dan Long -
@Dan Long is right
Uri -
Clean out the pentalobe screw heads first so the tool goes all the way in. A small sewing needle works well to loosen any build up and then press some putty/chewing gum into the screw head and pull away quickly for a final clean out.
William Olstad - Antwort
The this kit should include screws because you’re going to strip them. Can’t even get past step one. Did anybody figure this out
justin - Antwort
Never opened my phone ever, when I went to look at the first step.. I noticed one of my screws was stripped. I thought it was impossible, but I removed the non stripped one, then once I got to the stripped one.. I learned my assumptions were correct. I bought this one straight from the apple site years ago ahaha Any tips to remove the stripped screw?
Clarence Williams - Antwort
William Olstad's tip about cleaning the screws with a needle and a bit of poster putty worked well for me. There was a lot of crud in there! The opening is shallow, so it's easy to see how the screwdriver wouldn't catch with even a bit of grit in the way, No problem getting the pentalobe screws out with the ifixit screwdriver.
punkinann - Antwort
If all else fails, very carefully cut a slot across the head of the screw with a Dremel tool using a diamond bit that dentist will gladly give you - I ask my dentist for used bits; and chuck them in a drill bit chuck designed for Dremel. The slot allows you to use a tiny, straight blade screwdriver. You can reuse the screw or replace it with a new pentalobe screw.
Dan Smith - Antwort