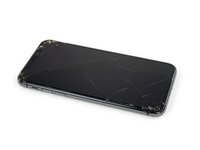
Einleitung
Diese Anleitung zeigt dir, wie du den Ohrhörer-Lautsprecher und die Frontsensoreinheit austauschen kannst. Diese Einheit besteht aus dem Ohrhörer-Lautsprecher, Flood Illuminator, Näherungssensor, Umgebungslichtsensor und Mikrofon.
Die Einheit ist ab Werk mit deinem individuellem iPhone gepaart. Du musst sie deswegen bei jedem Displaywechsel vom alten Display auf das neue übertragen.
Der "Flood Illuminator" ist ein Infrarotblitzlicht, welches zum biometrischen Sicherheitssystem Face ID gehört. Wenn die Einheit beschädigt oder nicht korrekt ausgetauscht wird, kann FaceID nicht mehr funktionieren. Auch Ersatz durch ein Neuteil bringt keine Abhilfe. Sei deswegen besonders vorsichtig und beschädige bei der Reparatur keine dieser Bauteile. Im Schadensfall kann nur Apple selbst das FaceID wiederherstellen.
Was du brauchst
-
-
Schalte dein iPhone aus, bevor du daran arbeitest.
-
Drehe die beiden 6,9 mm langen Pentalobe Schrauben an der unteren Kante heraus.
-
-
-
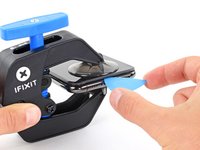
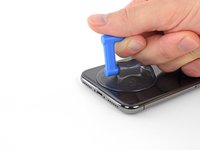
Zeichne mit einem Permanentmarker 3 mm von der Spitze des Plektrums entfernt einen Strich.
Got to step 2 and realized the fix kit doesn't include an opening pick! Looks like a guitar pick, and I have those lying around. Is that expected? Looks like the pick is used in many steps below. There's a little blue crowbar that isn't mentioned in the instructions. Perhaps that replaces the opening pick?
Hi! I can't see which guide you were using when writing this comment. Can you reply here with which guide and fix kit you used?
I see you posted this in Meta. I hope it's resolved soon! In the meantime, a guitar pick may work well enough for your repair.
what fix kit?
My fix kit didn't include an opening pick either
My AliExpress refurbished screen came with a pick that has a coin-like circle that pops out, so no modification was necessary
It's not an Ifixit KIT if it doesn't include everything. You'll need to order the opening pic separately. Or head to Walmart like myself and look for guitar pics. Hopefully, this will work just as well.
No pick in mine as well. It’s really not clear that you have to order this separately when ordering an IPhone SE 202/2022 screen repair kit. Is this the case?
Frustrated, I ordered a compact package where everything was encapsulated. Useless suction tools could not separate the screen. If it is unable to decouple the screen, then why sucking suction tools you have provided.
For my kit the triangle pick was stuck inside the box with the screen not with the other tools maybe it's also there for you
Y’all are getting far, FAR too detailed with some of this stuff…. Measuring and marking the pick that you won’t actually use to open the device?!? lol that’s kinda funny. Just heat it up, grab a spudger, and the back just pops right off! The iFixit tech need to stick to the KISS method more often, you know KEEP IT SIMPLE STUPID!!! Like l, for reals, I’ve been doing this stuff for YEARS and using iFixit guides regularly and this is just ridiculous at this point!
Will the phone still work if the sensor assembly on the back of the screen is damaged?
-
-
-
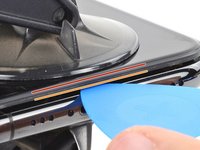
Überdecke die Glasscheibe des Displays komplett mit überlappenden Streifen von durchsichtigem Paketband.
-
Wenn das Glas so stark zerbrochen ist, dass der Saugheber in den nächsten Schritten nicht gut haftet, dann versuche ein starkes Klebeband ("Panzerband") zu einem Griff zu falten und so auf die Scheibe zu kleben, dass du sie damit hochziehen kannst.
-
-
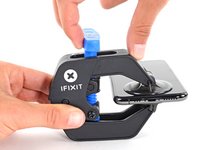
In diesem Schritt verwendetes Werkzeug:Clampy - Anti-Clamp$24.95
-
Drücke den blauen Griff zurück, damit die Arme der Anti-Clamp frei beweglich werden.
-
Schiebe die Arme entweder über die linke oder die rechte Kante des iPhones.
-
Bringe die Saugheber nahe an der Unterkante des Displays an, einen auf der Vorderseite, den anderen auf der Rückseite.
-
Drücke die Saugheber zusammen, so dass sie auf den Oberflächen haften.
-
-
-
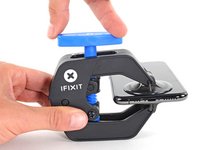
Drücke den blauen Griff vorwärts, um die Arme wieder zu verriegeln.
-
Drehe den Griff eine volle Umdrehung im Uhrzeigersinn, oder bis du merkst, dass sich die Saugheber dehnen.
-
Achte darauf, dass sich die Saugheber weiterhin gegenüber stehen. Wenn sie sich nicht mehr gegenüber stehen, dann löse die Saugheber ein wenig ab und schiebe sie in die richtige Position.
-
-
-
Führe einen erwärmten iOpener durch die Arme der Anti-Clamp.
-
Forme den iOpener so, dass er auf der Unterkante des iPhones liegt.
-
Warte eine Minute, damit sich der Kleber lösen und ein Spalt entstehen kann.
-
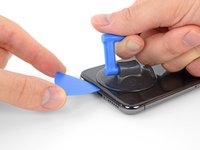
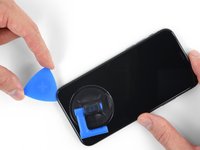
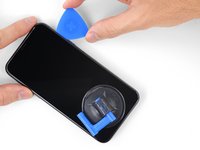
Setze ein Plektrum in den Spalt unter das Display und der Kunstoffblende ein, nicht unter das Display selbst.
-
Überspringe die nächsten drei Schritte.
DO NOT separate the glass from the plastic bumper or rim around it. These instructions don't clarify that the pick has to be inserted between the plastic rim and the metal body. It is likely that the glass will lift slightly off the plastic surround before the plastic will lift out of the metal body. I had success sliding a card or pick back and forth along the bottom edge of the plastic rim while pulling on the suction cup. Eventually there was a space large enough for the pick to go under the plastic rim.
Thanks for pointing this out! I'll revise this step to clarify this point.
-
-
-
Benutze einen Haartrockner/Fön, ein Heißluftgebläse oder bereite unseren iOpener vor. Erwärme damit die Unterkante des iPhones etwa eine Minute lang, um den Kleber darunter aufzuweichen.
General tip regarding heating necessary to remove adhesive:
consider using a heated tip of a small screwdriver or metal spudger (not the one made of plastic, provided in kit), rather than to heat the device itself.
You then need to be careful about the temp of the tool which if hot enough can melt plastic components or harm them. Keeping the heat source (heat gun) far enough away from the object that you’ll eventually melt the glue but would be much harder to melt components. I try to keep 4” or 5” gap between the source & object
Thanks for the info. Could a air convector do the job
If you have a 3d printer, heat the bed to 80c and put the phone screen side down on it for 30 secs
thaks for this advise, I was looking for this as I dont have a heat gun haha, nice hack
-
-
-
Wenn du einen einzelnen Saugheber benutzt, dann setze ihn am unteren Rand des iPhone auf, wobei du den gebogenen Teil des Bildschirms vermeiden musst.
If you were using some form of screen protector, it may come off first as soon as you pull on the suction cup. Do not be alarmed. That is normal behavior.
3m VSB double stick tape will stick to the screen when the suction cups fail (see my comment on step 1)
-
-
-
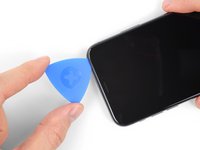
Ziehe fest und gleichmäßig am Saugheber und erzeuge dadurch einen kleinen Spalt zwischen Display und Rahmen.
-
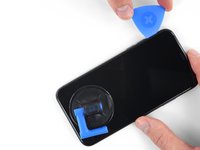
Setze ein Plektrum in den Spalt unter der Kunstoffblende am Display ein, nicht am Display selbst.
In addition to safety goggles, I would recommend you also wear good gloves to avoid getting cut with the glass as you try to pry it open.
The top about applying more heat and gently rocking the screen up and down to weaken the adhesive did the trick for me. Thank you!
There needs to be more clarity on where to shove the opening pick into. There is actually two openings that the pry tool can be forced into: one below the black plastic bezel, and one above the black plastic bezel. When I heated my screen with a warming pad and pulled up the suction cup, it actually pried apart above the black plastic bezel which removed the touch screen from the display panel. With this being the first newer iPhone I'd opened since the 3GS, I didn't realize that I was opening the wrong opening as the directions only mentioned one opening and did not warn of this. I was pretty disappointed in the lack of mentioning this, as I was taking my time and following it to the tee. As a result, it destroyed my original iPhone screen.
DO NOT separate the glass from the plastic bumper or rim around it. As someone else noted, these instructions don't clarify that the pick has to be inserted between the plastic rim and the metal body of the phone. When pulling upwards with the suction cup, it is likely that the glass will lift slightly off the plastic surround before the plastic will lift out of the metal body. I had success sliding a card or pick back and forth along the bottom edge of the plastic rim while pulling on the suction cup. Eventually there was a space large enough for the pick to go under the plastic rim.
Thank you for pointing this out! I've updated the step to reflect this.
The suction cup doesn't work at all... The minimum force I apply to lift it up, it comes off completely. This is very frustrating!!!
-
-
-
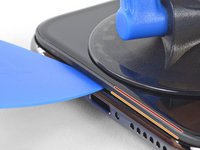
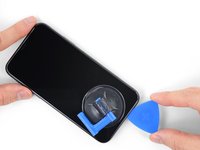
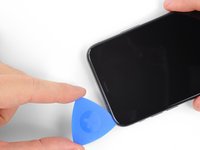
Schiebe das Plektrum um die linke untere Ecke und am linken Rand des iPhone hoch, zerschneide damit den Kleber, der das Display festhält.
-
-
Wouldn’t it be better to put this part BEFORE the step where you have to pry open the phone?
-
-
-
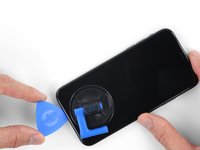
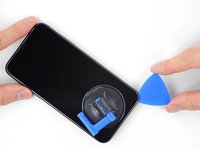
Setze da Plektrum wieder an der Unterkante des iPhone ein und schiebe es die rechte Seite hoch, um den Kleber darunter aufzutrennen.
If you have flat feeler gauges (for adjusting engine valve tappet clearance, ignition points … old school) the .003” thick gauge goes right in. Work your way up in thickness until you can get the pic or supplied pry tool in. Don’t insert metal feeler gauge in too far, just enough to hold crack open. I didn’t need to use the suction cup. I used a hot/cold gel pack heated in microwave to heat edges to soften glue a bit. Made sure it wasn’t so hot I couldn’t stand it on my skin.
-
-
-
Schiebe das Plektrum um die obere Ecke des Displays herum und ziehe gleichzeitig vorsichtig das Display mit wackelnden Bewegungen herunter in Richtung des Lightninganschlusses.
-
-
-
Öffne das iPhone, indem du das Display von der linken Seite her hochklappst, wie die Seite eines Buches.
-
Lehne das Display gegen einen Gegenstand, damit es abgestützt ist, wenn du daran arbeitest.
My phone came apart in a different way and looks not right the little box at the top of the display as actually bolted to the top of the frame body I think something went really wrong when I opened it.
It opens like a book but be careful not to open it all the way — only as far as shown in the photo. Otherwise it will strain the thin cable that connects the sensor module and then no more FaceID for you (or, as it turns out me). This could have been made more explicit in the instructions.
It opens like a book but be careful not to open it all the way … the small stainless steel tabs that hold the screen around the metal frame, that are on the bend place (right side of the phone)… are tend to bend, you can straighten them back to 90 deg. but the plastic base that they are on? very fragile- watch out not to break the plastic bezel … it may come apart of the glass.
Advice for re-assembly: Before closing up the phone with the seal, check if phone is powering up again and speaker, mic and sensors are still working. If done this check even before installing the board connector bracket in Step 13.
-
-
In diesem Schritt verwendetes Werkzeug:Magnetic Project Mat$19.95
-
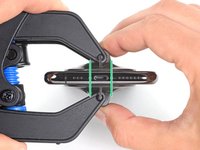
Entferne fünf Y000 Schrauben, welche die Halterung des Verbinders des Logic Board befestigen:
-
Drei 1,1 mm Schrauben
-
Eine 3,1 mm Schraube
-
Eine 3,7 mm Schraube
One thing I found helpful for replacing the screws was to use only the 000screwdriver tip, without the handle. This way, the tip isn’t magnetized and the screw doesn’t tend to ‘roll’ off the screwdriver tip (the screw has almost no mass, so the head (largest surface) is pulled around to the side of the screwdriver tip when magnetized).
Rich May 23, 2020
My 3.1mm screw had a stripped head, could not remove it. (Factory defect, this iPhone was never opened)
So I had to give up removing the display assembly, and jumped directly to battery replacement, Step 20.
That was tricky as I had to keep the display at 90º with a risk of breaking display connectors, but hopefully the replacement went well.
I would not recommend to do this but to follow the guide, but, in case someone encounters a similar issue, that could help!
Be careful on reassembly. Keep the screen supported and not moving. I had difficulty getting the screws in and ended up ruining the screen connectivity at the back of the screen where the ribbon cables go in near the center. I was trying to hand hold the screen and it ended up moving around too much.
To keep track of the screws, I copy the photos showing their places, then arrange these photos on document in Pages, print it. Next I apply two sided sticky tape (the roll-on type). So all screws have their corresponding places …
-
-
-
Entferne die Halterung.
I tested it, then proceeded to close up the device without the bracket. Do I need to reopen and install? All connections are good?
The bracket helps those many connectors underneath maintain good contact. Probably in the short term nothing bad will happen, but I’d hang onto the bracket and reinstall it when convenient.
Agree with Jeff
cgtyoder -
for me, the replacement battery was completely dead, small panic when the power-on button was pressed, but quickly realised that this was the situation, and now watching the phone take a power cycle.
Before clicking the screen assembly back, I tried to test the iPhone by pushing the start button, but nothing happened. After taking off the bracket, reseating the plugs I tried again - nothing happened! Then I plugged in the charging cable connected with the iMac, and it started immediately. So if the phone does not start using the startup button, it might just be a glitch when reconnecting the battery.
-
-
-
Hebele den Akkustecker mit einem sauberen Fingernagel oder einem Spudger aus seinem Sockel auf dem Logic Board.
-
Biege den Stecker etwas weg vom Logic Board, damit er nicht versehentlich einen Kontakt zum Sockel herstellen kann. Dadurch würde das iPhone während der Reparatur mit Strom versorgt werden.
cosa può succedere se non si disconnette la scheda logica'?
note: be careful not to crush or puncture your battery at this step!! I gave mine a minor dent, which I hope wont be a problem.. but something to keep in mind for fxlks in the future!
Thanks, already did it)
-
-
-
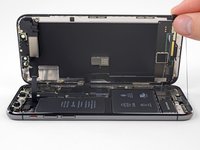
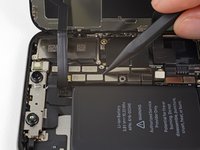
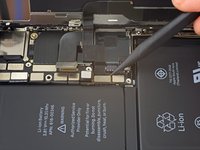
Löse den Verbinder der Sensoreinheit des Frontpanels mit der Spudgerspitze oder dem Fingernagel.
-
-
-
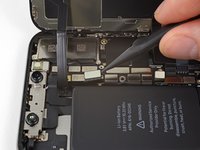
Löse den Verbinder des Kabels zum OLED Panel mit der Spudgerspitze oder dem Fingernagel.
Snap ‘em in like little Legos.
-
-
-
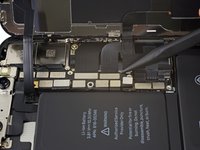
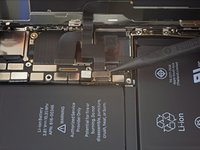
Hebele den Verbinder des Touchscreen Kabels mit der Spudgerspitze aus seinem Sockel.
This was probably the hardest part other than trying to get the screen off with the crappy suction cups. I re-installed the bracket only the find out that the touch screen would not respond to touch. Had to remove the five screws, remove the bracket and reseat the recessed screen connector. Reseating the bracket took another 10+ minutes. I carefully used the angled forceps to grab the cable and align the connector being careful not to damage the cable.
Once you have the connector seated, I would reconnect the battery, power on the phone, and check the touch screen response before re-installing the bracket (step 13).
Yeah, this was probably the trickiest part of the reassembly. The power connector cable kept getting in the way so I moved it carefully but fully out of the way. Then it was a matter of fiddling around with it a bit and being careful not to force it on.
I was positive that I had messed something up, I had powered up the phone to test three different times and everything seemed find except there was no touch at all. On my fourth attempt, I carefully examined everything for dust and debris (blowing gently), and I did notice that a corner of the connector (more like part of the ribbon) was bent slightly, and I straightened it. I don't know if it was the ribbon or some tiny debris, but after reseating a fourth time, it worked.
Very important part of the tutorial. Be careful and patience! In my case the screen and camera didn't respond after assemble, so I tried again to reconnect the connector like tutorial said and it worked well. Now my iPhone feel like a new one 💪🏼
-
-
-
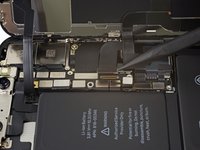
Hebe das Kabel vorsichtig an, bis es sich ablöst.
It is part of the face id part so yes. This is the ear piece too so if the ribbon tears there is a chance the ear piece will stop working as well.
Be super careful handling this ribbon particularly. I did a battery install and, when I was done, I had a phone with a new battery and no Face ID. That’s a $300 Apple repair, and no 3rd party shop will touch it. I believe the ribbon lays vertically (i.e., perpendicular to the “floor” of the phone, against the side edge of the battery. During the re-install, I must have forced the ribbon into position after seating the connector, causing fatal flexing of the ribbon. (Don’t know this for sure, but I see another comment saying that this cable is part of Face ID.) Anyway, bottom line: BE CAREFUL REMOVING AND REINSTALLING THIS RIBBON!
My flex cable was more than lightly adhered in place. I needed to use a guitar pic or similar to help encourage adhesive to separate. I wouldn’t pull too hard like shown in pictures unless you had just the right grip on the ribbon cable so as to avoid damaging flex cable. See note above (5/31/20)
Bizarre — it turns out my whole front panel sensor assembly came entire off of the front screen and is stuck to the logic board.
I also found the glue quite recluctant to release so I applied a second or two of heat using the wife's hair dryer which softened it and the cable lifted much easier then. Be careful not to apply too much heat though which could then impact other internal components.
Cho ít cồn 90° vào để mềm keo dễ tháo
my iphone x doesn't have a front panel sensor? in fact, it looks completely different than the picture???
@kennethmcleod, most likely you've separated the screen frame from the screen itself. We see this most commonly when people neglect to remove the pentalobe screws next to the charging port. Usually the cure is to take out those screws, then repeat the screen removal process on the frame that's still attached to the phone.
You don't need to disconnect the front sensor to change the screen. Just leave it connected and remove from the screen side.
I have damaged the front panel sensor assembly flex cable. Does it carry multiple channels of info or is it just one solid piece that can be soldered back together? If not, will the phone still work except Face ID?
-
-
-
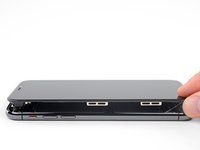
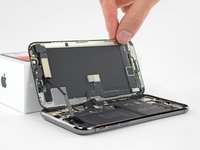
Entferne die Displayeinheit.
I tried this and broke the cable can it still repair
CAUTION:
Removing the Taptic Engine or Speaker in next step is optional and the guide continues as this was per se needed.
Unnecessary work and also If you remove the speaker you lose the adhesive gasket and this is not included in the scope of delivery of the "Battery replacement" offering.
So do not remove and avoid losing waterproofing.
Just to confirm the face id is not affected when replacing the earpiece assembly? Am I correct
Sorry for the late response, but you are NOT correct. Replacing the earpiece speaker assembly will result in the loss of Face ID functionality. That's the whole assembly, including the speaker, dot projector and flood illuminator. If you unsolder the speaker from the assembly, that can be replaced by itself without losing Face ID, but any other part will cause it to quit working.
-
-
-
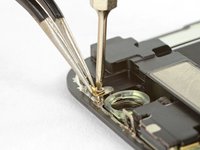
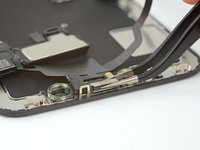
Entferne die 1,2 mm Y000 Schraube auf der Rückseite der Displayeinheit, in der Nähe des Infrarot-Kameraports.
when I opened my iPhone the screw was already stripped, I had the phone once at an Apple store for repair about 2 years ago. Had not opened it in between so it seems they stripped the screw there or it came like that from the factory. Any ideas? I don’t want to try and force it out.
Be careful: the metal clip beneath this screw it’s really small, make sure not losing it.
Steps 19 and on are all on the screen you just removed. Not the phone side. I didn’t look closely at the image and just went for the screw in roughly the same place on the phone body side. First warning sign it’s a phillips - but more importantly I was working on the entirely wrong piece. I guess you’ll probably figure it out faster than I did.
FYI: My iphone XS has a slightly different screw position for the one shown to have a “clip”. There is no clip for this screw on mine. Maybe a rev update because of the clip getting lost and being hard to reinstall?
FYI - The sensor assembly of the replacement looks a bit different from my original one. The screw is located further to the right on the original. As a result, I am unable to attach the sensor assembly on the replacement part, because the fixture is at a different position.
Unfortunately, there’s nothing I can do about it apart asking for a refund.
Screws at my Iphone X are normal,but even w heat,i cant take them off,and even the strongest member of my family cant do this
-
-
-
Unter der eben entfernten Schraube befindet sich ein kleiner Endungskontakt aus Metall. Wenn er nicht schon mit der Schraube herausgekommen ist, dann entferne ihn jetzt.
sin ese clip la señal wifi se recibe a duras penas
Is there any way we buy the ground metal clip separately please if there’s a way to get it emailed me
Reinstalling this clip + screw is super hard =P
It is pretty difficult without using a zoom in. A 2nd iphone camera zoomed in at 8x while using magnetic screwdrivers makes the job a little easier
Yes eBay has it
Screw Gasket Ear Speaker for Apple iPhone X Replacement Repair Phone Part Speak
This looks different on my iPhone X. There’s no clip. It turns out that the replacement screen is NOT compatible with my iPhone. See my comment on Step 23. Must be a different HW revision. The whole front sensor assembly casting is a bit different. After replacing 2 screens of older iPhone generations this is my first failure due to HW incompatibility. From here on forward I probably won’t attempt another major smart phone repair. Technology is getting to complex for DIY. Will buy an iPhone 13 Pro with insurance (even though it’s utterly overpriced and I always like the DIY challenge)…
it’s not technology that’s getting more advanced, it’s apple creating more barriers between a DIY repair vs funneling your hard earned dollar into apple care and the Genius Bar
I did the same thing here - its the x vs xs and my partner ordered the part
I ripped off the side clips and ones in wrong place (put the old screen next to it - and rip them off with needle nose plyers (in a rolling motion so you get each solder one at a time)). the smaller clips that had enough room i left.. then i could force the screen on.
And its working ...... lets see for how long - the sealant and small clips seem to be holding it together okQue pasa si no pones ese clip?
-
-
-
Entferne zwei weitere Y000 Schrauben, welche die Lautsprecher/Sensoreinheit befestigen:
-
Eine 1,6 mm Schraube
-
Eine 1,3 mm Schraube
What do you do if the 1.6mm tripoint screw won’t come out…? I think it may be stripped :(
You could try using an old screwdriver & carefully adding a dab of superglue to the screw to attach it to the screwdriver, Then the screw may come out, Superglue’s strength is holding 2 pieces together when the stress point is pulling the 2 pieces away from each other. Superglue becomes surprisingly easy to break when twisting the 2 pieces. So be careful since the rotation of the screw will put the stress point at the weakest of the glue’s strength.
I would suggest:
1. Try a small precision flat head, a good quality one, I bought some that were supposed to be to remove stripped screws, about 20-30 bucks for 4 or 5 of them, and they have saved my butt many times.
2. I have been able to remove stripped screws with wire cutters. Or you can try some vamp pliers but they are probably too large for this situation.
3. If the last two fail, the course of action is to basically destroy the head of that screw (assuming you are removing the stuff you need for your new lcd, which is very likely) they have drill bits called easy outs or screw removing drill bit, which is a drill bit with the spiral going the opposite direction (for a screw that tiny you can take a small drill bit, cut and sharpen the end that normally has no spiral, I have made that work in the past) the point is that as you drill in, the drill bit is digging and moving counterclockwise, so at some point as it digs in it will get “stuck” and keep spinning go the screw, thus removing it.
-
-
-
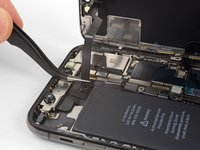
Hebele vorsichtig mit einem Spudger unter der Oberkante der Lautsprechereinheit und drehe sie herum, herunter und weg von der Oberkante des Displays.
-
-
-
Benutze einen Haartrockener oder ein Heißluftgebläse oder bereite einen iOpener vor, um Wärme oben vorne am Display für etwa eine Minute anzuwenden. So weicht der Kleber auf, der die Sensoren festhält.
I could not have done this without the iOpener, it was worth the investment!
-
-
-
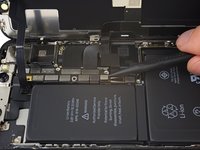
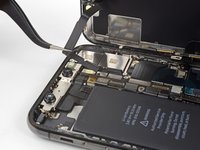
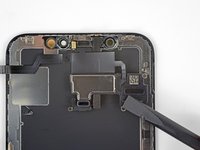
Schiebe das flache Ende deines Spudgers vorsichtig unter das Flachbandkabel unter dem Mikrofon.
-
Verdrehe ihn vorsichtig, um das Mikrofon abzulösen. Achte dabei darauf, dass das Kabel nicht zu stark angespannt oder beschädigt wird.
-
Hebe vorsichtig, falls nötig, mit der Spudgerspitze das Mikrofon aus seiner Vertiefung im Frontpanel.
-
-
-
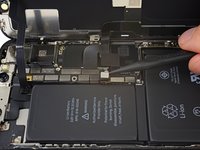
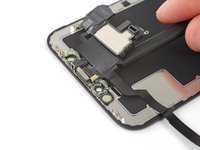
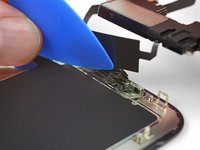
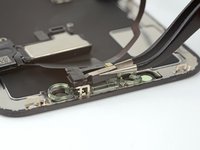
Schiebe ein Plektrum von links nach rechts unter dem Flexkabel und unter dem Näherungssensor und Flood Illuminator Modul durch.
-
Wackle vorsichtig hin und her und hebe das Modul an, damit es sich aus seiner Vertiefung im Frontpanel löst.
-
-
In diesem Schritt verwendetes Werkzeug:Tweezers$4.99
-
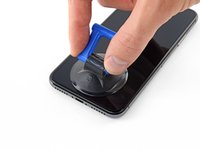
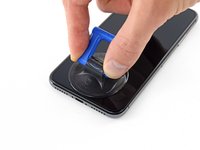
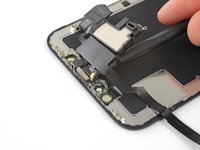
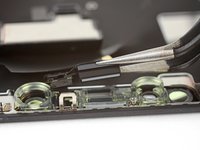
Wackle mit einer Pinzette am Helligkeitssensor und hebe ihn aus seiner Vertiefung im Display.
-
-
-
Wenn du den Umgebungslichtsensor erfolgreich, so wie im ersten Bild gezeigt, entfernst hast, kannst du zum nächsten Schritt übergehen.
-
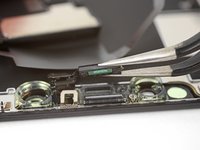
Wenn der weiße Lichtzerstreustreifen noch im Display festhängt, so wie im zweiten Bild gezeigt, dann musst du ihn vorsichtig an der Oberkante heraushebeln. Benutze dazu eine dünne Klinge oder Hebelwerkzeug. Wenn du noch einmal Wärme anwendest, geht es etwas leichter.
In my case the diffuser came out with the light sensor, but not completely. A layer of the diffuser was left behind in the recess. We will see how it goes. ;) I will report back.
As did mine. I managed to get the thin strip out with tweezers, it is like a sliver of tape, but not sure whether to install in new screen Did yours work OK without?
P Bond -
what colour is the diffuser
also can you show the position of sensors going back into the new screen
-
-
-
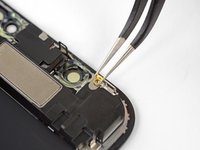
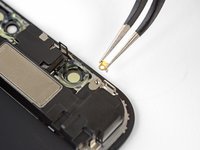
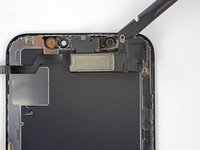
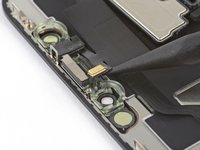
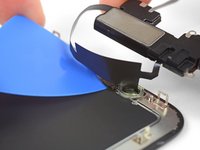
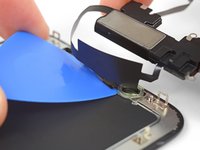
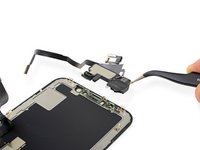
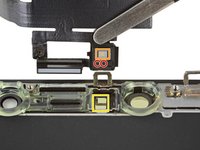
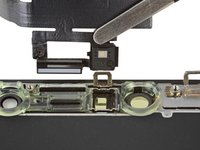
Entferne den Ohrhörer-Lautsprecher und die vordere Sensoreinheit.
-
Näherungssensor
-
Flood Illuminator
-
Das Modul muss so eingesetzt werden, dass die Komponenten von keinem Klebstoff behindert werden.
there was no bracket on my new screen I purchased from here.. am I supposed to heat up and remove the old one, or was their supposed to be one on the new screen ??
@br0k3nilluzion If your new display didn’t come with a front camera frame, you can (and should) remove the old one from your broken display and transfer it over. Use heat and careful wiggling/prying to remove it—and if it’s stubborn, add a few drops of isopropyl alcohol. Hope this helps!
Does face-id stop working if the black plastic separates from the flex(The orange and red dot)?
If the black plastic piece with the flood illuminator and the proximity sensor is separated from the flex cable, then Face ID will definitely not work. Be very careful not to damage any of the parts in the front sensor assembly.
There is some sort of a tape in front of the flood illuminator which is not present on the replacement screen! Is that gonna cause a problem too?
BTW, it’s so difficult to position the front camera frame without glue. I guess it takes a few attempts of trial and error!
It might not cause any major problems, but there’s a chance that it could effect FaceID functionality. If possible, transfer the tape from the old screen to the new one.
I find it better, regardless of if your new screen comes with the transparent front camera frame, to remove the front sensor assembly from the old screen with the frame, and lifting up the whole assembly using the frame. That way you do not need to apply heat directly to the fragile assembly, but apply it to the other side, the front of the screen at the top, instead, to soften the frame adhesive. The frame is then usually easy to pry loose using a narrow spudger, and comes off cleanly. After that it is much easier to remove the sensors and microphone from the frame, no heat needed usually. And if your new screen doesn’t come with the frame, just plonk the whole frame/sensor assembly down in the right place, and boom, Bob’s your uncle.
Hello I have an iPhone X i Bought it in 2019 with Face ID not working ( not available try later ) I think the screen was changed with another original , tru tone Off , Als off no auto brightness (and the PROXIMITY SENSOR too ! ) no black screen in calls, i would like to ask u if the earpiece speaker flex was changed with another one (all components ) not the original , did proximity sensor still work ?? Because I don’t know is the original flex of my iphone or not ? I found some scratches in the flex it appears to have small cut so I don’t know the PROXIMITY SENSOR not working because there are a small cut in the flex or because the flex is not the same ?? And if the flex is not the original it can disable (proximity sensor)too not only flood and als ?? Thank you
Yes it should still work. If you change the assembly to one that isn’t original to that iPhone X everything except the FaceID should still work - I have done so several times for clients. So the reason for yours not working is probably the same small scratches and cuts you have seen. The cable is a bit fragile and some of the copper leads running through it are extremely thin.
Lars -
To keep True Tone function on the replacement screen you’ll need a chip data programmer EEPROM to copay data from the old screen onto the new one. There a device called JC-V1 which should do the trick.
Screen glitching slightly after changing the screen. Any suggestion to what it can be?
Tim. I had a glitchy screen as well. It would force touch out of nowhere, and “ghost touch” every now and then. Eventually, the top half of the screen stopped responding. Reach out to customer service ASAP. You may have a defective screen.
My front ear speaker not working . The mic it’s working . Apple said you have to replace all the screen to fix the ear speaker because it’s connected with one cable all together. If I buy the speaker and change it myself it will work after or I’m getting into trouble?
I have the same problem. I have the same problem. how did you solve?
Be sure to remove the blue protective film from the BACK of a replacement screen.
Thank you so much for this. It does not look at all like it needs to be removed.
Thank you, Jim, came here just to look for that advice!
Do I remove the blue film on the back of the screen before re-installing the front sensors and speaker? Or can it be removed after they are in place?
Jssamp -
can this piece assembly cause for the back camera and flashlight not work? All I did was change the screen and transfer this earpiece and it says warning sign that the flashlight needs to cool down and back camera not working
disregard my last post, problem solved on my end customer had a bad back camera due to bad fall and so i replaced it and now the back camera and flashlight works. :)
Hello I replaced today the second time iphone x display. The first time after a while the front camera stopped working. Today mounted the second time the display and the front camera works, while the rear one does not work. What can I do? Thanks
-


Vergleiche dein neues Ersatzteil genau mit dem Originalteil. Möglicherweise musst du fehlende Bauteile übertragen oder Schutzfolien abziehen, bevor du es einbauen kannst.
Um dein Gerät wieder zusammenzusetzen, folge den Schritten in umgekehrter Reihenfolge.
Entsorge deinen Elektromüll fachgerecht.
Die Reparatur verlief nicht wie geplant? Schau in unsere Community zur Fehlerbehebung.
Rückgängig: Ich habe diese Anleitung nicht absolviert.
89 weitere Personen haben diese Anleitung absolviert.
Besonderer Dank geht an diese Übersetzer:innen:
100%

Diese Übersetzer:innen helfen uns, die Welt zu reparieren! Wie kann ich mithelfen?
Hier starten ›

25 Kommentare
Is it possible to fix the ““Face ID Is Not Available” problem? There seems to be a problem with the TrueDepth camera. Thanks!
@alejandrod I’m afraid Face ID won’t work if this part is replaced. As stated in the introduction, this component is paired to the logic board from the factory (similar to the home button on earlier iPhones). Currently, if you need to replace this part, you’ll have to sacrifice Face ID, or else pay Apple directly to perform the repair. (They have a software calibration tool that pairs the new part to your phone to re-enable Face ID, but they don’t share it with anyone outside of Apple.)
The flex cable was too bent, and now is broken. I’m going to buy another flex cable, but… Are there any ways to recover the Face ID functionality? Desoldering some components from the old one and weld them in the new flex cable?
Flex cables can be repaired by a skilled microsolderer. It’s not a DIY however. If it’s a phone you care about, you’ll want to find yourself a good repair shop with the right equipment and skills. Apple can also repair it, but they will most likely just charge you $279 to replace the entire screen.
My earpiece is broken would replacing mean that I’m sacrificing Face ID?
Just did mine, and yes, my face ID doesn’t work anymore.
Hey does anyone know what’s wrong with my Iphone X. I thought I had a blown ear speaker. So I just replaced the assembly, but after reassembling it doesn’t sound any different. Anyone speaking is extremely quiet. And yes my Bluetooth is off, no I don’t have any headphones in it. and the volume is all the way up. Any other ideas what is happening? It has been a major inconvenience to have to put everyone on speaker phone just to talk to them.
Have you checked the speaker grille/mesh to make sure it’s clean? They can get clogged with pocket lint over time, blocking sound from the speaker.
شكرا علي كلشيء
Hi All,
I replaced the screen on the iPhone X and now the camera and face ID don’t work. The camera app is black when I open it. I can’t test the proximity sensor because there is no cell service on the phone. I assumed I damaged the flex cable so I put a new one in and same result.
I put the original flex back on the original screen and same result. I am not sure if face ID or the camera was working before the repair. I normally check what is working and what isn’t, but I forgot to this time.
Thanks!
I lost the screw and grounding clip. Your step 21, “Beneath the screw you just removed lies a small metal grounding clip. “ Any ideal where I can get the screw and grounding clip?
Your step 21, “Beneath the screw you just removed lies a small metal grounding clip. “ I have lost the screw and grounding clip. Any ideal where I can find the screw and grounding clip/
Thank you
MEL
I have replaced the battery, the dock connector and this component and I forgot to install the grounding clip while closing the phone. Now everything works expect the charging; the phone recognizes the charger as an accessory but it does not charge at all. It charges only if it is not powered on (without showing any charging symbol, by the way). Do you know if this might be due to this missing grounding clip? Thanks!
Hola, con este proceso mi face id dejará de funcionar?
Saludos desde México!
Correcto, no funcionará
Can I replace the earpiece speaker without also replacing the front sensor assembly?
The earpiece flex is cut a little so my ear speaker stopped working is there any way to do this
after connect this cable phone restarting ?
There are 6.81mm long screws!
Daniel - Antwort
One of the pentalobe screws is stripped :( - suggestions for how to get it out?
cgtyoder - Antwort
same situation here
kaunomarcius - Antwort
Same issue for me too, how do I get the stripped screw out?
patronics - Antwort
Update: I was able to get the “stripped” screw out using another Pentalobe-2 screwdriver bit from another company. It seems it wasn’t the screw, but the screw driver that was actually stripped. Hence why the other screwdriver kit I got came with 3 of this bit, I suppose.
patronics - Antwort
I ended up going to a jewelry store, and they drilled down into the screw, with of course an incredibly tiny bit. That allowed me to insert the P2 driver, and I was able to unscrew it at that point. Good luck!
cgtyoder - Antwort
Same issue with the stripping. The tip of the iFixit P2 head in my $70 kit just ground off on the first screw and that was that. Not much you can do.
Kyle Harris - Antwort
yes correct the same happened to me, the screws were perfect shaped never been open and as soon as i used the P2 it stripped the screws, seems like the P2 is slightly smaller but Dremel kit with a very small drill bits and precise knife tool is the way to go.
Dulce Vidal - Antwort
This step in automatically followed through, without any thought. Why remove these screws? Can anybody explain? The Screen is detachable all the same, with them well screwed in…
Uri - Antwort
These screws attach to a plate that’s part of the screen half of the phone. If you succeed in detaching the screen without removing those, it would seem reasonable that you will have damaged that plate or its ability to keep the two halves together.
Dan Long -
@Dan Long is right
Uri -
Clean out the pentalobe screw heads first so the tool goes all the way in. A small sewing needle works well to loosen any build up and then press some putty/chewing gum into the screw head and pull away quickly for a final clean out.
William Olstad - Antwort
The this kit should include screws because you’re going to strip them. Can’t even get past step one. Did anybody figure this out
justin - Antwort
Never opened my phone ever, when I went to look at the first step.. I noticed one of my screws was stripped. I thought it was impossible, but I removed the non stripped one, then once I got to the stripped one.. I learned my assumptions were correct. I bought this one straight from the apple site years ago ahaha Any tips to remove the stripped screw?
Clarence Williams - Antwort
William Olstad's tip about cleaning the screws with a needle and a bit of poster putty worked well for me. There was a lot of crud in there! The opening is shallow, so it's easy to see how the screwdriver wouldn't catch with even a bit of grit in the way, No problem getting the pentalobe screws out with the ifixit screwdriver.
punkinann - Antwort
If all else fails, very carefully cut a slot across the head of the screw with a Dremel tool using a diamond bit that dentist will gladly give you - I ask my dentist for used bits; and chuck them in a drill bit chuck designed for Dremel. The slot allows you to use a tiny, straight blade screwdriver. You can reuse the screw or replace it with a new pentalobe screw.
Dan Smith - Antwort