Zum Hauptinhalt wechseln

GuliKit KingKong 2 Pro Battery Replacement

Was du brauchst

  1. GuliKit KingKong 2 Pro Battery Replacement, Unfasten the back cover screws: Schritt 1, Bild 1 von 1
    • Use a Phillips #00 screwdriver to remove the four 11 mm-long screws securing the back cover.

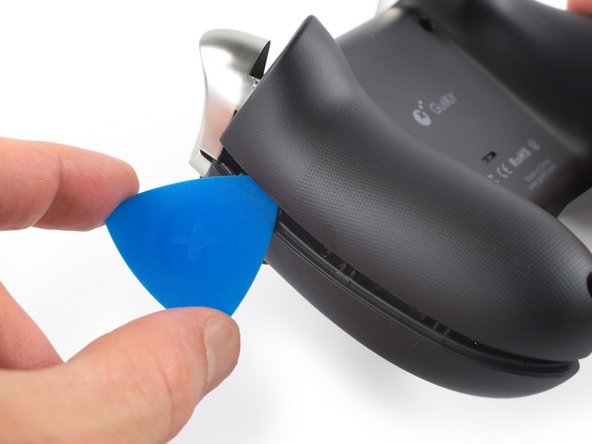
  2. GuliKit KingKong 2 Pro Battery Replacement, Insert an opening pick: Schritt 2, Bild 1 von 2 GuliKit KingKong 2 Pro Battery Replacement, Insert an opening pick: Schritt 2, Bild 2 von 2
    • The back cover of the GuliKit Kingkong 2 Pro is held in place by plastic clips.

    • Insert an opening pick into the gap between the front assembly and the back cover at the bottom edge of the controller.

    • Tilt your opening pick downwards to widen the gap.

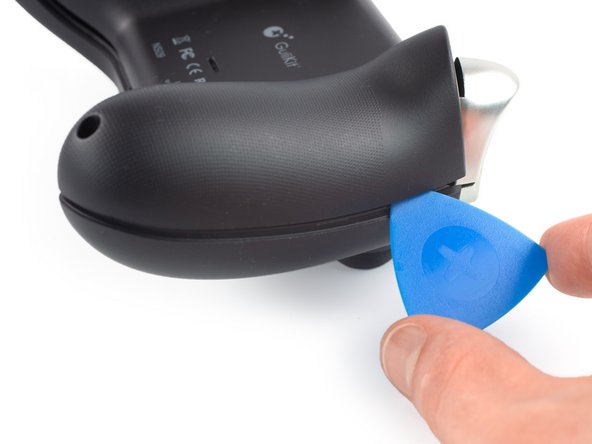
  3. GuliKit KingKong 2 Pro Battery Replacement, Separate the front assembly and back cover: Schritt 3, Bild 1 von 2 GuliKit KingKong 2 Pro Battery Replacement, Separate the front assembly and back cover: Schritt 3, Bild 2 von 2
    • Insert an opening pick into the gap between the front assembly and the back cover at the outside of the right controller handle.

    • Slide the opening pick along the gap to separate the front assembly from the back cover.

  4. GuliKit KingKong 2 Pro Battery Replacement: Schritt 4, Bild 1 von 2 GuliKit KingKong 2 Pro Battery Replacement: Schritt 4, Bild 2 von 2
    • Insert an opening pick into the gap between the front assembly and the back cover at the outside of the left controller handle.

    • Slide the opening pick along the gap to separate the front assembly from the back cover.

  5. GuliKit KingKong 2 Pro Battery Replacement, Remove the back cover: Schritt 5, Bild 1 von 2 GuliKit KingKong 2 Pro Battery Replacement, Remove the back cover: Schritt 5, Bild 2 von 2
    • Separate the back cover from the front assembly and remove it.

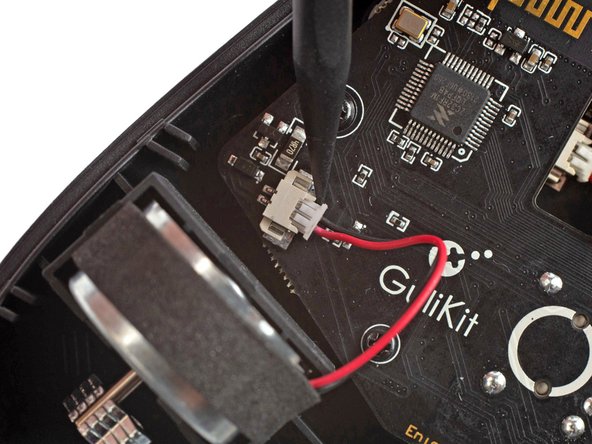
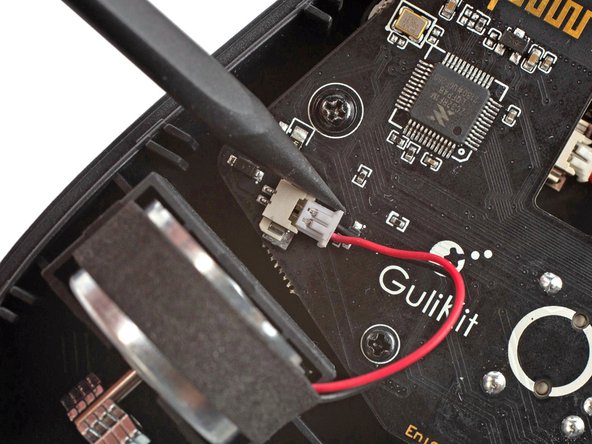
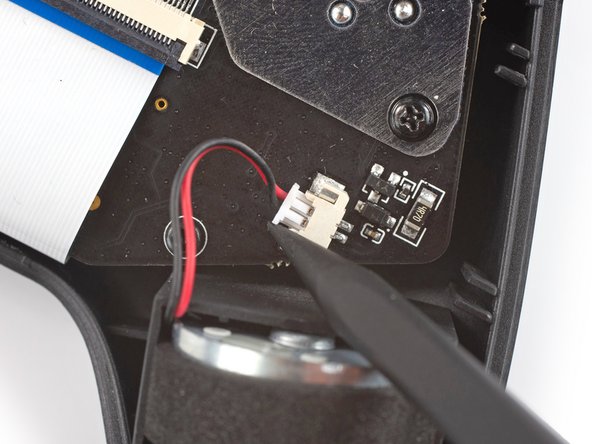
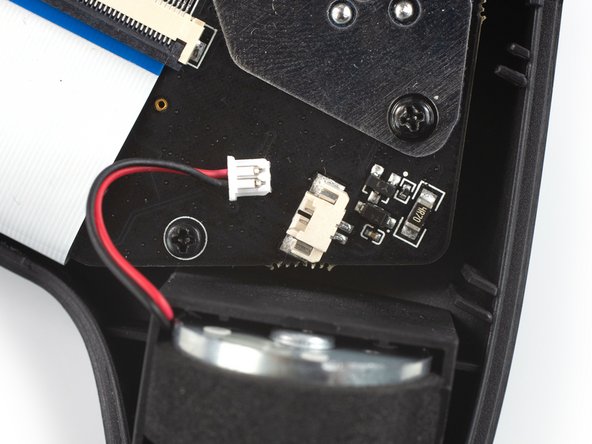
  6. GuliKit KingKong 2 Pro Battery Replacement, Disconnect the right vibration motor: Schritt 6, Bild 1 von 3 GuliKit KingKong 2 Pro Battery Replacement, Disconnect the right vibration motor: Schritt 6, Bild 2 von 3 GuliKit KingKong 2 Pro Battery Replacement, Disconnect the right vibration motor: Schritt 6, Bild 3 von 3
    • It's not mandatory to remove the two vibration motors to remove the mainboard assembly. However, other repairs become much easier with the motors removed. If you want to leave the motors in place, you can jump straight to step 9.

    • Pull on the connectors themselves and not the cables to avoid damaging them.

    • Use the point of a spudger to disconnect the right vibration motor by pushing the connector straight out of its socket.

    • If you can't disconnect the vibration motor with a spudger, use a pair of blunt nose tweezers to pull the connector out of its socket.

  7. GuliKit KingKong 2 Pro Battery Replacement, Disconnect the left vibration motor: Schritt 7, Bild 1 von 3 GuliKit KingKong 2 Pro Battery Replacement, Disconnect the left vibration motor: Schritt 7, Bild 2 von 3 GuliKit KingKong 2 Pro Battery Replacement, Disconnect the left vibration motor: Schritt 7, Bild 3 von 3
    • Use the point of a spudger to disconnect the left vibration motor by pushing the connector straight out of its socket.

  8. GuliKit KingKong 2 Pro Battery Replacement, Remove the vibration motors: Schritt 8, Bild 1 von 1
    • Remove the vibration motors by lifting them out of the controller housing.

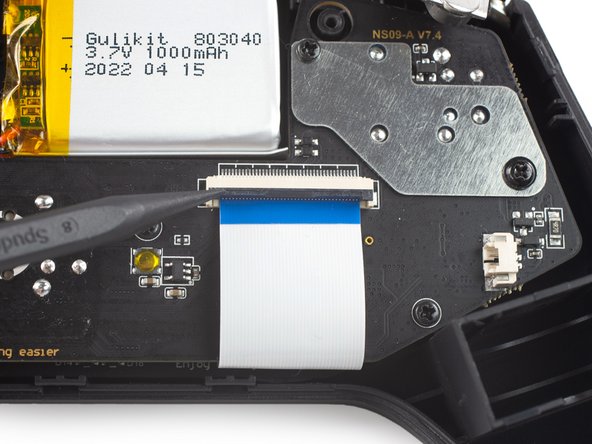
  9. GuliKit KingKong 2 Pro Battery Replacement, Release the interconnect cable ZIF connector: Schritt 9, Bild 1 von 2 GuliKit KingKong 2 Pro Battery Replacement, Release the interconnect cable ZIF connector: Schritt 9, Bild 2 von 2
    • Use a spudger, an opening tool, or your fingernail to flip up the small, hinged locking flap on the interconnect cable's ZIF connector.

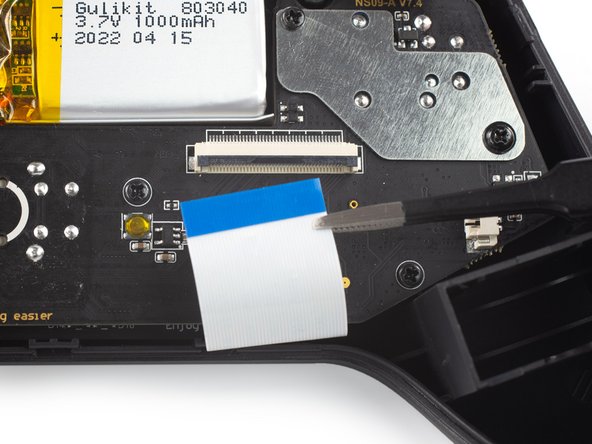
  10. GuliKit KingKong 2 Pro Battery Replacement, Disconnect the interconnect cable: Schritt 10, Bild 1 von 2 GuliKit KingKong 2 Pro Battery Replacement, Disconnect the interconnect cable: Schritt 10, Bild 2 von 2
    • Use a pair of blunt nose tweezers to disconnect the interconnect cable by pulling the cable straight out of the connector.

  11. GuliKit KingKong 2 Pro Battery Replacement, Unfasten the mainboard assembly screws: Schritt 11, Bild 1 von 1
    • Use a Phillips #00 screwdriver to remove the screws securing the mainboard assembly:

    • Four 7.8 mm-long screws.

    • Two 11 mm-long screws.

  12. GuliKit KingKong 2 Pro Battery Replacement, Remove the mainboard shield: Schritt 12, Bild 1 von 2 GuliKit KingKong 2 Pro Battery Replacement, Remove the mainboard shield: Schritt 12, Bild 2 von 2
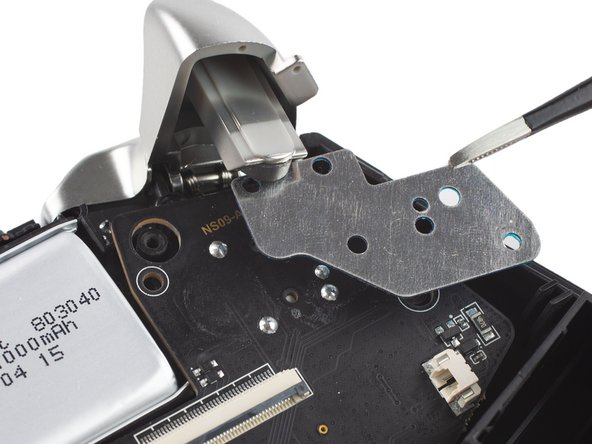
    • Use a pair of blunt nose tweezers to remove the metal shield from the mainboard assembly.

  13. GuliKit KingKong 2 Pro Battery Replacement, Remove the mainboard assembly: Schritt 13, Bild 1 von 3 GuliKit KingKong 2 Pro Battery Replacement, Remove the mainboard assembly: Schritt 13, Bild 2 von 3 GuliKit KingKong 2 Pro Battery Replacement, Remove the mainboard assembly: Schritt 13, Bild 3 von 3
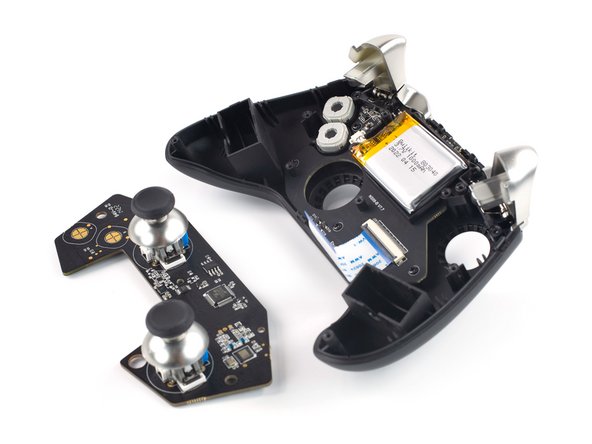
    • Remove the mainboard assembly by lifting it out of the controller housing.

  14. GuliKit KingKong 2 Pro Battery Replacement, Unfasten the battery frame screw: Schritt 14, Bild 1 von 1
    • Take care not to puncture the battery with your tool—a punctured battery may leak dangerous chemicals or cause a fire.

    • Use a Phillips #00 screwdriver to remove the single 7.8 mm-long screw securing the battery frame.

  15. GuliKit KingKong 2 Pro Battery Replacement, Free the battery frame: Schritt 15, Bild 1 von 3 GuliKit KingKong 2 Pro Battery Replacement, Free the battery frame: Schritt 15, Bild 2 von 3 GuliKit KingKong 2 Pro Battery Replacement, Free the battery frame: Schritt 15, Bild 3 von 3
    • Free the battery frame by lifting it off the plastic pins holding it in place.

  16. GuliKit KingKong 2 Pro Battery Replacement, Disconnect the battery: Schritt 16, Bild 1 von 2 GuliKit KingKong 2 Pro Battery Replacement, Disconnect the battery: Schritt 16, Bild 2 von 2
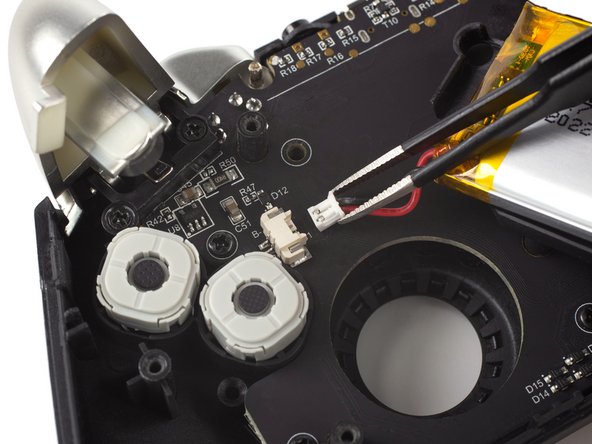
    • Pull on the connectors themselves and not the cables to avoid damaging them.

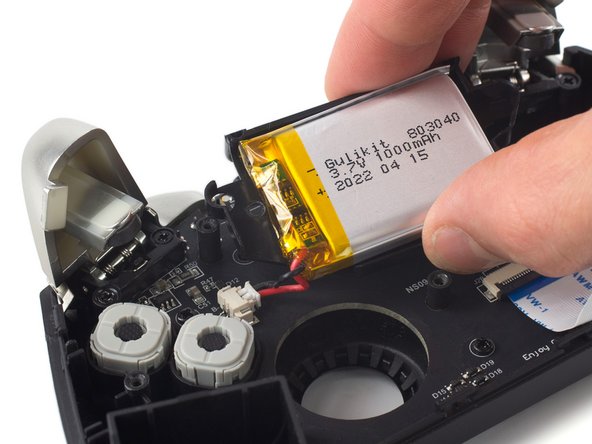
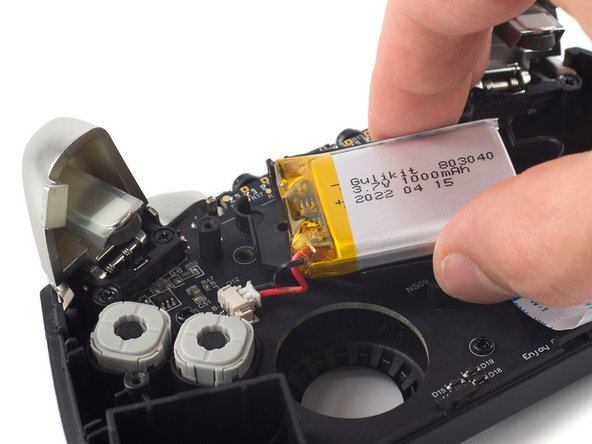
    • Use a pair of blunt nose tweezers to disconnect the battery connector by pulling it straight out of its socket.

    • Remove the battery and its frame from the controller housing.

  17. GuliKit KingKong 2 Pro Battery Replacement, Loosen the battery adhesive: Schritt 17, Bild 1 von 2 GuliKit KingKong 2 Pro Battery Replacement, Loosen the battery adhesive: Schritt 17, Bild 2 von 2
    • The GuliKit KingKong 2 Pro battery is held in place by mild adhesive.

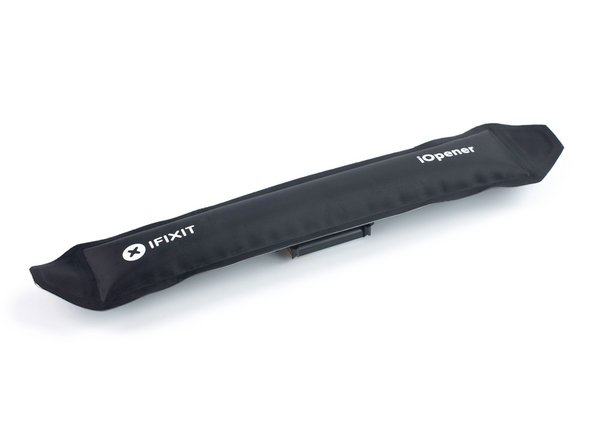
    • Apply a heated iOpener to the back of the battery frame for two minutes to loosen the adhesive underneath the battery.

    • A hair dryer, heat gun, or hot plate may also be used, but be careful not to overheat the battery.

  18. GuliKit KingKong 2 Pro Battery Replacement, Remove the battery: Schritt 18, Bild 1 von 2 GuliKit KingKong 2 Pro Battery Replacement, Remove the battery: Schritt 18, Bild 2 von 2
    • Take care not to puncture or bend the battery with your tool—a punctured or bent battery may leak dangerous chemicals or cause a fire.

    • Insert an opening pick into the gap between the battery frame and the battery.

    • Slide the opening pick underneath the battery to cut the adhesive and pry it up.

    • Remove the battery.

    • Do not reinstall a damaged or deformed battery, as doing so is a potential safety hazard.

    • Secure the new battery with pre-cut adhesive or double-sided adhesive tape. In order to position it correctly, apply the new adhesive into the frame at the places where the old adhesive was located, not directly onto the battery. Press the new battery firmly into place.

Abschluss

To reassemble your device, follow these instructions in reverse order.

For optimal performance, calibrate your newly installed battery after completing this guide.

Take your e-waste to an R2 or e-Stewards certified recycler.

Repair didn’t go as planned? Check out our Answers community for troubleshooting help.

Ein:e weitere:r Nutzer:in hat diese Anleitung absolviert.

Dominik Schnabelrauch

Mitglied seit: 11/23/16

203.906 Reputation

682 Anleitungen geschrieben

Team

iFixit Mitglied von iFixit

Staff

135 Mitglieder

17.198 Anleitungen geschrieben

3 Kommentare

where i can buy battery? I think i get new gamepad with dead battery.

Darrick - Antwort

What are the dimensions of the battery so we know which battery to order?

PinataStorm - Antwort

I am wondering where I can buy a replacement battery, I have ordered several off of Amazon, but the connector is far smaller than ones I have found. If the size of the connector has a size that I could reference, that would be great as well.

Cobriss - Antwort

Kommentar hinzufügen

Seitenaufrufe:

Letzte 24 Stunden: 2

Letzte 7 Tage: 33

Letzte 30 Tage: 132

Insgesamt: 4,862