
MacBook Pro 15" Retina Display Mitte 2012 Lüfter links austauschen

Einleitung
Zu Schritt 1 der AnleitungAnhand dieser Anleitung kannst du einen neuen linken Lüfter einsetzen (links wenn du das Gerät mit dem Logic Board zu dir hin drehst).
Was du brauchst


-
-
Entferne die folgenden P5-Pentalobe-Schrauben, mit denen das Gehäuseunterteil am MacBook Pro befestigt ist:
-
Acht 3,0 mm Schrauben
-
Zwei 2,3 mm Schrauben
-
-
-
Hebe das Gehäuseunterteil von der Kante aus, die der Kupplungsabdeckung am nächsten liegt, vom MacBook Pro ab.
-
Lege das Gehäuseunterteil beiseite.
-
-
-
Heble den Akkuanschluss mit dem flachen Ende eines Spudgers vorsichtig aus seiner Buchse auf dem Logic Board heraus.
-
Biege die Akkukabel nach hinten und aus dem Weg, so dass der Akkuanschluss nicht versehentlich mit dem Logic Board in Kontakt kommt.
-
-
-
Stecke das flache Ende eines Spudgers unter die Gummiummantelung des Kühlkörpers des linken Lüfters, damit du sie herunternehmen kannst.
-
-
-
Entferne die folgenden drei Schrauben, mit denen der linke Lüfter am Logic Board befestigt ist:
-
Eine 4,4 mm T5 Torx-Schraube mit 2 mm Bund
-
Eine 5 mm T5 Torx Schraube mit 2 mm Bund
-
Eine 3,9 mm T5 Torx Breitkopfschraube
-
-
-
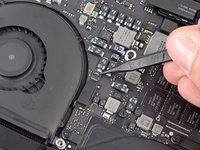
Klappe den Sicherungsbügel am ZIF-Anschluss des linken Ventilator-Flachbandkabels mit der Spitze eines Spudgers nach oben.
-
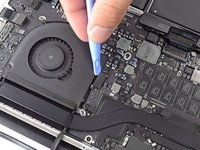
Schiebe ein Plastiköffnungswerkzeug von oben unter das linke Lüfterkabel, um das Kabel vom Logic Board zu lösen.
-
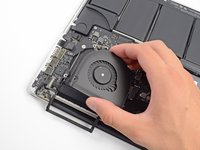
Hebe den linken Lüfter aus dem Gerät.
-


Arbeite die Schritte in umgekehrter Reihenfolge ab, um dein Gerät wieder zusammenzubauen.
Arbeite die Schritte in umgekehrter Reihenfolge ab, um dein Gerät wieder zusammenzubauen.
Rückgängig: Ich habe diese Anleitung nicht absolviert.
51 weitere Personen haben diese Anleitung absolviert.
Besonderer Dank geht an diese Übersetzer:innen:
100%


Diese Übersetzer:innen helfen uns, die Welt zu reparieren! Wie kann ich mithelfen?
Hier starten ›

8 Kommentare
Great directions! My 6-year old dropped my laptop from the couch armrest. No visible damage made but the left fan started to make a lot of noise. I was able to complete the entire left fan swap in about 20-30 minutes. I was lucky and found the fan cable was not strongly adhered to the board. However, for me, it was easier to lift the fan and free the cable from underneath. Be aware on the step before this: the retaining flap is very, very tiny. Look at the "view huge" image to get a fix on how to flip it up. Thanks iFixit for the part and tools. My new Retina MacBook Pro is running silent again.
This ended up being very easy - took me 20 minutes (my first repair). With my experience, the expoxy / glues you have to pry off turn out to not be that stuck on in the first place, and actually easily re-adhere after installing the new fan.
Btw iFixit saved me from the "minimum three days in the shop" nonsense that seems to be applecare (I'm chained to my laptop). Understand they have to follow procedure, but common sense is if you can hear a fan buzzing it's probably the fan.
Next time I'll be putting that $350 into the iFixit used parts fund :)
The instructions and tools are fantastic! It was really easy to follow through with them. The left fan I received was not so great. When I got it installed it made a "spinning disc" sound, so I took it out and reinstalled it. Unfortunately, it didn't solve the issue and sounded the same. In the end, I opted to put my original fan back in. I noticed that iFixit's left fan's strip (the part that connects to the computer) was a little bit longer than my original, so when I went to install it, the strip bent and tore a bit. But not through the connections. I don't think that could be the cause, but it's possible. Or perhaps the fan I received is faulty.
This is my everyday working computer, I have it already 3 years. Was never open since it never needed repair.
My fans were both emitting a high pitch noise when fully revved up. First I opened the computer and fully blowed out the cumulated lint with a Dust Off can (compressed air)
With this guide I disassembled both fans, and proceeded to unscrew the top on both of them and pulled out the rotor with a suction cup to reveal the bushing. After fully cleaning all the rotor itself, I applied a drop of PTFE oil (teflon) to the axle. Reassembled and presto. Like new!!!
also done. both fans in 50'.
thanks ifixit!