Einleitung
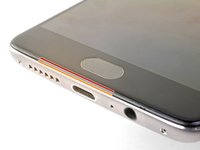
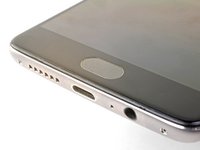
Folge dieser Anleitung, um die Displayeinheit deines OnePlus 3 zu entfernen und zu ersetzen. Diese Anleitung bezieht sich auf Ersatz-Displays, die mit einem bereits vorinstallierten Rahmen geliefert werden.
Bei dieser Reparatur wird das Smartphone sehr weit auseinandergebaut, der Akku muss ersetzt werden und Komponenten vom alten Teil auf das Ersatzteil übertragen werden.
Der schwerste Schritt wird das Lösen der Klammern am Rahmen.
Wenn der Akku aufgebläht ist, musst du entsprechende Vorsichtsmaßnahmen treffen.
Sorge zu deiner eigenen Sicherheit dafür, dass der Akku nicht mehr als 25% geladen ist. Falls der Akku während der Reparatur versehentlich beschädigt wird, wird so das Risiko eines gefährlichen Feuers verringert.
Was du brauchst
-
-
Nimm ein SIM-Auswurfwerkzug, ein Bit oder eine aufgebogene Büroklammer und setze es in das kleine Loch zwischen An/Aus-Knopf und SIM-Slot.
-
Drücke es kräftig hinein, um den SIM-Einschub aus dem Gerät zu lösen.
-
-
-
Entferne die beiden 2,6 mm Torx T2 Schrauben an der Unterkante des Smartphones.
-
-
-
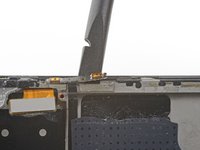
Naht am Displayglas. Diese Naht gehört zur Displayeinheit. Heble nicht an dieser Naht, sonst trennst du die Bildschirmeinheit auf und beschädigst sie.
-
Naht am Rahmen. Hier sind der Kunstoffrahmen und die Rückabdeckung miteinander verbunden. Heble nur an dieser Naht.
-
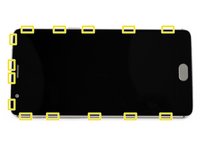
Der Rahmen ist mit vierzehn Rasten an der Rückabdeckung befestigt. Beim Abhebeln der Rückabdeckung musst du genau wissen, wo sie sich befinden.
This picture is a bit misleading, the frame seam is actually sunk into the metal frame, and is not visible at first.
With an older phone, it’s more likely to separate the display panel itself than to separate the displaypanel from the frame. If the top of the screen comes off first, before the part with the touch sensor, then you’re separating the wrong thing (ie displaypanel).
Mind that the displaypanel itself seems as if it has two seams (the panel itself and the board).
Thanks for the helpful tip! I re-worded the step slightly to hopefully clarify where the frame seam is.
-
-
-
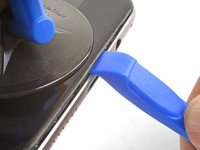
Bringe einen Saugheber nahe der Unterkante des Displays an.
-
Ziehe gleichmäßig und kräftig am Saugheber.
-
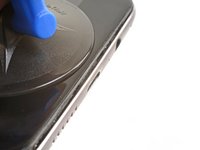
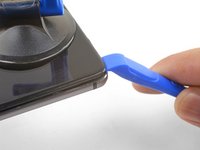
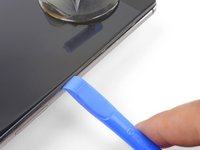
Drücke die Kante eines Plastiköffnungswerkzeugs direkt in die Rahmenaht nahe beim Saugheber, bis sich die Kante des Werkzeugs zwischen Kunstoffrahmen und dem Rand der Rückabdeckung einzwängt.
To get maximum leverage and make this step possible with my weaker suction cup, I held down the phone with a plastic pick/tool pressed down onto the metal back. As the suction cup pulled up the plastic frame, the plastic pick holding down the metal back naturally was pushed further and further into the gap between the frame and back.
-
-
-
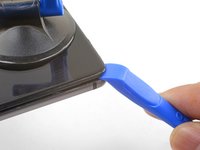
Wenn das Plastiköffnungswerkzeug eingezwängt ist, dann kannst du es sorgfältig an der Unterkante des Smartphones entlang schieben.
-
Führe das Werkzeug vorsichtig um die linke Ecke des Smartphones herum, halte es dabei immer in der Naht drin.
-
-
-
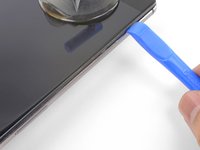
Schiebe das Plastiköffnungswerkzeug weiter die lange Kante entlang, wobei sich die Rasten lösen.
I couldn’t get the last clip easily, so I also went around the other side, and then the last two clips left and right went out togther much more easily.
Yep, thanks for your note. It was far more easy to go round the other side.
-
-
-
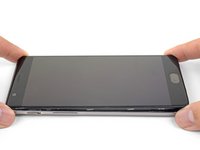
Wenn die untere und die linke Kante des Smartphones frei sind, kannst du vorsichtig am Rahmen wackeln, damit sich auch die Rasten an der oberen und der rechten Kante lösen.
-
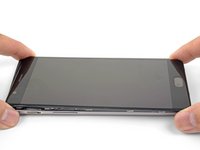
Hebe den Bildschirm hoch und entferne ihn.
-
Richte die Oberkante des Rahmens an der Rückabdeckung aus und achte darauf, dass die oberen Rasten korrekt sitzen.
-
Drücke an den langen Kanten des Smartphones entlang, so dass die restlichen Rasten einschnappen.
I’m having trouble putting on the back cover, anyone else had this issue?
Hello.
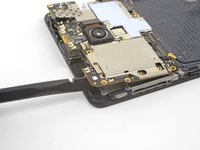
From this Step on I directly jumped to Step 13. Removing the 7 Screws. NOT removing the Mainboard. It is easy possible to remove the camera just like this if you loosen the Camera-cable and pull carefull on it. Because the 7 Screws are removed there is enough space to remove the old camera and bring the new camera in. I tried It various times to verify this.
-
-
-
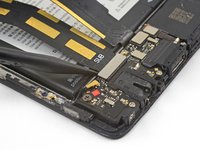
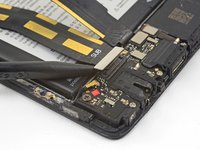
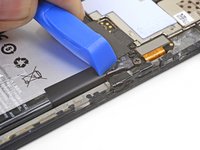
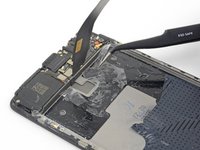
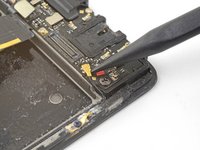
Heble mit der Spudgerspitze den Akkustecker aus seinem Anschluss über der rechten oberen Ecke des Akkupacks hoch und trenne ihn ab.
-
Biege den Stecker vom Anschluss weg, so dass er sich nicht versehentlich verbinden kann.
Why not removing the camera without removing the mainboard?
Warum wird die rückseitige Kamera nicht ausgebaut, ohne das Mainboard auszubauen?
Hello Ingo,
The rear camera is trapped under the motherboard. You must at least loosen the motherboard to remove the camera.
Die Kamera befindet sich unter dem Motherboard. Sie müssen mindestens das Motherboard lösen, um die Kamera zu entfernen.
During reassembly this part was tricky for me: the new battery couldn’t clip into place the way the old one did, resulting in a loose connection and “battery does not match “ message when trying to power the phone up. The new battery probably had a slightly different connector that than the old one. I even ordered another battery but the same thing happened. I finally managed to connect it by applying much more pressure on the press connector than needed for the other ones. it did not make any clip sound though.
-
-
-
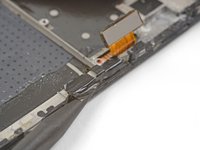
Entferne die 3 mm Kreuzschlitzschraube, mit der die Kabelhalterung befestigt ist.
-
Entferne die Kabelhalterung.
-
-
-
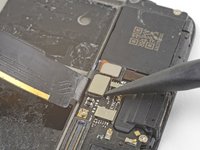
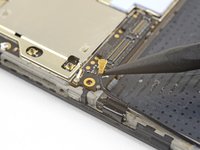
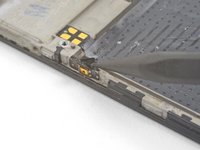
Heble das Verbindungsflachbandkabel mit der Spudgerspitze hoch und löse es oberhalb des Akkus von der Hauptplatine ab.
-
Trenne genauso das Flachbandkabel zur Tochterplatine von der Hauptplatine ab.
-
-
-
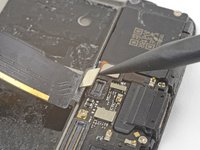
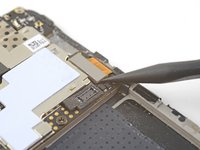
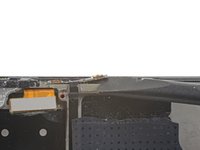
Unter dem Akku befindet sich das Verbindungsflachbandkabel zur Tochterplatine. Heble es mit der Spudgerspitze hoch und trenne es ab.
-
-
-
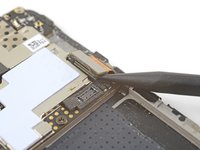
Entferne das Verbindungsflachbandkabel.
-
Biege das immer noch verbundene Kabel vorsichtig vom Akku weg.
Upon reassembly place the cable back correctly. Apparently, it is often overlooked, see: Replaced Battery, Now My Phone is Overheating and Won't Boot
Thanks for the tip! I’ll adjust the step add this info.
-
-
-
Schiebe mit dem Plastiköffnungswerkzeug alle Stücke von Klebeband ab, mit denen der Akku an der Kante des Kunstoffrahmens befestigt ist. Auf jeder Seite des Akkus sollte sich mindestens ein Klebestreifen befinden.
-
-
-
-
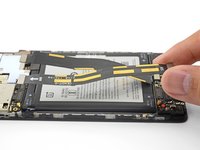
Halte den Rahmen des Smartphones fest gegen den Tisch.
-
Ziehe die durchsichtige Zuglasche fest und gleichmäßig nach oben, bis sich der Akku aus seiner Vertiefung löst.
-
Klappe den Akku ganz aus seiner Vertiefung heraus und ziehe alle Kleberreste ab.
I found (once I had bent the old battery removing it) that there is a film around the battery which would come away much more easily. I suggest this step is updated:
Peel back the four black sticky tabs which say “Position 1” (one at each corner of the battery) and the peel back the black sticky film connected to the tabs. Now pull the clear pull tab upwards and the battery should come away.
This! I did it by unpealing the “Position 1” tabs, and then pulled the battery much more easily. Thanks for the hint! Interestingly, it still came out with the black film intact and on the battery. I then put this black film and the pull tab on the new battery, which didn’t have either. I applied some double-sided tape between the black film and the phone to glue the whole thing in place.
I agreee , just peel the “position1” tabs. Plus my spare battery didn’t come with these tabs so I had to reuse the old ones anyway.
romDL -
-
-
In diesem Schritt verwendetes Werkzeug:Tesa 61395 Tape$5.99
-
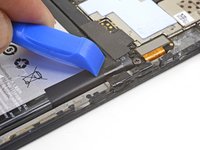
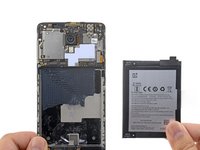
Entferne den Akku und beseitige alle Kleberreste vom Rahmen.
-
-
-
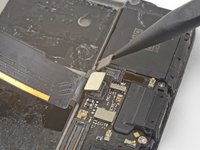
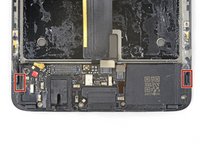
Heble den Stecker der kapazitiven Tasten mit der Spudgerspitze hoch und löse den Stecker aus seinem Anschluss unterhalb des Akkus auf der Tochterplatine .
-
Wiederhole das Ganze, um den Stecker des Fingerabdrucksensors aus seinem Anschluss auf der Tochterplatine zu lösen.
-
-
-
Schiebe die Spudgerspitze unter das Verbindungskabel der Antenne und heble es hoch, so dass es sich von der Tochterplatine ablöst.
-
-
-
Entferne die sieben Kreuzschlitzschrauben, mit denen die Tochterplatine am Rahmen befestigt ist:
-
Zwei schwarze 3 mm Schrauben
-
Fünf silberfarbene 2,9 mm Schrauben
-
-
-
Die Tochterplatine ist immer noch mit zwei Kunstoffrasten befestigt.
-
Schiebe das flache Ende des Spudgers unter die Lautsprecheröffnung und verdrehe den Spudger vorsichtig, bis sich die Tochterplatine von den Rasten löst.
-
-
-
Entferne die Tochterplatine.
Please mention about the removal of finger print sensor connector
Hello! The fingerprint sensor connector should be disconnected in step 11.
It’s actually mentioned on step 17.
-
-
-
Schiebe die Kante eines Öffnungswerkzeugs unter die Abdeckung des Fingerabdruckscanners nahe an der Unterkante des Rahmens und heble nach oben.
-
Entferne die Abdeckung des Fingerabdruckscanners.
-
-
-
Drücke mit dem Finger von Vorderseite des Displays her fest auf den Fingerabdruckscanner, bis er sich aus seiner Vertiefung herauslöst.
-
-
-
Löse den Fingerabdruckscanner mit seinem Klebestreifen vom Rahmen ab.
-
Entferne den Fingerabdruckscanner.
-
-
-
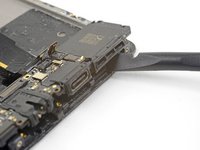
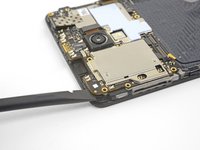
Schiebe die Spudgerspitze unter das Verbindungskabel zur Antenne in der linken unteren Ecke der Hauptplatine.
-
Heble das Verbindungskabel zur Antenne hoch und trenne es ab.
-
-
-
Heble den Displaykabelstecker mit der Spudgerspitze aus seinem Anschluss auf der Hauptplatine hoch.
-
-
-
Entferne die sieben Kreuzschlitzschrauben, mit denen die Hauptplatine am Rahmen befestigt ist:
-
Vier schwarze 3 mm Schrauben
-
Drei silberfarbene 2,9 mm Schrauben
-
-
-
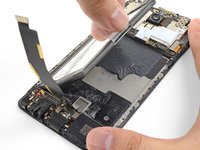
Schiebe das flache Ende des Spudgers unter die obere linke Ecke der Hauptplatine.
-
Verdrehe den Spudger und heble ihn hoch, so dass die Hauptplatine aus ihrer Vertiefung herauskommt.
I find it easier to pry from the opposite side, where the antenna cable connector are as it required less force to release the motherboard.
-
-
-
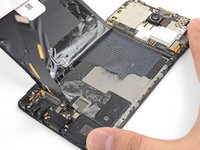
Entferne die Hauptplatine.
When removing the motherboard, the front camera module's connector on the backside of the board tried to be retained by its recess in the frame. I had to peel the tape off the back of the front camera, then remove the motherboard, and finally prise the connector away from the frame before reinstalling it on the motherboard.
-
-
In diesem Schritt verwendetes Werkzeug:Electrical Tape in 6 Assorted Colors$9.99
-
Die Lautstärkeregler sind an der rechten Kante des Smartphones mit schwarzem Klebeband bedeckt. Heble es mit der Spudgerspitze hoch und entferne es.
-
Wiederhole das Ganze für das schwarze Klebeband, mit dem die Einschalttaste an der linken Kante des Smartphones bedeckt ist.
I'd personally recommend you always buy a replacement power & volume button flex cable when doing this repair. They're usually only a few pounds/dollars/euro to add to your order when already buying a replacement screen and battery. The reason I say this is the cable is super fragile and easily fails near the buttons where it bends sharply round the side of the frame. I just finished this screen repair to discover that my power button only works when the cable is straightened, and doesn't work when the button is in place on the side... looks like I'm back to waiting for the postman to bring me another part :)
-
-
In diesem Schritt verwendetes Werkzeug:Tesa 61395 Tape$5.99
-
Drücke die Platine der Lautstärkeregler vorsichtig mit dem flachen Ende des Spudgers vom Rahmen weg.
-
Mache solange weiter, bis sich die Platine vom Rahmen löst.
-
-
In diesem Schritt verwendetes Werkzeug:Tesa 61395 Tape$5.99
-
Heble die Einschalttaste an der linken Kante des Rahmens mit der Spudgerspitze hoch und löse sie ab.
-
Um die Einschalttaste wieder einzubauen, musst du ein kleines Stück einer vorgestanzten Klebefolie oder einer Rolle Tesafilm abschneiden und damit die Taste am Rahmen festkleben.
-
-
-
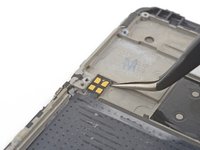
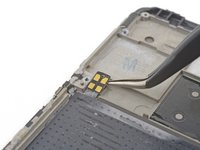
Drücke eine Pinzette zusammen und setze die Spitzen unter das rechteckigen Kontaktpad nahe der linken oberen Kante des Rahmens.
-
Heble das Kontaktpad hoch und löse es vom Rahmen.
Sometimes this rectangular contact pad is glued with very strong glue to the pad! Consider getting a replacement part here because you may destroy this component.
-
-
-
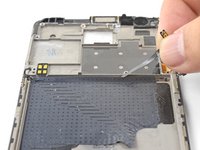
Hebe das Flachbandkabel der Lautstärkeregler aus seiner Rille heraus nach oben.
-
Entferne die Baugruppe aus Einschalttaste und Lautstärkeregler.
-
-
-
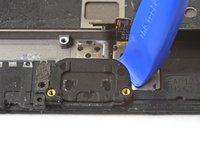
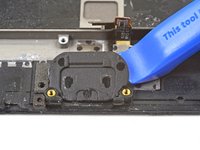
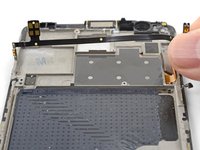
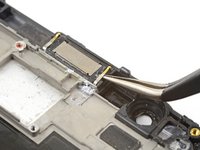
Drücke die Pinzette zusammen und setze die Spitze unter eine der Klammern des Ohrhörer-Lautsprechers.
-
Ziehe die Spitze langsam nach oben und heble so den Ohrhörer-Lautsprecher aus seiner Vertiefung heraus.
-
-
-
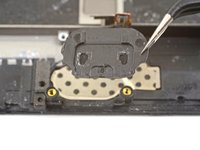
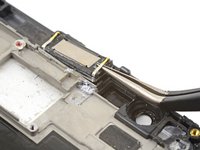
Entferne den Ohrhörer-Lautsprecher.
-
So wird der Ohrhörer-Lautsprecher wieder eingebaut:
-
Setze den Ohrhörer-Lautsprecher in seine Vertiefung und drücke ihn gut mit dem Finger fest.
-
-
-
Entferne die beiden 1,9 mm Kreuzschlitzschrauben, mit denen die Erdungsklammern des Rahmens befestigt sind.
This was the most difficult step for me. For some reason the screw of one grounding clips is stuck. It just kept spinning and spinning in place. I couldn’t find a thin enough object to go under the screw head to wedge it out. I even tried a razor blade, much to my terror. In the end i just left it there and reassembled my phone with just one grounding clip. I don’t know how important that thing is and if it will affect my phone. But it’s been a couple of hours and my phone seems to work fine. Wifi and data reception didn’t suffer. I don’t know about calls yet. I guess we’ll see.
-
-
-
Entferne die beiden Endungsklammern am Rahmen und übertrage sie auf die Ersatz-Baugruppe.
-
-
-
Hole das Verbindungskabel der Antenne aus seiner Rille heraus und übertrage es auf die Ersatz-Baugruppe.
-
-
-
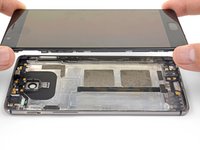
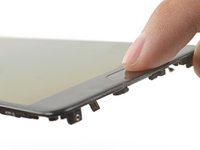
Nur das blanke Display mit Touchscreen bleibt übrig.
-
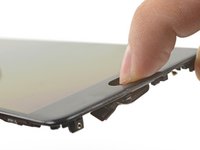
Übertrage alle Bauteile, die du in den vorigen Schritten von der alten Bildschirmeinheit ausgebaut hast, auf die neue Einheit.
-


Um dein Gerät wieder zusammenzubauen, folge der Anleitung in umgekehrter Reihenfolge.
'''Für eine optimale Leistung, solltest du deinen neu eingebauten Akku kalibrieren: Lade das Smartphone vollständig auf und lasse es dann noch mindestens 2 weitere Stundenladen. Verwende es nun normal, bis es sich wegen geringen Akkustandes von selbst ausschaltet. Lade es dann ohne Unterbrechung auf 100% auf.
Entsorge deinen Elektromüll fachgerecht.
Bei der Reparatur ist etwas falsch gelaufen? Auf unserem OnePlus 3 Antwortenforum (englisch) findest du Hilfe bei der Problemlösung.
Rückgängig: Ich habe diese Anleitung nicht absolviert.
61 weitere Personen haben diese Anleitung absolviert.
Besonderer Dank geht an diese Übersetzer:innen:
100%


Diese Übersetzer:innen helfen uns, die Welt zu reparieren! Wie kann ich mithelfen?
Hier starten ›


47 Kommentare
Yeah I've done one of these and am literally about to do the 2nd one. Easy as you like :D
Be sure to purchase the LCD with frame as it's much quicker.
Hi,
May I kindly ask, both oneplus 3 and oneplus 3T are the same screen? I'm about to buy a screen with frame and digitizer, and all sellers name their products "oneplus 3/3T LCD screen".
It is sure that Oneplus 3 lcd screen is compatible with Oneplus 3T.
Witrigs -
if the touch still works and it is only the screen to be cracked is there another procedure to follow? Do I need to replace the whole LCD?
Yes, because it is really difficult to replace front glass screen only, I prefer you take the whole screen with lcd + front glass+ middle frame.
Witrigs -
I did this repair on my phone, but is cracked the screen on the last step... first pop in the top of the phone and than the bottom into the aluminum back!!! And when doing the teardown remove the sim tray first!
I made this mistake as well, everything else worked fine though.
Be careful during this replacement, because it’s easy to break the earpiece speaker when moving it from the broken screen to the new piece.
I second this! It’s so easy to break the earpiece speaker because the it’s made of two pieces that easily separate when, say, your tweezer only picks up the top portion and the bottom held on to the adhesive.
the touch still works and it is only the LCD cracked is there another procedure to follow? Do I need to replace the whole LCD? And Rainbow pattern or color-blocks shows on some areas of LCD screen..
So, I have done it and everything seemed to be fine until I switched off the screen. Although the hardware buttons work, the screen is totally unresponsive. I men the screen works during start up and the entire phone works fine, but when the screen goes black it won't respond.
The only thing I did wrong: I put in the cable that was labeled “sub” and “main” in the wrong way. Could that be the problem? Anyone an idea what I can do?
Same here. In my case I had to switch off all gestures and then the replacement screen worked normally. Works OK with my original screen though. Not sure why is this happening, maybe because of low quality ebay crap. But the seller agreed with the return and refund.
lubos -
So what, I need to buy a new battery as well, just to change the screen? I'm so poor
Hi Tara,
Unfortunately, with how the OnePlus 3 is designed, you should change the battery also. The lithium-ion battery is easily damaged from any bending occurred when it’s pried out. Replacing it will prevent a lot of future problems.
Will not using adhesive when putting in a new battery be a problem. There is adhesive on my new assembly but I’d like to be able to easely replace my battery in the future. There is adhesive on the new frame with a protective layer you are supposed to peel off, is it ok if you leave that there? Won’t this cause thermal problems? Also, what is the point of removing the battery from the original phone. If you need to get a new battery anyway this shouldn’t be needed right? I mean, isn’t it a little bit stupid to bend a battery if you don’t need to, it is always nice to try to prevent battery fires wherever possible right?
Hi TT-392,
You are right in that you do not need to remove the battery from the original phone. Removing the battery makes removing the flex cable near the top of the battery easier, but it can be done with the battery in place.
The battery should be held down by at least some adhesive in the phone. The plastic will not cause overheating issues, but you do not want the battery to move in the phone. You can choose to expose some of the battery adhesive so that it will be an easier task to replace it in the future.
So I managed to replace my screen and came across a few things that might help others. I wasn’t able to open the screen from the bottom so I tried the side. In the process of doing this I pulled the screen from the display and broke parts of it. This wasn’t a problem because I was replacing the display+frame. After a few times of opening and closing the phone I have realized that it is a lot easyer to open the phone by pushing the screen out from inside of the sim slot. This could probably damage the sim slot but that is a lot less likely than breaking the screen, at least if you are unexperienced. A friend of mine did damage the back cover by doing this with a metal screwdriver so I would advise a plastic spudger. Also, my buttons ended up acting funny because I replaced the tape with electrical tape, It worked fine after I salvaged some of the old tape. Maybe something other than electrical tape is better.
my glass is a little cracked but display touch is half working and half black. can it be fixed?
Hi Sartaj,
If you replace the screen and digitizer, that should solve the problem.
Yes, unfortunately you cannot just remove the screen by itself for the OnePlus 3. You have to disconnect things from the back before attempting that. It looks like the capacitative button connector wasn’t disconnected (step 17), and tore. However, if your replacement part came with the capacitative button connector, you’re fine!
This guide is made for screen and frame replacements. It should not be used for screen-only replacement. I will edit the introduction to emphasize that.
This guide worked well for my OnePlus3T. I even used a OnePlus3 screen (or possible a generic) instead of a 3T screen (You can tell because the top corners are rounded and not square. There were only two issues during the process, the first being that when reinstalling the fingerprint sensor I had to put multiple layers of tape between it and the cover for the sensor to be flush with the new screen, and the second being that when reinstalling the motherboard I bent in the clip (which is located at the top of the frame) because I wasn’t sure where it was/how it worked. I’d recommend highlighting the clip in the guide. Otherwise fairly pain free, took a while but nothing was crazy fragile or difficult.
I’m glad it worked out for you! Thanks for the suggestions—I’ll edit the steps to incorporate your suggestions.
I dropped my phone - nothing is cracked or torn from the outside, but the display slowly progressed to be blue. Touch is still working, but sort of the “blue liquid” has slowly progressed from a few drops to now a lake.
I am confused by some comments, so I hope someone can help me with my questions:
1. For this issue, do I need to change the whole display + frame?
2. Do I need to exchange the battery for this issue? I read it is easier in some cases, but not sure about this case?
The costs are a big issue for me (honestly a little shocked that only the screen is already 120€ here? I have access to all the ifixit tools and that is more than my phone had cost and my budget is 50€. Wondering if better to be without a phone for a few month and buy another second hand A3003 instead?
Hi nerdia,
You don’t need to change the frame. You can choose to change the display itself, but the process is even more involved than this, and adds the risk of damaging the capacitative sensors next to the fingerprint sensor.
We highly recommend you to replace the battery when replacing the screen. You have to take the battery out regardless whether you replace the frame or not, and there is considerable chance the battery is damaged in the process.
As for the decision, that is up to you! The repair is pretty involved, and the OLED panel drives the part price up. This is also a great hands-on learning experience.
Did a screen/digitaliser + battery replacement on my OnePlus 3T. At step 33, Salmontuna makes an absolutely vital point to be aware of. In my OnePlus 3T, this contact pad was adhered to the chasis. I tried loosening the glue with a hair dryer, but the part was so fragile that it simply snapped off. I had to replace the part, which can be found for about £1-2 on eBay. Was a bloody difficult repair, but glad I’ve done it.
First time I’ve done anything like this, good tutorial and detailed pictures. Minor point but if you review or update the tutorial, might be an idea to keep the orientation of the phone the same, or a photo at the start of the step to confirm the orientation!
Thanks again!
Thanks for the suggestion! I’ll keep that in mind for future guides.
Is there a guide to replace the screen only? I cannot find it.
I have replaced the LCD screen (screen & touch screen / digitizer) and the screen turns on but the touch feature does not work. Where would you recommend I start to troubleshooting?
Hi Michael,
I would suggest checking to see if the display connector has any debris, and to re-seat the connector.
I need some help here
not sure if people still use this forum but i torn down my oneplus 3t and now i’m trying to reassemble it. but i found something very weird. I didn’t find any display cable ??? And when i look closely it’s actually under the case (between screen itself and the screen metal frame). I don’t know how to post pictures here but it’s really confusing me . I could have made a mistake somewhere but i neve opened that part of the phone and i have no idea how the phone was working fine without it
Here is a picture link for my last comment. Bare in mind that i never touched that part of the phone and that the screen was working fine.
https://drive.google.com/file/d/1agEloGa...
i really don’t understand
Hi Emir,
It looks like the cable connector was pushed down and got stuck between the display and the frame. Use a spudger or tweezers to carefully fish the connector out of its recess. It should look something like this. Note that this guide is for the OnePlus 3, which has some minor differences compared to the 3T.
Can you guys give me any suggestion where to buy a screen replacement?
I’m suspicious of the cheap ones from china on ebay which cost around 30$.
I went for such a cheap OLED screen. Had no time to replace it yet but it is more or less an experiment. It is economically not viable to buy a 150 dollar screen to do the replacement in my opinion. The phone is over 4 years old and for 200 dollars a more powerful phone can be bought based on the specs. YMMV
Very good guide, perfectly. My Oneplus 3T now is like a new one.
I followed the instructions and everything works fine except for the last step - I can’t get the new screen and frame to go back into the case.
Has anyone else experienced this?
I’ve tried differing angles, light and harder pressure, but the screen seems to be standing proud of the rear case. And the power button and sim slot not aligning.
Any advice?
Thanks,
Steve Williams
Hi
I faced similar issue because the replacement batterie I bought was not exactly the same size as original one. Since it was a bit larger, it was up on one side.
Measure the size of original and spare battery if you can
Thanks, I’ll check that, though it was supposed to be a genuine oneplus replacement battery - but who knows with Ebay!
I’ve realised the replacement screen I fitted is thicker than the original so this may be a factor too.. Unfortunately I suspect the new screen I bought was not a genuine part!
if it’s from Ebay, I don’t really think it’s a genuine battery. I don’t know policy in each country but at least in France, OnePlus doesn’t sell the battery. You have to go through their support service.
Step 36 just destroyed my speaker. The speaker split in two and the copper coils broke off from the magnet.
Replacement of a broken display worked very well.
Some minor details were different with my ONEPLUS A3010_28_191104 model.
The frame grounding clips near the switches (step 38) seem to have been omitted in the display of my phone.
The two screws to open the case were P2, not T2 — not a problem with the iFixit bit set, and maybe the repair shop that fixed the phone before replaced the screws.
The repair shop that did the last fix may have made my job easier, by omitting quite a bit of adhesive (and a screw or two).
Nasty surprise: When reassembling, the phone informed me that the replacement battery from iFixit isn't compatible.
Fortunately, the old battery was still in good shape, so I kept using it.
Thanks for a very helpful repair manual!
The display from my OnePlus 3 loosened from the frame. Which glue do I use to tighten them together again?