Einleitung
Diese Anleitung zeigt dir, wie du den Akku am Samsung Galaxy S9+ entfernen kannst.
Durch das Öffnen des Samsung Galaxy S9+ werden die wasserfesten Dichtungen Gerät beschädigt. Wenn du die Klebedichtungen nicht erneuerst, wird dein Smartphone normal funktionieren, aber nicht mehr wasserdicht sein.
Bevor du dein Smartphone öffnest, solltest du es auf unter 25% entladen. Erwärme dein Smartphone nicht, wenn dein Akku aufgebläht ist. Aufgeblähte Akkus können sehr gefährlich sein, trage deswegen eine Schutzbrille und sei sehr vorsichtig. Wenn du nicht weißt, wie du weitermachen sollst, dann gehe lieber zu einer Fachwerkstatt.
Um einige der Bauteile wieder zu befestigen, wirst du Ersatzklebestreifen benötigen.
Was du brauchst
Einführungsvideo
-
-
Schalte dein Smartphone aus.
-
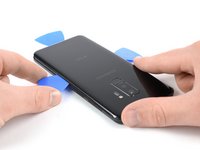
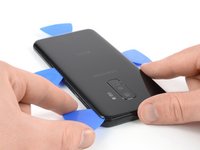
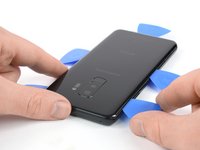
Lege einen erwärmten iOpener auf die lange Kante des Smartphones, um den Kleber unter der Glasrückseite aufzuweichen. Lasse den iOpener mindestens zwei Minuten lang liegen. Möglicherweise musst du diesen Schritt beim Entfernen der Glasrückseite mehrfach wiederholen.
-
-
-
In den folgenden Schritten wirst du den Kleber auftrennen, der die Glasrückseite befestigt.
-
Schneide an den folgenden Stellen durch den Kleber:
-
Hier ist der Kleber dick aufgetragen
-
Hier ist der Kleber dünn aufgetragen
-
Heble oder schneide nicht in diesem Bereich, damit das Flachbandkabel zum Fingerabdrucksensor nicht beschädigt wird.
The yellow portion labeled "Avoid prying in this area" is also pretty heavily glued. I had luck using heat to soften it, but I messed up my fingerprint sensor because the image above is mirrored - I sliced through the right side because the image says it's on the left. The fingerprint sensor cable is actually on the right (when viewing the back side of the phone) on the same side as the phone's volume control.
-
-
-
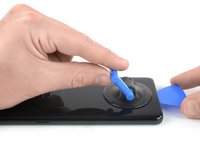
Drücke einen Saugheber auf der Glasrückseite fest.
-
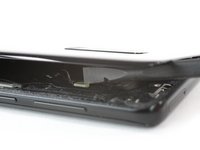
Hebe die Glasrückseite mit dem Saugheber unten leicht an, um einen kleinen Spalt zwischen Glasrückseite und Rahmen zu erzeugen.
-
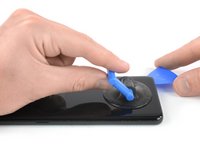
Setze ein Plektrum in den eben erzeugten Spalt ein und schiebe es in die untere rechte Ecke.
This is the most challenging part. The suction cup can barely hold for the amount of force required...but here's a tip, especially for the first-timers like me. It's not obvious in this image, but the back, curved as it is as it attaches to the frame, is curved because the surface under the back is also curved. Therefore, using an angle for the pick that's a bit tilted up will help to get under the back, and get the cutting of the adhesive started.
Don't let that give you too much confidence, though. Sufficient heating of the back, to make the adhesive soft enough to yield to the several picks, is essential. Go slow, if you go too fast, or don't have enough heat, you WILL break the glass...as I did. Replacements, fortunately, are easy to find and not too expensive.
-
-
-
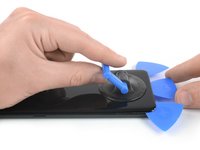
Setze ein zweites Plektrum ein und schiebe es in die untere linke Ecke.
-
Setze ein drittes Plektrum am unteren Ende des Smartphones ein, so dass sich der Kleber im weiteren Verlauf der Reparatur nicht wieder verbinden kann.
-
-
-
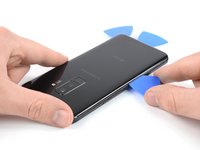
Beginne die Spitze des Plektrums von der unteren linken Ecke an der Seite des S9 Plus entlang hochzuschieben.
-
Lasse das Plektrum an seinem Platz stecken, nachdem du den Kleber bis zur Seitenmitte an der linken Seite aufgeschnitten hast.
-
Schiebe das Plektrum an der unteren rechten Ecke bis zur Seitenmitte des Rahmens und lasse es dort stecken.
-
-
-
Setze ein viertes Plektrum an der rechten Seite des Rahmens ein und schiebe es in die obere rechte Ecke.
-
Schiebe ein fünftes Plektrum die linke Seite des Smartphones entlang bis zur oberen linken Ecke.
-
Schneide den restlichen Kleber unter dem oberen Teil der Glasrückseite mit dem Plektrum auf.
-
-
-
-
Hebe die Glasrückabdeckung sorgfältig an der Seite mit der Lautstärketaste an.
-
Heble das Flachbandkabel zum Fingerabdrucksensor mit der Kante eines Spudgers hoch und trenne es ab.
I also have a G965U model S9+, and its fingerprint read also remained in the back glass.
It's easier to pop the button up than it is to reattach it when reassembling the phone. Well, I sure hope it goes better for you than it did me. (:
-
-
-
Entferne die Glasrückseite.
Is it necessary to replace the rear glass adhesive? I have given up on water resistance, just want it to hold in one piece.
Hi Zachary,
in order to assure that the rear glass sticks to the rest of the phone assembly you have to replace the rear glass adhesive once you removed the rear glass. However you can use a narrow and strong double sided tape, tesa tape or our precut adhesive card. All of these will do their job however as you just mentioned you will lose the water protection of your phone. Before installing all of these it is very important to remove the old adhesive backings (for example with high isopropyl alcohol 90% or higher).
Sadly it's not possible to replace the rear glass without new adhesive.
-
-
-
Entferne die neun 4 mm Kreuzschlitzschrauben #00.
Don´t forget to unscrew the two screws on the left side (one near the battery, and one near the edge).
11 screws need to be removed here. Watch the video to confirm the remaining 2.
The 9 screws shown won't let the bracket up unless you finish with the 2 more screws. (near edge and bottom of the bracket).
-
-
-
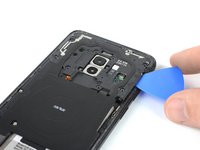
Setze ein Plektrum unter die rechte Seite der Kunstoffabdeckung ein, welche die NFC Antenne und die Ladespule enthält.
-
Klappe das Plektrum zur Seite, um die Abdeckung aus ihren Plastikrasten zu lösen.
-
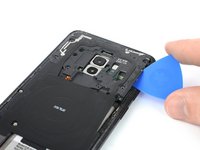
Arbeite dich ganz um die Kunstoffabdeckung herum und heble dabei alle restlichen Rasten auf.
I used a pointed metal spudger to pop that piece. The picks were more difficult here. There's an arrow that points the spot that needs to be opened.
-
-
-
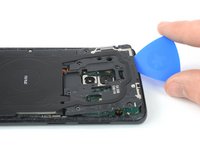
Entferne die Kunstoffabdeckung, welche die NFC Antenne und die Ladespule enthält.
-
-
-
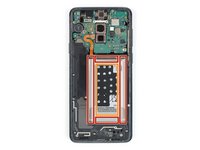
Heble mit dem flachen Ende des Spudgers das Akkukabel hoch und trenne es ab.
-
-
-
Benutze einen iOpener, um den Kleber unter dem Akku zu lösen. Lege den iOpener wenigstens zwei Minuten lang auf.
-
Benutze im folgenden Schritt den Spudger nur an den rot markierten Stellen, dort befindet sich der Kleber am Akku.
-
Vermeide diesen Bereich. Direkt unter dem Akku befindet sich im Mittelrahmen eine Lücke und du kannst das Display versehentlich durch sie beschädigen.
-
-
-
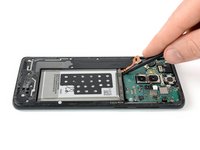
Setze das flache Ende des Spudgers an der oberen linken Ecke des Akkus beim Flachbandkabel ein und heble fest und gleichmäßig nach oben.
-
Arbeite dich mit dem Spudger an der linken Seite des Akkus nach unten und löse die Klebeverbindung.
Hello Laurence,
there is no risk that the panel gets damaged by the alcohol. The alcohol is relatively pure and will evaporate quickly.
Hello, I replace the battery but I scratched the central part where the battery was lying on. As a result, on the screen there is a bad green permanent vertical line. I could go on for a couple of months, but there is a way to replace that part as well? Is now my phone dangerous for myself?
Hi simnmr69,
it seems like you damaged your screen during the battery removal. You can replace the screen as well following this guide. However a damaged screen won't be dangerous for you when using the phone but take care to use a new and undamaged battery since a punctured or bent battery may leak dangerous chemicals or cause a thermal event.
I used glue to adhere the battery, T-7000 kind from Amazon store. I didn't put it on the glass but rather the outer edge of the battery.
-
-
-
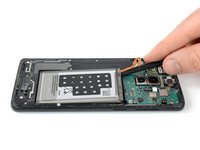
Setze den Spudger in die obere rechte Ecke des Akkus ein und heble ihn hoch.
It took me like 25 minutes to get my battery out. I have a heat gun that was relatively helpful here but prying seemed to work as long as the adhesive was softened.
-
-
-
Entferne den Akku.
-
Wenn du Isopropylalkohol verwendet hast, dann warte zehn Minuten lang, bis du den neuen Akku einbaust, bis der Alkohol vollständig verdunstet ist.
Anyone know the purpose of the black piece with the holes in it? Do I need to transfer it to the new battery?
It is a foam sticker and most likely for transferring heat form the battery to the NFC antenna and to the rear case. If the new battery comes with one pre-installed–lucky you, if not, don’t worry you’ll be fine, too.
Where is a video for placement of glue stickers??
or how to remove the old glue, especially from the rear of the back case lol. Otherwise the kit is very comprehensive
after replacing the battery using the Ifixit kit on my S9+ and following the correct procedure for charging the new battery, its still showing up on the Samsung Members app, Diagnostics as being weak and that it needs replacing. I have charged and used the device normally for the last few days and it still fails the test. Am not impressed.
-


Um dein Gerät wieder zusammenzusetzen, folge den Schritten in umgekehrter Reihenfolge.
Schalte, wenn möglich, dein Smartphone ein und teste alle Funktionenh, bevor du es wieder zusammenklebst und neu abdichtest.
Für eine optimal eLeistung solltest du deinen neuen Akku nach der Reparatur neu kalibrieren.
Bitte entsorge deinen Elektroschrott fachgerecht.
Deine Reparatur hat nicht den gewünschten Erfolg gebracht? Auf unserem Antwortenforum findest du Hilfe bei der Fehlersuche.
Rückgängig: Ich habe diese Anleitung nicht absolviert.
55 weitere Personen haben diese Anleitung absolviert.
Besonderer Dank geht an diese Übersetzer:innen:
100%


Diese Übersetzer:innen helfen uns, die Welt zu reparieren! Wie kann ich mithelfen?
Hier starten ›


7 Kommentare
Just be careful to remember to try phone parts (such as, battery recharging OBV, Fingerprint sensor…) before closing with the new cover.
Also remember to attach the Wireless card before doing the battery test otherwise the phone will say that can’t charge because the phone is too cold.
That’s because on the wireless charger module there is the heat sensor.
Missed one of the most important parts: Where and how do you install the adhesive pieces? There are a lot of them and the linked article doesn't even come close to explaining it for this phone.
Good instruction, I was successful replacing the battery however I accidentally damaged the fingerprint scanner cable because the image showed above is mirrored and I sliced too far in on the wrong side.
Also, a brief note on which adhesives can/should be removed before reassembling would be very helpful.
Re-assembly is not as straightforward as using the reverse order as above as you need to remove all the old adhesive and re-apply the adhesive supplied with the kit. It's not obvious where the upper and lower adhesive parts go - the following ifixit youtube is very useful at working out where and how to re-apply the adhesive:
How To Re-Apply Adhesive to Your Samsung Galaxy Phone! - YouTube
Hello Flavio, can you describe the problem in detail. I have connected the wireless card before the battery and i have receive the triangle with red thermometer and said can’t charge because the phone is too cold. Any advices? Thanks in advanced
I don't know how much longer should I use for the min heat gun.
Hui Chen - Antwort
Only heat it up so you can still handle the phone. That depends on your heat gun. Wearing (ESD-)gloves might give you some extra degrees.
Tobias Isakeit -
It is very very hard to remove the back glass due to the adesive… I don't know if it is possibile (at least for everyone) to remove it wothout broking the glass
Luigi - Antwort
This is nearly impossible without breaking the glass or risking overheating. I would say apply heat repetitively for 6-8 minutes. The very most adhesive is across the bottom so push the pry stick way in. I generally start on the rear side.
Thomas Hayes - Antwort
Whoah NO. It will damage the camera and other sensitive electronics.
D Harlo -
Heating the back is essential, challenging, frustrating and, for first-timers such as myself, seemingly impossble, but I will say don't give up...I'll have another comment later.
cbclistener - Antwort
I tried with the iopener but I gave in after three attempts. I then used a hairdryer and a pizza oven infrared thermometer, heating in increments. 60C did the trick and I was able to get the first pick in. Further heating was necessary to ease the rest of the back off, all to 60C.
Chris Harrison - Antwort