Einleitung
Wenn das Display deines iPhone 11 zerbrochen ist, kein Bild beim Einschalten zeigt oder nicht auf Berührung reagiert, kannst du mit Hilfe dieser Anleitung dein iPhone 11 Display tauschen und dein Handy selbst reparieren.
Wenn auf der Rückseite deines Ersatzdisplays bereits diese dünne Metallabschirmung des LCDs angebracht ist, dann benutze diese kürzere Anleitung. Wenn die Abschirmung fehlt, dann lies weiter, diese Anleitung zeigt, wie das Display getauscht und die alte LCD-Abschirmung übertragen wird.
Die kombinierte Baugruppe aus Ohrhörer-Lautsprecher und Sensoren auf der Rückseite des Displays ist mit dem iPhone ab Werk gepaart. Du musst sie deswegen mit Hilfe der folgenden Anleitung bei jedem Displaytausch von deinem alten auf das neue Display übertragen. Sie enthält den Flood Illuminator, das ist ein Bestandteil des biometrischen Face ID. Wenn er beschädigt oder ausgetauscht wird, funktioniert Face ID nicht mehr. Sei also besonders vorsichtig und beschädige während der Reparatur keines dieser Bauteile. Nur von Apple "autorisierte" Techniker können die Face ID-Funktion wiederherstellen.
Hinweis: True Tone funktioniert nach einem Displaytausch nicht mehr, selbst wenn original Apple Teile verwendet werden.
Was du brauchst
Einführungsvideo
-
-
Schalte dein iPhone aus, bevor du mit dem Zerlegen anfängst.
-
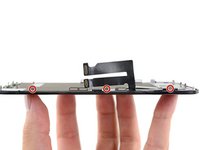
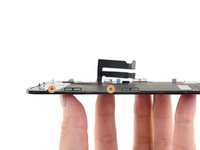
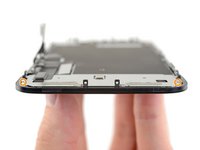
Entferne die beiden 6,7 mm langen Pentalobe Schrauben an der Unterkante des iPhone.
-
-
-
Zeichne mit einem Permanentmarker 3 mm von der Spitze des Plektrums entfernt einen Strich.
Got to step 2 and realized the fix kit doesn't include an opening pick! Looks like a guitar pick, and I have those lying around. Is that expected? Looks like the pick is used in many steps below. There's a little blue crowbar that isn't mentioned in the instructions. Perhaps that replaces the opening pick?
Hi! I can't see which guide you were using when writing this comment. Can you reply here with which guide and fix kit you used?
I see you posted this in Meta. I hope it's resolved soon! In the meantime, a guitar pick may work well enough for your repair.
what fix kit?
My fix kit didn't include an opening pick either
My AliExpress refurbished screen came with a pick that has a coin-like circle that pops out, so no modification was necessary
It's not an Ifixit KIT if it doesn't include everything. You'll need to order the opening pic separately. Or head to Walmart like myself and look for guitar pics. Hopefully, this will work just as well.
No pick in mine as well. It’s really not clear that you have to order this separately when ordering an IPhone SE 202/2022 screen repair kit. Is this the case?
Frustrated, I ordered a compact package where everything was encapsulated. Useless suction tools could not separate the screen. If it is unable to decouple the screen, then why sucking suction tools you have provided.
For my kit the triangle pick was stuck inside the box with the screen not with the other tools maybe it's also there for you
Y’all are getting far, FAR too detailed with some of this stuff…. Measuring and marking the pick that you won’t actually use to open the device?!? lol that’s kinda funny. Just heat it up, grab a spudger, and the back just pops right off! The iFixit tech need to stick to the KISS method more often, you know KEEP IT SIMPLE STUPID!!! Like l, for reals, I’ve been doing this stuff for YEARS and using iFixit guides regularly and this is just ridiculous at this point!
Will the phone still work if the sensor assembly on the back of the screen is damaged?
-
-
-
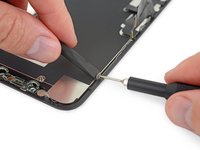
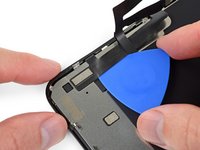
Überdecke die Glasscheibe des Displays komplett mit überlappenden Streifen von durchsichtigem Paketband.
-
Wenn das Glas so stark zerbrochen ist, dass der Saugheber in den nächsten Schritten nicht gut haftet, dann versuche ein starkes Klebeband ("Panzerband") zu einem Griff zu falten und so auf die Scheibe zu kleben, dass du sie damit hochziehen kannst.
-
-
In diesem Schritt verwendetes Werkzeug:Clampy - Anti-Clamp$24.95
-
Drücke den blauen Griff zurück, damit die Arme der Anti-Clamp frei beweglich werden.
-
Schiebe die Arme entweder über die linke oder die rechte Kante des iPhones.
-
Bringe die Saugheber nahe an der Unterkante des iPhones an, einen auf der Vorderseite, den anderen auf der Rückseite.
-
Drücke die Saugheber zusammen, so dass sie auf den Oberflächen haften.
-
-
-
Drücke den blauen Griff vorwärts, um die Arme wieder zu verriegeln.
-
Drehe den Griff eine volle Umdrehung im Uhrzeigersinn, oder bis du merkst, dass sich die Saugheber dehnen.
-
Achte darauf, dass sich die Saugheber weiterhin gegenüber stehen. Wenn sie sich nicht mehr gegenüber stehen, dann löse die Saugheber ein wenig ab und schiebe sie in die richtige Position.
-
-
-
Führe einen erwärmten iOpener durch die Arme der Anti-Clamp.
-
Forme den iOpener so, dass er auf der Unterkante des iPhones liegt.
-
Warte eine Minute, damit sich der Kleber lösen und ein Spalt entstehen kann.
-
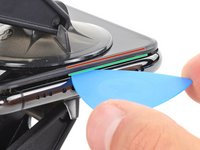
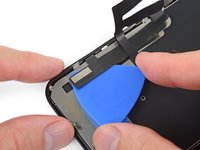
Setze ein Plektrum in den Spalt unter das Display und der Kunstoffblende ein, nicht unter das Display selbst.
-
Überspringe die nächsten drei Schritte.
Insert an opening pick into the gap under the screen and the plastic bezel, not the screen itself.
Any suggestions if the screen is broken and the anti-clamp just separates the screen from the bezel?
-
-
-
Benutze einen Haartrockner, ein Heißluftgebläse oder bereite einen iOpener vor und erwärme eine Minute lang die Unterkante des iPhones.
-
-
-
Wenn du einen einzelnen Saugheber benutzt, dann setze ihn an der Unterkante des iPhones auf. Vermeide dabei den gebogenen Teil der Glasscheibe.
-
-
-
Ziehe den Saugheber kräftig und gleichmäßig hoch, so dass ein kleiner Spalt zwischen Frontpanel und Rückgehäuse entsteht.
-
Setze ein Plektrum in den Spalt unter dem Display und der Kunstoffblende ein, nicht unter dem Display selbst.
This turned out to be the most difficult part for me. My old ifixit suction cup didn't suck hard enough to generate enough force to pry the display from the case. I ended up applying heat at least a dozen times, and I had to pull up on the suction cup forcefully over and over and over while repositioning it several times. I finally had success inserting my pick into the tiny gap after 30 or so rapid tugs on the suction cup.
I have the same question
After heating (I used a hair dryer for 4-5 mins, moving around whole frame, to make sure was pretty hot, then let sit for 1 minute), insert a razor blade between the bezel and the frame, at the bottom edge. Lever upwards, the screen will easily pull away. You won’t even need the suction cup.
-
-
-
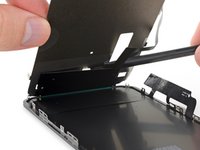
Schiebe das Plektrum um die untere linke Ecke herum und dann an der linken Seite nach oben. Trenne so die Verklebung des Displays auf.
-
-
-
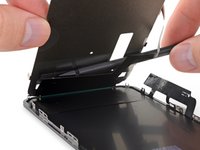
Setze das Plektrum erneut an der Unterkante des iPhones ein und schiebe es zum Auftrennen des Klebers an der rechten Seite nach oben.
Instructions are confusing as the last step says not to insert at certain points, while this says to slide all the way up the right side - is it that sliding is ok but inserting isn't (whatever that might mean) or just not more than 3mm?
Just slide slightly and the display will rise without problems on all iPhone models, sometimes if I have long nails I even insert a fingernail and lift the display.
Tonynox -
-
-
-
Ziehe die rechte Kante des Displays behutsam nach unten (in Richtung des Lightning-Anschlusses).
-
Setze das Plektrum in die obere rechte Ecke des Smartphones ein.
-
-
-
Ziehe das Display soweit wie nötig nach unten (in Richtung des Lightning-Anschlusses), bis der Spalt groß genug ist, um ein Plektrum einzusetzen.
-
Schiebe das Plektrum zur oberen linken Ecke hin und trenne alle restlichen Klebeverbindungen auf.
-
-
-
Ziehe an der kleinen Noppe am Saugheber, so dass er sich vom Frontpanel ablöst.
-
-
-
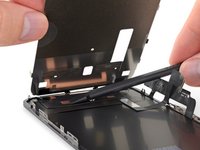
Klappe das Display von der linken Seite her, wie die Rückseite eines Buchs, hoch und öffne das iPhone.
-
Stütze das Display an einem stabilen Gegenstand ab.
-
-
-
-
Hebe das Display ein wenig an der Unterkante an und kippe es dabei, so dass du im folgenden Schritt besser an die Schrauben herankommst.
-
-
In diesem Schritt verwendetes Werkzeug:Magnetic Project Mat$19.95
-
Entferne die drei 1,1 mm Y000 Schrauben, mit denen die Halterung des Akkusteckers befestigt ist.
During reassembly, I had to connect my phone to the charger before it would power up.
Die Schrauben sind wahnsinnig kurz, tatsächlich winzig klein. Nach dem Herausdrehen könnte es im ersten Moment so aussehen, als habe man die Schrauben ausgebohrt anstatt herauszudrehen, sie sind jedoch sehr schnell gelöst und liegen dann entweder im Gehäuse oder sind neben dem Gehäuse herausgefallen. In jedem Fall sollten sie nie auf den Boden fallen, da sie dann kaum mehr auffindbar wären.
I got to this point thinking/hoping I could eek by with a Y1 orY0 or even a PH000 driver but no such luck. The Y000 is in fact necessary. Finishing this repair will have to wait for now.
ALSO thanks Apple, there is ABSOLUTELY no reason AT. ALL. to use so many random, oddball screw heads, BUT to make self repairs more difficult and expensive. A real F-U to the consumer!
-
-
-
Heble den Akkustecker mit einem Spudger oder einem Fingernagel aus seinem Anschluss auf dem Logic Board.
-
Biege den Stecker ein wenig vom Logic Board weg, so dass er sich nicht versehentlich mit seinem Anschluss verbinden kann.
-
-
-
Drehe die fünf 1,1 mm Y000 Schrauben heraus, mit denen die Halterung der Logic Board Abdeckung befestigt ist.
Die Schrauben sind wahnsinnig kurz, tatsächlich winzig klein. Nach dem Herausdrehen könnte es im ersten Moment so aussehen, als habe man die Schrauben ausgebohrt anstatt herauszudrehen, sie sind jedoch sehr schnell gelöst und liegen dann entweder im Gehäuse oder sind neben dem Gehäuse herausgefallen. In jedem Fall sollten sie nie auf den Boden fallen, da sie dann kaum mehr auffindbar wären.
-
-
-
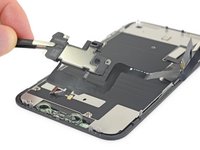
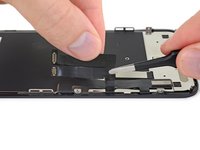
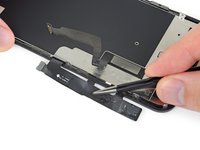
Trenne den Stecker am Kabel zum LCD-Panel mit einem Spudger oder dem Fingernagel ab.
-
Trenne den Touchscreen-Stecker daneben ab.
Be mindful when reconnecting LCD panel connector and digitizer connector. It’s looks very similar. These 2 ribbon connectors a slightly different.
Pay attention.
내 아이폰이 디스플레이 분리 단계를 거친 후, 전원이 들어오지 않습니다. 층전기를 꽂아도 배터리에 미세한 전기 반응이 느껴지지 않고, 탭틱 엔진도 작동하지 않게 되었습니다. cpu 온도는 여전히 뜨껍습니다. 내 마더보드가 디스플레이 분리 후 갑자기 고장난건가요?
Hast Du das Problem gelöst?
커넥터 핀을 빼거나 다시 넣기 위해 구부러졌을 수 있습니다. 핀이 구부러진 경우 돋보기 등으로 살펴보고, 그렇다면 적절한 매장에 가져가세요.
Hampter -
-
-
-
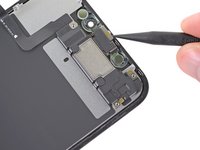
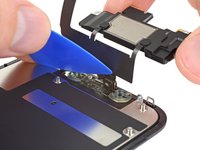
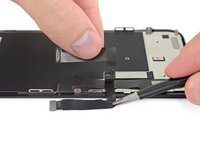
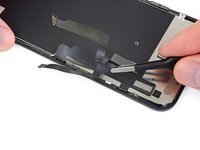
Trenne den Stecker zur Frontsensoren-Gruppe mit der Spudgerspitze oder dem Fingernagel ab.
There needs to be an extra step between 24 and 25 for reassembly, telling folks to apply adhesive here. I got the thing almost all the way put back together before realizing that the adhesive was a single piece that needs the cables to be disconnected in order to apply it.
-
-
-
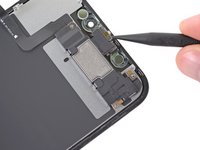
Entferne die Displayeinheit.
After this step its probably a good idea to test the new screen (you dont have to plug in the front camera assembly)
Not a technician, so correct me if I'm wrong: I think that it's at this step of reassembly (before you reattach the screen) that you apply waterproof glue, if you have it.
You are both correct. Testing the screen before putting on adhesive means the screen can be returned if faulty. Many places will not accept a screen return that has adhesive on it.
So if it works apply adhesive at this point. When testing don’t just rely on Apple logo test touch functionality also .
-
-
-
Entferne die vier Schrauben, mit denen die Lautsprecher/Sensorbaugruppe befestigt ist:
-
Drei 1,6 mm Kreuzschlitzschrauben
-
Eine 1,3 mm Y000 Schraube
Correct me if I am wrong but you no longer need to do this as of IOS 15.2 as apple doesnt disable Face ID on 3rd party repairs
-
-
-
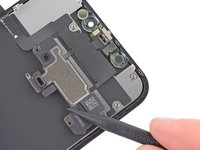
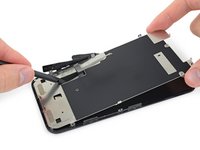
Heble die Oberkante des Lautsprechers behutsam mit der Spudgerspitze hoch.
-
Klappe die Lautsprechereinheit um, weg von der Oberkante des Displays nach unten.
-
-
-
Benutze einen Haartrockner, ein Heißluftgebläse oder bereite einen iOpener vor und erwärme den oberen Displayrand ein bis zwei Minuten lang, damit der Kleber an den Sensoren weich wird.
Sometimes this won't be sufficient for the glue to melt. I ripped the ambient cable twice trying to remove it from the greenish plastic piece (the one with two round holes on the two sides). Here's a less risky procedure: take off the plastic piece together with the rest of the speaker + front sensors, as a block. Then when reassembling, remove the plastic piece from the new screen, and apply the whole block instead.
-
-
-
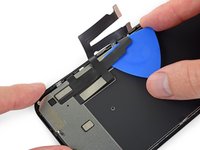
Schiebe behutsam die Kante eines Plektrums unter das Flachbandkabel unterhalb des Mikrofons.
-
Verdrehe es vorsichtig und löse das Mikrofon ab. Achte dabei darauf, dass du das Flachbandkabel nicht zu stark anspannst oder beschädigst.
-
Benutze, falls nötig, die Spudgerspitze, um das Mikrofon endgültig aus seiner Ausbuchtung im Frontpanel zu lösen.
This step was a little bit confusing. I thought that the entire ribbon assm should be removed once the speaker was detached. The entire assm doesn’t actually come off until Step 30.
Be careful in the next few steps, as you can easily damage some parts. Make sure that you operate gently, and that you don't pull, twist or apply too much pressure on the components.
-
-
In diesem Schritt verwendetes Werkzeug:Tweezers$4.99
-
Schiebe die kleine Halterung mit einer Pinzette gerade nach oben vom Helligkeitssensor ab.
As you remove it, familiarise with its position. It will be hard to put it back into place. If you pay close attention to how it comes out, it will be easier to put it back
-
-
-
Wackle mit einer Pinzette am Helligkeitssensor und hebe ihn aus seiner Ausbuchtung im Display heraus.
-
-
-
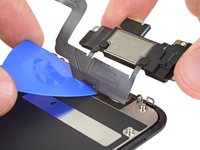
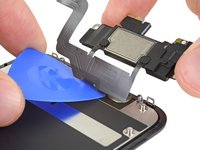
Schiebe ein Plektrum von links nach rechts unter das Flachbandkabel und unter das Näherungssensor/Flood Illuminator- Modul.
-
Wackle behutsam am Modul und hebe es aus seiner Ausbuchtung im Frontpanel heraus.
-
-
-
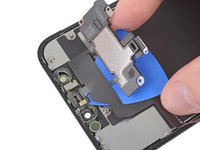
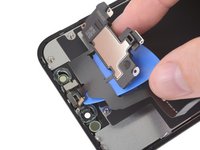
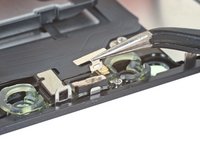
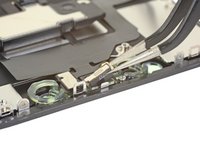
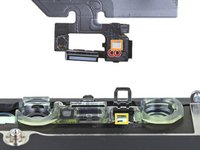
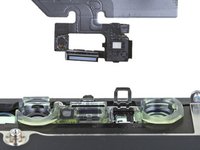
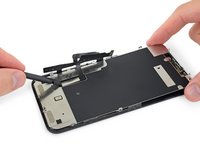
Entferne den Ohrhörer-Lautsprecher und die Front-Sensor-Baugruppe.
-
Näherungssensor
-
Flood Illuminator
-
Das Modul muss so eingesetzt werden, dass keines dieser Bauteile durch Klebstoff blockiert wird.
Right here. Hope it helps!
When I reinstall this assembly on the new (ifixit) screen, once all the sensors are in their holes and you fold the speaker back over, the screw holes don't line up, OR the speaker doesn't fit snugly. You can move the speaker so its no longer snug, and the screw holes line up. Is there a trick to this?
My replacement screen didn't come with the transparent plastic bits surrounding the front camera, infrared and earpiece speaker... I wonder what would have turned up if I didn't purchase the " original" version in that dodgy shop... lol. If this is your case, you need to clean the glass off this piece of plastic and metal, try not to damage the earpiece protection included on top of that piece, and go back to that shop for a good argument! Got some pics if needed.
Correction: I finally got rid of the earpiece protection because I hadn't noticed that was included in the replacement screen, although of much lower quality than the "real" original.
In addition: be veeeeeery gentle on the heat gun, I accidentally melted a bit of the plastic in the "plastic and metal piece"... Made the ambient light sensor fit kinda loose. :/
Thanks a lot ! My son's iphone is reborned, and I'm upskilled !
-
-
-
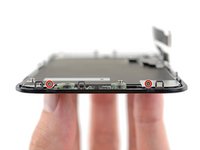
Entferne folgende 1,1 mm Y000 Schrauben, mit denen die LCD Abschirmung befestigt ist:
-
Drei Schrauben an der Seite nahe der Displaykabel
-
Zwei weitere Schrauben auf der gegenüberliegenden Seite
L’appui sur les vis est réellement important, au risque de foirer celles-ci. N’hésitez donc pas à appuyer, en faisant contre-poids du côté opposé bien évidemment.
This is the bit that was difficult. The tri'point screwdriver y0000 barely fits this tricky size. It could have been the cheap screwdriver that came with the screen replacement kit. Stripped 2 screws, drilled out with an appropriate size drill bit ' frame still intact. I had more success using a size 0.7mm flathead screwdriver.
-
-
-
Entferne die restlichen 1,1 mm Y000 Schrauben von der Ober- und der Unterkante der LCD Abschirmung:
-
Zwei Schrauben nahe an den Ausschnitten für die Kameras
-
Zwei Schrauben an den unteren Ecken
-
-
-
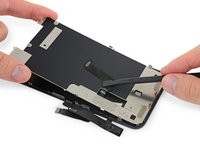
Erwärme die Rückseite des Displays mithilfe eines iOpeners (oder eines Föns/einer Heißluftpistole), um den Kleber aufzuweichen, mit dem die Displaykabel an der LCD Abschirmung befestigt sind.
-
-
-
Setze ein Plektrum zwischen die Displaykabel und die LCD Abschirmung.
-
Schiebe es zur Unterkante des Displays und beginne, die Kabel abzulösen.
-
Halte an, sobald du das Ende des ersten Kabels erreicht hast.
-
-
-
Setze dein Plektrum erneut ein, und zwar dieses Mal zwischen die beiden Kabel.
-
Schiebe das Plektrum zur Unterkante des Displays, um die beiden Kabel voneinander zu trennen.
-
-
-
Löse das gesamte Touchscreen-Kabel von der LCD Abschirmung ab und falte es zur Seite.
IPhone XS copy phone ka folder
-
-
-
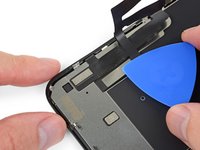
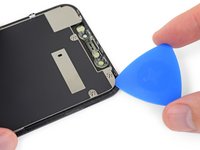
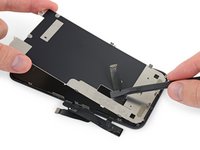
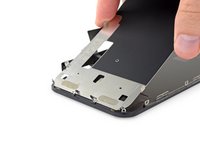
Setze ein Plektrum unter die Oberkante der LCD Abschirmung und verdrehe es, um die Abschirmung vom Display abzulösen.
-
-
-
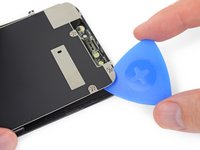
Fasse die LCD Abschirmung an der Oberkante und klappe sie leicht hoch.
-
Drücke mit deinem Spudger leicht auf den unteren Teil des Displaykabels und schiebe es durch den Ausschnitt in der LCD Abschirmung.
-
-
-
Hebe die Oberkante der LCD Abschirmung etwas weiter an und führe das restliche Displaykabel durch den Ausschnitt in der Abschirmung.
-
-
-
Hebe die LCD Abschirmung noch weiter an, bis du das restliche Displaykabel, das auf der Rückseite festgeklebt ist, sehen kannst.
-
Schiebe einen Spudger zwischen die LCD Abschirmung und das Displaykabel und löse sie ganz voneinander ab.
-
-
-
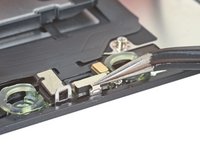
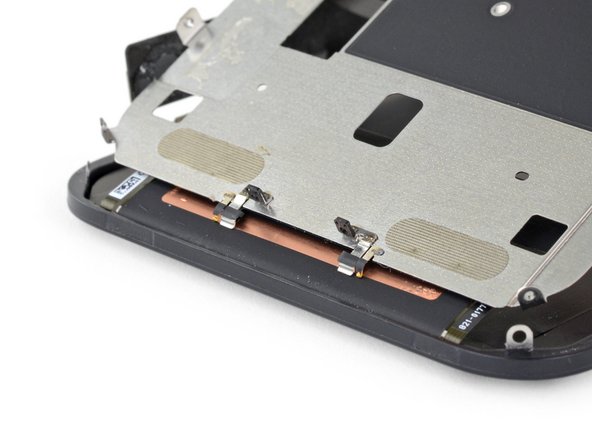
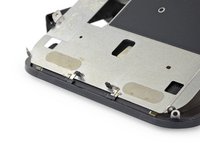
Beim Anheben der LCD Abschirmung sind an der Unterkante Metallstifte zu sehen.
hello whaty if one of the golden contact pins ( i guess it is) to be exact right one has freyed up a bit and looks messy. could it cause harm or it is not very important?
On reassembly leave the adhesive cover on the digitizer cable so that it doesn’t get caught on the LCD shield while working the other cable in place and positioning the shield on the frame. When you are ready to stick the digitizer cable to the shield remove the protective plastic.
-
-
-
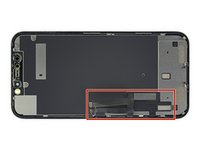
Nur das LCD und der Touchscreen bleiben übrig.
-


Vergleiche dein neues Ersatzteil genau mit dem Originalteil. Möglicherweise musst du fehlende Bauteile übertragen oder Schutzfolien abziehen, bevor du es einbauen kannst.
Um dein Gerät wieder zusammenzusetzen, folge den Schritten in umgekehrter Reihenfolge.
Entsorge deinen Elektromüll fachgerecht.
Die Reparatur verlief nicht wie geplant? Schaue zunächst in unsere ausführliche iPhone Fehlerdiagnose oder speziell unsere Seite zum Thema iPhone 11 lässt sich nicht anschalten. In unserem iPhone 11 Forum findest du weitere Hilfe bei der Fehlerbehebung.
Rückgängig: Ich habe diese Anleitung nicht absolviert.
181 weitere Personen haben diese Anleitung absolviert.
Besonderer Dank geht an diese Übersetzer:innen:
100%


Diese Übersetzer:innen helfen uns, die Welt zu reparieren! Wie kann ich mithelfen?
Hier starten ›


24 Kommentare
I am a repair technician from California, and I use your company’s tools and I gotta say that I love them. Very sleek, and the powerful magnetic bits help me get the job done. I did 5 repairs yesterday and each one finished was a good feeling of satisfaction. In the future, if you guys decide to make some sort of in-depth manual for the newer iPhones, that would be great because diagrams are not only a great way for me to sharpen my own skills, but will help make training new techs a breeze.
Cheers all the way from Fresno!
Hi, I replaced the display independently, not in the Apple service, to my disappointment I found a message in the device that warned me that the part is not original, consequently the FaceID was disabled. Can you tell me about ear? Thank you
Getting a message saying not genuine is known issue. there is no workaround yet. as far as face ID not working, you need to check for tear on the flex as you probably damaged it during transfer. If it’s broken, there is no way to fix.
The Important Display Message can be removed, check here: https://www.youtube.com/watch?v=bLo0_p7O...
Ricky LV -
Great repair guide. My only issues:
1. There are no instructions for removing the metal panel from the back of the old screen (nor how to reinstall it).
2. There are no instructions for removing the old, black adhesive from around the edge of the old case (nor the much needed instructions for reinstalling the new adhesive without damaging it or compromising the purpose of replacing this adhesive). This info is also missing from the adhesive replacement page for the iPhone 11.
I was able to patiently work my way through both of these issues and complete the repair on an iPhone 11. Covering these issues as additional steps of the repair guide would be very helpful for future iFixers.
Anyone have the phone randomly reboot after screen replacement? All aspects work on the phone after replacement. It just randomly goes black and then restarts
Maybe just a bad battery connection or a stained/bent connector
I am a repair tech at a repair shop we do more but thats what we are called and i love you’re tools, they are just perfect for everything and all i can say really is, be super careful with the screen and the prox flex, they can be eaisly ripped and really ruin you’re day because to restore the face id with a new prox requires micro sodering but other then that just be careful
I find the OEM screen looks more yellowish, is it me only?
OEM screens tend to have the colors a little bit off, could also be caused by disabled true tone.
Overall a very useful repair guide, there´s just one issue I came across:
Different display manufactors.
Been looking around, due to some issues and so far I´ve seen some different manufactors for the iPhone 11 (and the XR):
Toshiba (the print on the display starts with C11 or F7C, as seen on the last picture)
LG (DTP or C3F)
Sharp (DKH)
someone else stumbled across this?
Apple doesnt offer new displays, however afaik the original apple product manufacturer foxconn refurbishes original screens. Or you could just get a refurbished screen from somewhere else…
For iphone 11, on the flex if there is a square code QRC is DTP and a rectangle is C11
Didier -
Awesome guide, thank you very much! By the way, after the replacement the true tone function will most likely be disabled, which can as far as i know only be fixed by copying the firmware from the old screen over to the new one with a programmer (for example Qianli iCopy Plus). Also, the phone will notify you that the screen is not genuine after every restart and it will always show a notification in the settings. The only way to get around that is to swap the chip on the display cable with a hot air station and solder paste (not worth the hustle in my opinion, i dont mind the one notification in settings). https://www.youtube.com/watch?v=agq2HPK-...
Cheers!
Hi, since replacing my screen my ear speaker has been very muffed/static. Is there any way I can fix this? Thanks
I’d suggest checking the mesh under the earpiece for dirt and stuff that could be blocking the sound and maybe trying to refit it, maybe it’s not properly seated. Could also be fixed by just reseating the earpiece flex…
completed the guide. thx. my iphone claimed the screen is not original. anyway, seems to work correct
Hello I was wondering if anyone could help me. I recently replaced the screen of an iphone 11. The phone was good for the first couple of days but now the customer is having some issues. His display is something randomly scrolling up, mainly while watching videos and sometimes the screens just starts to act crazy and press random things. I’ve been doing some research and I found that something i could do is reset the phone to factory settings. However i’m unsure if this is like a software or a hardware issue. Any advice is helpful, thanks!
From my experience this sound like a ghost touch issue. Usually caused by a loose/broken/dirty connection or an overly tight screw somewhere. It's unlikely, but if you installed a screen protector afterwards, it may have a fingerprint or dirt between the protector and the phone screen. Same thing happened when we did my sisters phone at our store, a connection was loose and a screw was a little bit tight. Maybe a more experienced tech could offer more in-depth insight.
Teejay R -
Hello, I followed the guide and repairs. My phone will not come on. Unless sitting on the charger and then I only get the Apple logo for a few seconds and it does this repeatedly. Any guess on where I went wrong? Thanks
Hi all, Im still trying to get a better understanding of the different types of "screen repair" that can be done.
From what I understand, it is possible to perform a replacement of ONLY the "front glass/screen" with 3rd party, non-OEM screens that you can purcahse online) OR you can replace BOTH the screen and digitizer.
ALot of 3rd party sellers sell a "screen replacement" but I am not sure exactly what I need to look for.
My front screen is cracked but the damage that is visible is purely physical (II don't see /experience any altered pixels, flashing colors etc, just dealing with a iphone with a cracked front screen). BUT in addition to the physical damage, the right side of my iphone 11 (specifically a small area that covers the "&" sign and letter "i" on my keyboard are non-responsive.
Now, is the item Im commenting on going to fix my touch issue? If not, which Ifixit replacement part(s) will resolve this? if at all.
thanks
The ribbon cables used on this screen are incredibly weak, when compared to the apple ones. Did this whole thing and had the phone fully working. Made sure the cables were in the right spot and started pressing the screen in just for the display cable to split in half from a couple pounds of pressure. Absolutely livid. Waste of money and time. You can really tear these cables apart with the tiniest fold.
the right screws wouldn’t come off
Yusef San Inocencio - Antwort
ok one came of but my right wont come of either!!!!
Aisa Jawara -
Hello guys, I still haven't found away to power off the iphone without using the screen. Cheers!
danielaguirre93 - Antwort
You can try this.
Quickly Press and release the volume up button.
then Quickly Press and release the volume down button.
then press and hold the power button and wait until it turns off.
worked for me :D
Benóný Egilson - Antwort
Where does one get replacement seals? Is this the same as the display assembly adhesive?
Brian Baker - Antwort
not of the screwdrivers i have seem to be able to turn the screws
Aisa Jawara - Antwort
how do you change battery of an iPhone 11 and still the battery health shows, do you use a software for that?
Great Me - Antwort
Battery health won’t show on a non Apple battery.
DON’T forget to discharge old battery before removing it. Very impressive fire (and smoke!) if you puncture it. Ask me how I know
Doug Harrowing - Antwort