Einleitung
Die Taptic Engine ist für Vibrationen und die haptische Rückmeldung an deinem iPhone zuständig. Diese Anleitung zeigt dir, wie du die Taptic Engine ausbauen und ersetzen kannst.
Bei dieser Anleitung wird die Displayeinheit abgelöst und ausgebaut; die Absicht dahinter ist, dass du leichter arbeiten kannst und Beschädigungen der Displaykabel nicht so leicht passieren können. Wenn du dich sicher fühlst und die Displaykabel beim Ausbau der Taptic Engine nicht entfernen willst, dann kannst du die Schritte mit dem Abtrennen des Displays überspringen.
Was du brauchst
-
-
Schalte dein iPhone aus, bevor du daran arbeitest.
-
Drehe die beiden 3,5 mm Pentalobe Schrauben an der unteren Kante heraus.
-
-
-
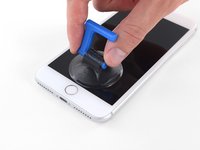
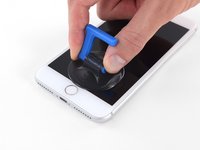
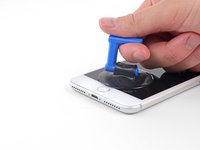
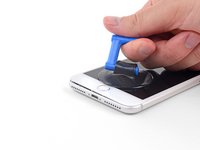
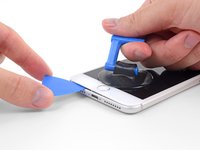
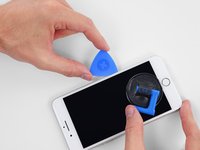
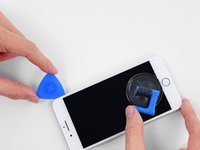
Zeichne mit einem Permanentmarker 3 mm von der Spitze des Plektrums entfernt einen Strich.
Got to step 2 and realized the fix kit doesn't include an opening pick! Looks like a guitar pick, and I have those lying around. Is that expected? Looks like the pick is used in many steps below. There's a little blue crowbar that isn't mentioned in the instructions. Perhaps that replaces the opening pick?
Hi! I can't see which guide you were using when writing this comment. Can you reply here with which guide and fix kit you used?
I see you posted this in Meta. I hope it's resolved soon! In the meantime, a guitar pick may work well enough for your repair.
what fix kit?
My fix kit didn't include an opening pick either
My AliExpress refurbished screen came with a pick that has a coin-like circle that pops out, so no modification was necessary
It's not an Ifixit KIT if it doesn't include everything. You'll need to order the opening pic separately. Or head to Walmart like myself and look for guitar pics. Hopefully, this will work just as well.
No pick in mine as well. It’s really not clear that you have to order this separately when ordering an IPhone SE 202/2022 screen repair kit. Is this the case?
Frustrated, I ordered a compact package where everything was encapsulated. Useless suction tools could not separate the screen. If it is unable to decouple the screen, then why sucking suction tools you have provided.
For my kit the triangle pick was stuck inside the box with the screen not with the other tools maybe it's also there for you
Y’all are getting far, FAR too detailed with some of this stuff…. Measuring and marking the pick that you won’t actually use to open the device?!? lol that’s kinda funny. Just heat it up, grab a spudger, and the back just pops right off! The iFixit tech need to stick to the KISS method more often, you know KEEP IT SIMPLE STUPID!!! Like l, for reals, I’ve been doing this stuff for YEARS and using iFixit guides regularly and this is just ridiculous at this point!
Will the phone still work if the sensor assembly on the back of the screen is damaged?
-
-
-
Lege überlappende Streifen durchsichtigen Packbands über das Display des iPhones, bis die gesamte Oberfläche bedeckt ist.
-
Wenn du den Saugheber in den nächsten Schritten nicht befestigen kannst, falte ein starkes Stück Klebeband (z.B. Paketband) zu einem Griff und hebe das Display stattdessen damit an.
-
-
-
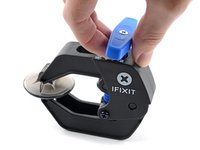
Wir haben die Anti-Clamp entwickelt, um das Öffnen von Geräten zu erleichtern. Die nächsten drei Schritte zeigen, wie sie verwendet wird. Wenn du sie nicht benutzen willst, überspringe die nächsten drei Schritte und folge einer anderen Methode.
-
Ziehe den blauen Griff nach hinten, um die Arme der Anti-Clamp zu entriegeln.
-
Schiebe die Arme entweder über die rechte oder die linke Kante deines iPhones.
-
Bringe die Saugheber nahe an der Unterkante des iPhones an, einen auf der Vorderseite, den anderen auf der Rückseite.
-
Drücke die Saugheber auf den Oberflächen fest.
-
-
-
Ziehe den blauen Griff nach vorne, um die Arme zu arretieren.
-
Drehe den Griff 360° im Uhrzeigersinn, oder soweit, bis du merkst, dass sich die Saugheber dehnen.
-
Achte darauf, dass sich die Saugheber weiterhin gegenüber stehen. Wenn sie sich nicht mehr gegenüber stehen, dann löse die Saugheber ein wenig ab und schiebe sie in die richtige Position.
-
-
-
Erhitze eine iOpener und führe ihn durch die Arme der Anti-Clamp hindurch.
-
Falte den iOpener so, dass er auf der Unterkante des iPhones liegt.
-
Warte eine Minute, damit sich der Kleber lösen kann und ein Spalt entsteht.
-
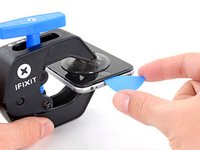
Setze ein Plektrum unter das Display ein, sobald die Anti-Clamp einen ausreichend großen Spalt geschaffen hat.
-
Überspringe die nächsten drei Schritte .
-
-
-
Es ist leichter das iPhone zu öffnen, wenn du das untere Ende erwärmst. Du weichst so die Verklebungen auf.
-
Du kannst das untere Ende des iPhones mit einem Haartrockner oder einem iOpener erwärmen. Wende die Wärme 90 Sekunden lang an, um den Kleber aufzuweichen.
6/14/23 I did this repair but used a heat gun on low for 60 seconds. This allowed me to open the case as the instructions say, but in the end the Home button failed. I probably over heated it. I used this "go around" for a virtual Home button. I don't care about touch ID:
-
-
-
Setze einen Saugnapf auf die untere Hälfte der Vorderseite , direkt über dem Home Button.
Using just the single suction cup that is included in the battery replacement kit probably wouldn’t open the device. An iOpener and an iSlack should be the recommended method. However, you can get it open with just the single suction cup and iOpener, but does take a lot of time.
Get an iOpener and iSlack with the battery replacement kit.
I used a flat x-acto (#18) blade knife tool to gently pry back the screen enough to allow me to insert the pick near the bottom corner. I then worked the pick under the screen as mentioned in steps 5 & 6 below then. This worked really well for me.
I used the suction cup without heating the phone - the adhesive came away quite easily without applying any heat. Maybe due to age of phone (nearly 4 years old). Worth trying.
My screen was very shattered, and was quite hard to get suction, as my tape was very low quality. However, after pulling it up a little bit, I was able to insert a regular razor blade into the very small gap and used that as a lever.
Oh my goodness! Don't do that again. You can definitely damage something in the phone if you use a sharp metal razor blade..
cytur -
-
-
-
Ziehe gleichmäßig und fest am Saugnapf. Es sollte sich ein kleiner Spalt zwischen Front Panel und Rückgehäuse bilden.
-
Setze ein Plektrum oder ein dünnes Hebelwerkzeug ein paar Millimeter in den Spalt ein.
After multiple tries and using a very hot iOpener, it will not open.
In sheer frustration, I pulled out my trusty pocket knife and managed to lift the bottom of the screen slightly, but in the process, cracked the glass from the bottom to the home button. The case is open now.
-
-
-
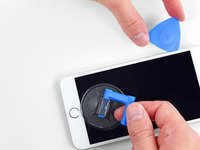
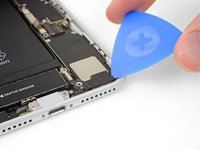
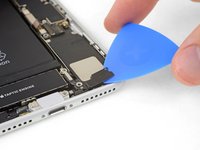
Schiebe das Plektrum um die Ecke und entlang der linken Kante nach oben in Richtung der Tasten für die Lautstärkeregelung und des Stummschalters. Trenne so die Klebeverbindung des Displays auf.
-
Halte vor der oberen linken Ecke an.
Do not go over the top otherwise you can crack the screen. Sadly happened to me :(
The instruction should be:
“Stop near BUT BEFORE REACHING the top left corner of the display”
-
-
-
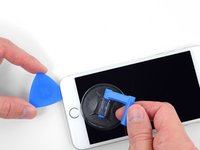
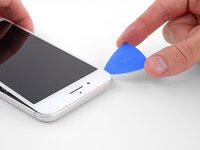
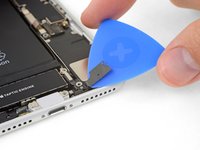
Setze das Plektrum an der rechten unteren Ecke ein. Schiebe es um die Ecke herum, dann entlang der rechten Kante nach oben. Trenne dadurch die Verklebung.
I had really good luck using a hairdryer on some of the more stubborn portions of adhesive.
-
-
-
-
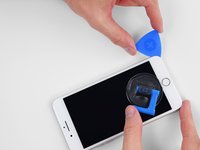
Schiebe das Plektrum unter das Display und die Oberkante entlang, um die letzte Klebeverbindung zu trennen.
Be very careful at this step. The glass at the top will break very easy when the display is lifted too much.
-
-
-
Schiebe die Displayeinheit leicht nach unten, weg von der Oberkante, um die Rasten, mit denen sie am Rückgehäuse gehalten wird, zu lösen.
-
-
-
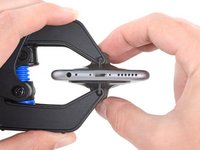
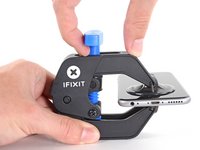
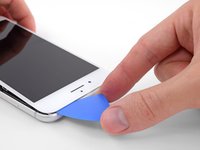
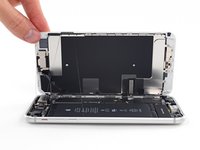
Öffne das iPhone, indem du das Display von der linken Seite her aufklappst, so wie man die Seite eines Buches umschlägt
-
Lehne das Display an einen geeigneten Gegenstand, um es gut zu stützen, während du weiter am iPhone arbeitest.
Das “links” ist auf dem Foto rechts.
-
-
In diesem Schritt verwendetes Werkzeug:Magnetic Project Mat$19.95
-
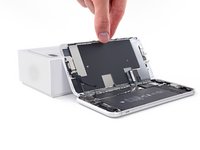
Entferne die vier Kreuzschlitzschrauben (JIS) mit denen die untere Display Kabel Halterung auf auf der Platine angeschlossen ist:
-
Zwei 1,3 mm Schrauben
-
Eine 1,4 mm Schraube
-
Eine 2,7 mm Schraube
The Phillips screwdriver bit is the PH000. The measurement refers to the screw length.
-
-
-
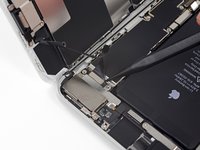
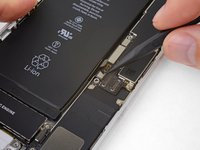
Hebele den Akkuanschluss mit der Spudgerspitze aus seinem Sockel auf dem Logic Board.
-
Biege das Akku Anschlusskabel etwas weg vom Logic Board, um zu verhindern, dass es sich versehentlich wieder mit dem Akku verbindet und das iPhone während der Reparatur unter Spannung setzt.
When I reassembled the iPhone 8 Plus, I had to plug it into a Lightning cable to wake it up (just pushing power button wasn’t sufficient).
-
-
-
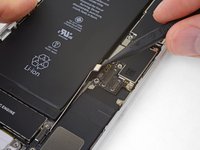
Hebele den breiten unteren Displayverbinder mit der Spudgerspitze oder mit dem Fingernagel gerade aus seinem Sockel.
I got hold of a iPhone 8 Plus with cracked screen that I am planning to fix.
Here is my problem:
When I tried to take out the screen from my phone, (step 15-18) I was curious about the new screen, so I tried to connect it. It was completely dead! Then I tried the old cracked one, and suddenly that was dead to! This is a phone that some fool has been inside earlier and changed battery, but I suspect he has done some more really stupid things. The Taptic Engine is living its own life and vibrating every time I slightly touch the home button. (I have a new Taptic Engine) The phone is also full of dust and small particles that does not belong there. One tri-point Y000 screw (step 18) is even missing! Now the biggest problem is that both screens are black! I know the phone is on, because I hear voice command speak when I turn on the power. The screen worked before I tried to change it? And one last thing: My new LCD screen came with new flex cables. Is it possible to switch over, so I can use the old ones?
Hi,
Is your problem solved?
Be careful of damaging MOSFETs by the LH side of the large lower display cable. After replacing the battery and turning the device on, the phone showed low charge and didn't have a charging symbol even after plugging into multiple cables and chargers. Turns out I had damaged the logic board attempting to disconnect the connector.
-
-
-
Löse den Verbinder am zweiten unteren Displaykabel mit der Spudgerspitze. Er ist direkt hinter dem eben gelösten.
I used the other end of the spudger on this connector and it seemed to work a little better for me. I came in from underneath the top-right edge instead of the bottom right.
-
-
-
Entferne die beiden TriPoint Y000 Schrauben, welche die Halterung über dem Verbinder der Sensoreinheit am Front Panel befestigen:
-
Eine 1,0 mm Schraube
-
Eine 1,2 mm Schraube
una vite da 1mm e due viti da 1.2 mm???
Ciao Matteo! Grazie per l’osservazione. Ho appena modificato il testo :) La traduzione è aperta a tutti. Hai quindi la possibilità di fare le tue suggestione direttamente nel testo e sei il benvenuto se vuoi usare di questa possibilità nel futuro. Grazie ancora per la vigilanza! Saluti, Claire
The tool kit does include a 1.0 or1.2mm screwdriver! How am I supposed to remove those screws?
Bought the screwdriver that supposedly fits these screws and it still doesn’t work.
My bracket looks different. Can’t get these screws out.
kit came with wrong bit. i received 2x P02 (penta tips) and no tri point y000.
-
-
-
Entferne die Halterung, welche den Verbinder der Front Panel Sensoreinheit bedeckt.
-
-
-
Löse den Verbinder der Front Panel Sensoreinheit mit der Spudgerspitze oder dem Fingernagel von seinem Sockel.
-
-
-
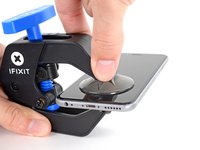
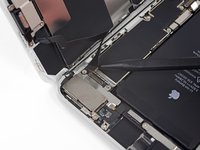
Entferne die Displayeinheit.
Should there be a step somewhere in here to point out when to remove the blue plastic from the new iFixit screen?
-
-
-
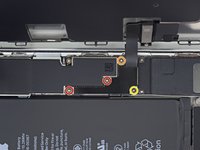
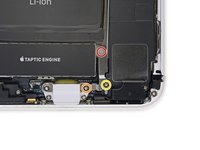
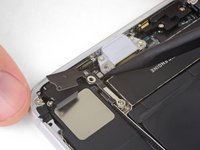
Entferne die drei Schrauben, welche die L-förmige Halterung neben der Taptic Engine befestigen:
-
Eine 1,3 mm Y000 Schraube
-
Eine 2,6 mm Kreuzschlitzschraube
-
Eine 3,5 mm Kreuzschlitzschraube
De Y000 schroef nam meteen ook de 2.4 mm standoff-schroef aan de achterzijde mee. Wat lastig om die uit elkaar te halen.
-
-
-
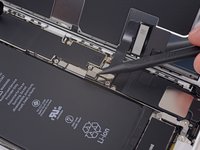
Trenne den verklebten Teil des Antennenflexkabels mit einem Plektrum von der Oberfläche des Lautsprechers.
-
-
-
Heble das Antennenflexkabels mit der Spudgerspitze hoch und löse es vom Logic Board ab.
-
-
-
Heble das andere Ende des Antennenflexkabels mit der Spudgerspitze hoch und löse es aus seinem Anschluss neben dem Lightning Port.
I was unable to plug this back in when re-assembling. My home button doesn’t work anymore. The connector it was supposed to plug into seems to spin around.
I had a similar experience during this repair. My problem was that the nib on the ribbon that actually connects in to the socket came off the ribbon cable when I initially detached the cable. I didn’t realize this until after the repair, but I also had to replace the Wifi Diversity cable entirely. A tell-tale sign is that you don’t receive good cell reception.
Lucas -
I did not notice until reassembly, but the antenna socket pulled off the board. I have no micro-soldering tools. The friction of the connector was greater than the solder holding it in place.
The little connector in the first picture ripped the component off the circuit board when trying to pry it up so be careful. I’m guessing it’s like a previous poster said and the socket is stronger than the glue/material that holds the component to the PCB. This was on a new board during disassembly trying to locate a potential problem. Phone still workings with WiFi and cellular normally but the cellular signal is down about 1/3 on average wherever I am.
Mine broke too and wifi still works fine
Does this have anything to donwith upper speaker connection?
-
-
-
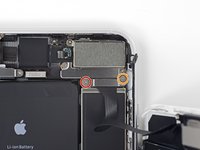
Entferne die Wi-Fi Antenne.
This had a little adhesive on the metal band. Couldn’t just pluck it out as shown. What I did worked but what I should’ve done is run my blue puck up and down the length.
I followed these steps to this point and maybe applied force in the wrong spot or too much force and it appears that when I loosened the wifi diversity antenna from the socket below the Taptic Engine module, it came up with the socket detached from the logic board. Did I just really screw up my iPhones WiFi capability?
-
-
In diesem Schritt verwendetes Werkzeug:Standoff Screwdriver for iPhones$5.49
-
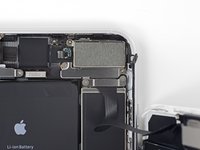
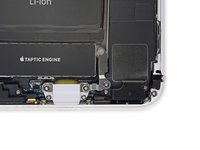
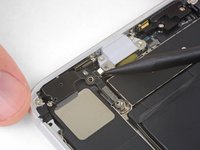
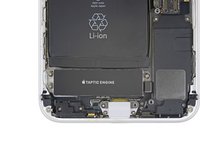
Entferne die drei Schrauben, welche die Taptic Engine befestigen:
-
Zwei 1,5 mm Kreuzschlitzschrauben
-
Eine 2,4 mm Abstandsschraube
-
-
-
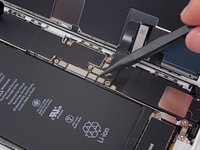
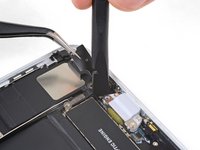
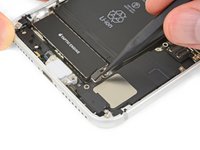
Heble mit der Spudgerspitze das Flexkabel zur Taptic Engine hoch und löse es ab.
-


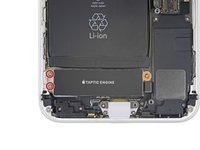


Vergleiche dein Ersatzteil mit dem Originalteil. Möglicherweise musst du fehlende Bauteile vom alten auf das neue Teil übertragen, oder Schutzfolien vom Neuteil abziehen, bevor du es einbauen kannst.
Um dein Gerät wieder zusammenzubauen, befolge die Anleitung in umgekehrter Reihenfolge.
Entsorge deinen Elektromüll sachgerecht.
Hat die Reparatur nicht ganz geklappt? In unserem Forum findest du Hilfe bei der Fehlersuche.
Rückgängig: Ich habe diese Anleitung nicht absolviert.
23 weitere Personen haben diese Anleitung absolviert.
Besonderer Dank geht an diese Übersetzer:innen:
100%

Diese Übersetzer:innen helfen uns, die Welt zu reparieren! Wie kann ich mithelfen?
Hier starten ›


6 Kommentare
After that , printfinger will work ?
iPhone had back glass crack and vibration feedback from the haptic engine and thought “dang, engine must be messed up from being dropped and cracked”. Well looking online and seeing common issues with “screws being lose”, I figured… Let us tackle this fix. 10 minutes later, screen is removed carefully and professionally and 2 screws were sliding around in the phone with 2 more barley holding the engine. Screwed in. Phone haptic is feeling good as new :D
Is it true that you cannot replace the engine? It have heard it will not work without some kind of data transfer? I broke the flex during a repair and need an answer!
Hello! No, the Taptic Engine is not paired to the device. You can replace the module without any software intervention.
what do I do about super stripped screws?
Ean Palacios - Antwort
I’m sorry, your comment slipped past my radar earlier. For future fixers that might see this and ask the same question, you can check out our stripped screw guide for some detailed advice.
Adam O'Camb -
Do you need a toolkit like the essential toolkit
Adam Palmer - Antwort
Hi Adam. Having a tool kit with all of the listed parts above is best. The screw heads are very small and each set of screws needs a very specific type of driver to remove them without stripping any of them.
Kyle Luksa -