Zum Hauptinhalt wechseln
Gemeinsam reparieren - Jetzt registrieren

Google Pixel 10a Loudspeaker Replacement

Was du brauchst

  1. Google Pixel 10a Loudspeaker Replacement, Prepare your Pixel for disassembly: Schritt 1, Bild 1 von 2 Google Pixel 10a Loudspeaker Replacement, Prepare your Pixel for disassembly: Schritt 1, Bild 2 von 2
    • Let your Pixel's battery drain below 25% before starting this repair. A charged lithium‑ion battery may catch fire if damaged.

    • Unplug all cables and completely power down your Pixel.

    • If your rear cover is bulging, your battery may be swollen—take appropriate precautions.

    Frag FixBot

    Kommentar hinzufügen

  2. Google Pixel 10a Loudspeaker Replacement, Eject the SIM card tray: Schritt 2, Bild 1 von 3 Google Pixel 10a Loudspeaker Replacement, Eject the SIM card tray: Schritt 2, Bild 2 von 3 Google Pixel 10a Loudspeaker Replacement, Eject the SIM card tray: Schritt 2, Bild 3 von 3
    • Insert a SIM card eject tool or a straightened paper clip into the small hole in the SIM card tray.

    • Press firmly to eject the tray.

    • Remove the tray.

    Frag FixBot

    Kommentar hinzufügen

  3. Google Pixel 10a Loudspeaker Replacement, Heat the rear cover: Schritt 3, Bild 1 von 1
    • The rear cover is secured by mild adhesive. Heating the cover softens the adhesive, making it easier to separate.

    • Use a hair dryer to heat the entire rear cover until it's hot to the touch.

    • For best practices on using a hair dryer to soften adhesive, check out this guide.

    • Alternatively, follow this guide if you're using an iOpener to heat the edge.

    Frag FixBot

    Kommentar hinzufügen

  4. Google Pixel 10a Loudspeaker Replacement, Create an opening gap: Schritt 4, Bild 1 von 2 Google Pixel 10a Loudspeaker Replacement, Create an opening gap: Schritt 4, Bild 2 von 2
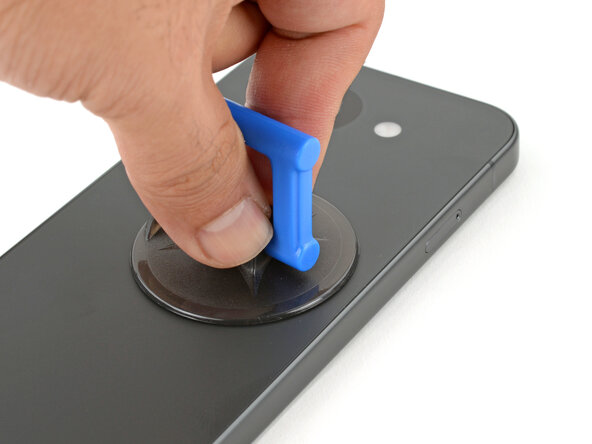
    • Apply a suction handle near the center of the rear cover's right edge, as close to the edge as possible.

    Frag FixBot

    Kommentar hinzufügen

  5. Google Pixel 10a Loudspeaker Replacement: Schritt 5, Bild 1 von 3 Google Pixel 10a Loudspeaker Replacement: Schritt 5, Bild 2 von 3 Google Pixel 10a Loudspeaker Replacement: Schritt 5, Bild 3 von 3
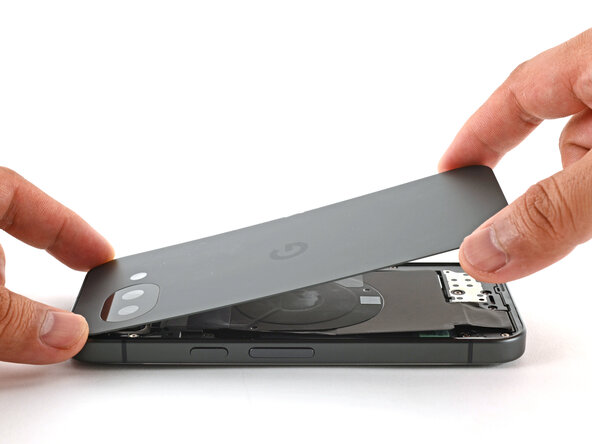
    • Pull up on the suction handle with strong, steady force until a gap forms between the cover and frame.

    • If you're having trouble, reheat the edge and try again.

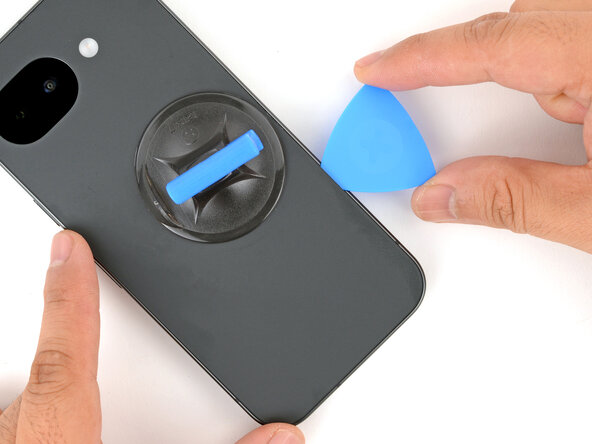
    • Insert the tip of an opening pick into the gap.

    Frag FixBot

    Kommentar hinzufügen

  6. Google Pixel 10a Loudspeaker Replacement, Adhesive information: Schritt 6, Bild 1 von 2 Google Pixel 10a Loudspeaker Replacement, Adhesive information: Schritt 6, Bild 2 von 2
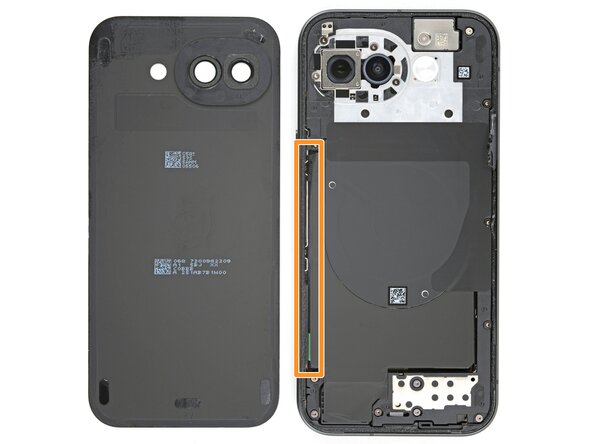
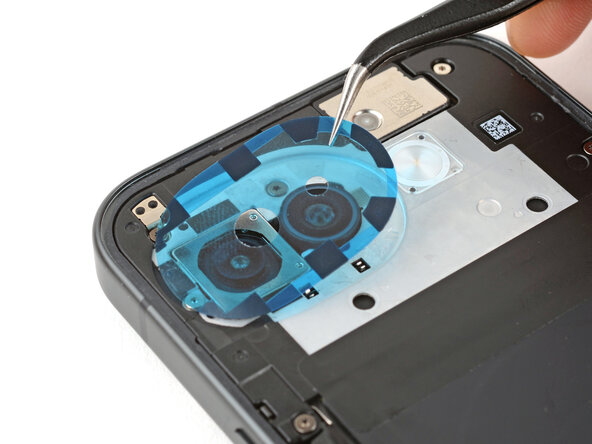
    • The rear cover is secured with adhesive around the frame perimeter and near the cameras. Use this picture as a reference while you separate the adhesive.

    • When separating the left edge adhesive, don't insert your pick more than 3 mm to avoid damaging the wireless charging coil and its graphite film.

    Frag FixBot

    Kommentar hinzufügen

  7. Google Pixel 10a Loudspeaker Replacement, Separate the rear cover: Schritt 7, Bild 1 von 3 Google Pixel 10a Loudspeaker Replacement, Separate the rear cover: Schritt 7, Bild 2 von 3 Google Pixel 10a Loudspeaker Replacement, Separate the rear cover: Schritt 7, Bild 3 von 3
    • Slide the opening pick around the entire perimeter to separate the adhesive.

    • If you're having trouble separating the adhesive, apply more heat and try again.

    Frag FixBot

    Kommentar hinzufügen

  8. Google Pixel 10a Loudspeaker Replacement: Schritt 8, Bild 1 von 3 Google Pixel 10a Loudspeaker Replacement: Schritt 8, Bild 2 von 3 Google Pixel 10a Loudspeaker Replacement: Schritt 8, Bild 3 von 3
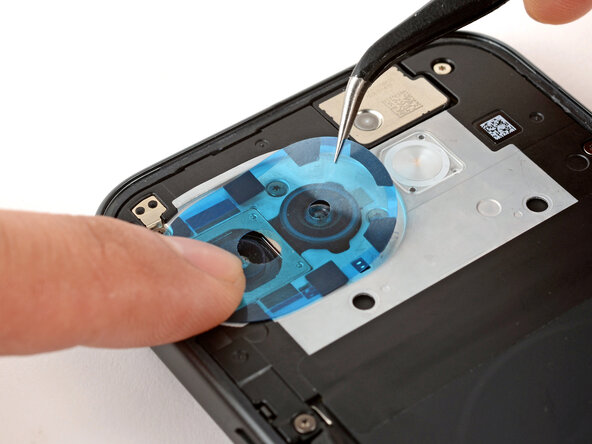
    • Insert the opening pick deeper near the top-left corner and pry to separate the adhesive around the camera bezel.

    Frag FixBot

    Kommentar hinzufügen

  9. Google Pixel 10a Loudspeaker Replacement: Schritt 9, Bild 1 von 2 Google Pixel 10a Loudspeaker Replacement: Schritt 9, Bild 2 von 2
    • Slowly peel up and remove the rear cover.

    Frag FixBot

    Kommentar hinzufügen

  10. Google Pixel 10a Loudspeaker Replacement, Remove the wireless charging assembly screws: Schritt 10, Bild 1 von 2 Google Pixel 10a Loudspeaker Replacement, Remove the wireless charging assembly screws: Schritt 10, Bild 2 von 2
    In diesem Schritt verwendetes Werkzeug:
    Magnetic Project Mat
    $16.96
    • Use a Torx Plus 3IP screwdriver to remove the fifteen 5.0 mm‑long screws securing the wireless charging assembly:

    • Thirteen gray screws

    • Two silver non-magnetic screws

    • Throughout this repair, keep track of each screw and make sure it goes back exactly where it came from to avoid damaging your phone.

    Frag FixBot

    Kommentar hinzufügen

  11. Google Pixel 10a Loudspeaker Replacement, Unclip the wireless charging assembly: Schritt 11, Bild 1 von 3 Google Pixel 10a Loudspeaker Replacement, Unclip the wireless charging assembly: Schritt 11, Bild 2 von 3 Google Pixel 10a Loudspeaker Replacement, Unclip the wireless charging assembly: Schritt 11, Bild 3 von 3
    • Use an opening pick to pry up and unclip the wireless charging assembly from the two cutouts—one near the bottom-right corner, and another on the left edge near the power button.

    Frag FixBot

    Kommentar hinzufügen

  12. Google Pixel 10a Loudspeaker Replacement, Remove the wireless charging assembly: Schritt 12, Bild 1 von 2 Google Pixel 10a Loudspeaker Replacement, Remove the wireless charging assembly: Schritt 12, Bild 2 von 2
    • Remove the wireless charging assembly.

    Frag FixBot

    Kommentar hinzufügen

  13. Google Pixel 10a Loudspeaker Replacement, Remove the battery connector cover: Schritt 13, Bild 1 von 1
    • Use a Torx Plus 3IP screwdriver to remove the 1.9 mm‑long screw securing the battery connector cover.

    Frag FixBot

    Kommentar hinzufügen

  14. Google Pixel 10a Loudspeaker Replacement: Schritt 14, Bild 1 von 2 Google Pixel 10a Loudspeaker Replacement: Schritt 14, Bild 2 von 2
    • Remove the battery connector cover.

    Frag FixBot

    Kommentar hinzufügen

  15. Google Pixel 10a Loudspeaker Replacement, Disconnect the battery: Schritt 15, Bild 1 von 3 Google Pixel 10a Loudspeaker Replacement, Disconnect the battery: Schritt 15, Bild 2 von 3 Google Pixel 10a Loudspeaker Replacement, Disconnect the battery: Schritt 15, Bild 3 von 3
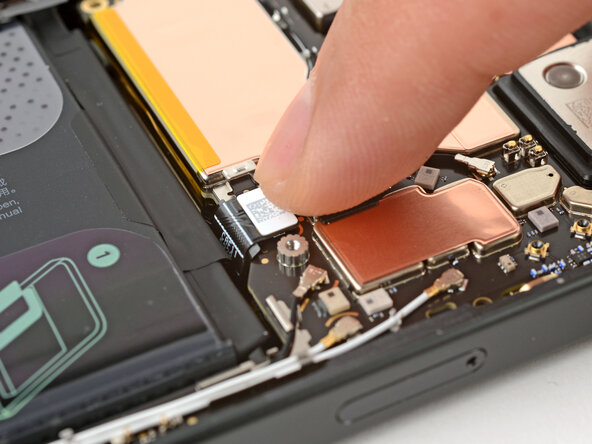
    • Insert the point of a spudger under the top-right corner of the battery connector.

    • Pry up to disconnect the battery.

    • Throughout the repair, pry only at the instructed area (also marked by a gold line on the circuit board) to prevent damage to the delicate components near the connector socket.

    Frag FixBot

    Kommentar hinzufügen

  16. Google Pixel 10a Loudspeaker Replacement, Disconnect the front camera: Schritt 16, Bild 1 von 3 Google Pixel 10a Loudspeaker Replacement, Disconnect the front camera: Schritt 16, Bild 2 von 3 Google Pixel 10a Loudspeaker Replacement, Disconnect the front camera: Schritt 16, Bild 3 von 3
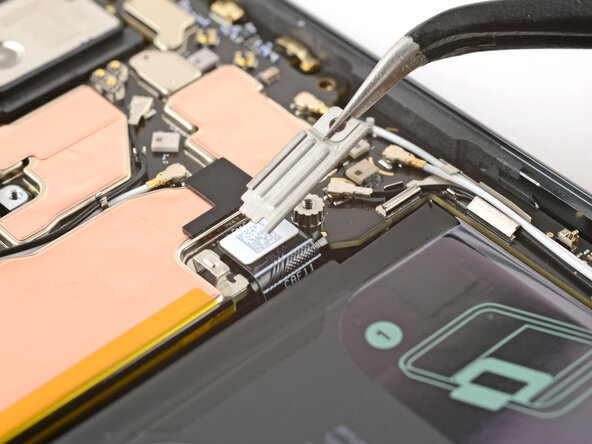
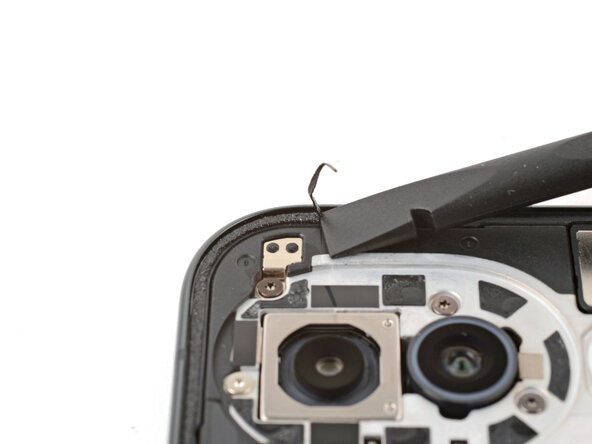
    • Insert the point of a spudger under the top-left corner of the front camera connector and pry up to disconnect it.

    • Flip the camera module out of its recess and onto the logic board, making sure not to tear the copper foil.

    Frag FixBot

    Kommentar hinzufügen

  17. Google Pixel 10a Loudspeaker Replacement, Remove the logic board screws: Schritt 17, Bild 1 von 2 Google Pixel 10a Loudspeaker Replacement, Remove the logic board screws: Schritt 17, Bild 2 von 2
    • Use a Torx Plus 3IP screwdriver to remove the two 2.9 mm‑long screws securing the logic board:

    • One at the top near the front camera

    • One near the bottom-right corner

    Frag FixBot

    Kommentar hinzufügen

  18. Google Pixel 10a Loudspeaker Replacement, Remove the logic board: Schritt 18, Bild 1 von 2 Google Pixel 10a Loudspeaker Replacement, Remove the logic board: Schritt 18, Bild 2 von 2
    • Insert the point of a spudger under the logic board near the front camera and pry up to loosen the board.

    Frag FixBot

    Kommentar hinzufügen

  19. Google Pixel 10a Loudspeaker Replacement: Schritt 19, Bild 1 von 2 Google Pixel 10a Loudspeaker Replacement: Schritt 19, Bild 2 von 2
    • Make sure you've ejected the SIM card tray.

    • Insert the point of a spudger in the notch at the bottom-right corner of the logic board and pry up to loosen the board.

    Frag FixBot

    Kommentar hinzufügen

  20. Google Pixel 10a Loudspeaker Replacement: Schritt 20, Bild 1 von 1
    • Bend the battery connector away from the logic board so it won't catch when you remove the board.

    Frag FixBot

    Kommentar hinzufügen

  21. Google Pixel 10a Loudspeaker Replacement: Schritt 21, Bild 1 von 2 Google Pixel 10a Loudspeaker Replacement: Schritt 21, Bild 2 von 2
    • Use your fingers to carefully lift and remove the logic board.

    Frag FixBot

    Kommentar hinzufügen

  22. Google Pixel 10a Loudspeaker Replacement, Remove the loudspeaker: Schritt 22, Bild 1 von 3 Google Pixel 10a Loudspeaker Replacement, Remove the loudspeaker: Schritt 22, Bild 2 von 3 Google Pixel 10a Loudspeaker Replacement, Remove the loudspeaker: Schritt 22, Bild 3 von 3
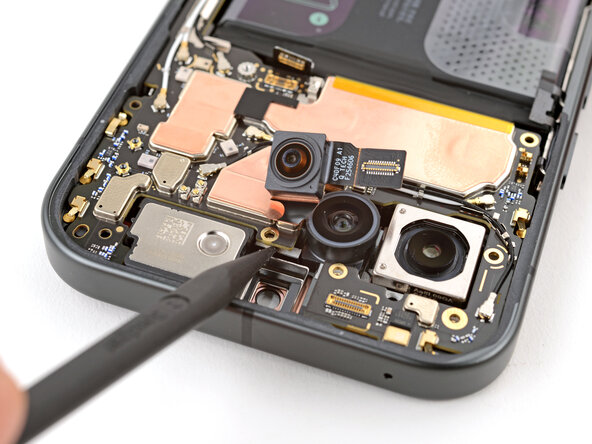
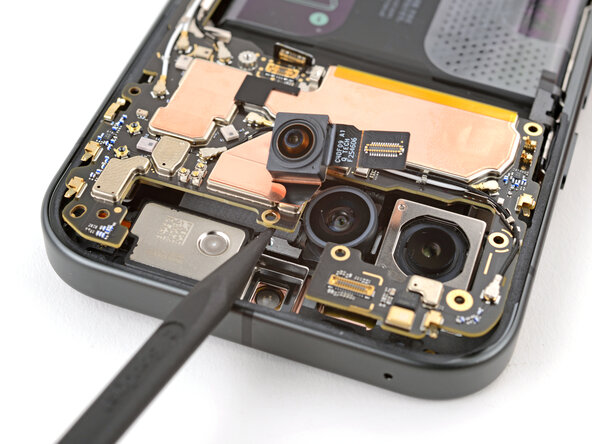
    • Use the point of an opening pick to pry up the top edge of the loudspeaker.

    • Remove the loudspeaker.

    Frag FixBot

    Kommentar hinzufügen

  23. Google Pixel 10a Loudspeaker Replacement, Disassembly complete: Schritt 23, Bild 1 von 1
    • Congratulations on completing disassembly! The remaining steps will show how to reassemble your phone.

    Frag FixBot

    Kommentar hinzufügen

  24. Google Pixel 10a Loudspeaker Replacement, Install the loudspeaker: Schritt 24, Bild 1 von 2 Google Pixel 10a Loudspeaker Replacement, Install the loudspeaker: Schritt 24, Bild 2 von 2
    • Lay the loudspeaker in place at a shallow angle and guide the gasket into its cutout.

    • Press down firmly on the loudspeaker until it clicks into place.

    Frag FixBot

    Kommentar hinzufügen

  25. Google Pixel 10a Loudspeaker Replacement, Logic board connector information: Schritt 25, Bild 1 von 1
    • The screen attaches to the underside of the logic board by a press connector, which you'll indirectly connect as you install the board. Follow the next few steps carefully to ensure this connects properly.

    Frag FixBot

    Kommentar hinzufügen

  26. Google Pixel 10a Loudspeaker Replacement, Install the logic board: Schritt 26, Bild 1 von 2 Google Pixel 10a Loudspeaker Replacement, Install the logic board: Schritt 26, Bild 2 von 2
    • Insert the bottom edge of the logic board at a shallow angle into the frame so the USB-C port presses snugly against its frame cutout.

    Frag FixBot

    Kommentar hinzufügen

  27. Google Pixel 10a Loudspeaker Replacement: Schritt 27, Bild 1 von 2 Google Pixel 10a Loudspeaker Replacement: Schritt 27, Bild 2 von 2
    • Use your finger to press the logic board near the USB-C port until you feel the board click in place.

    • If you're having trouble, try realigning the logic board so it presses snugly against the frame.

    • The logic board should fully seat against the plastic alignment pin.

    Frag FixBot

    Kommentar hinzufügen

  28. Google Pixel 10a Loudspeaker Replacement: Schritt 28, Bild 1 von 3 Google Pixel 10a Loudspeaker Replacement: Schritt 28, Bild 2 von 3 Google Pixel 10a Loudspeaker Replacement: Schritt 28, Bild 3 von 3
    • Bend the battery connector out of the way so it won't be trapped under the logic board.

    • Lay the top part of the logic board in its recess.

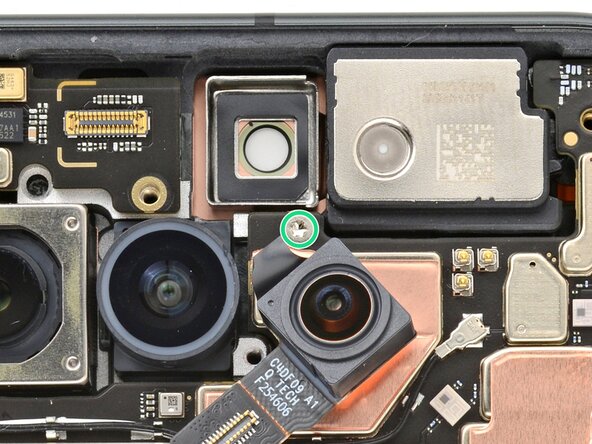
    • Use the point of a spudger to help shift the rear cameras into their cutouts.

    Frag FixBot

    Kommentar hinzufügen

  29. Google Pixel 10a Loudspeaker Replacement, Install the logic board screws: Schritt 29, Bild 1 von 2 Google Pixel 10a Loudspeaker Replacement, Install the logic board screws: Schritt 29, Bild 2 von 2
    • Use a Torx Plus 3IP screwdriver to install the two 2.9 mm‑long logic board screws:

    • One at the top near the front camera

    • One near the bottom-right corner

    Frag FixBot

    Kommentar hinzufügen

  30. Google Pixel 10a Loudspeaker Replacement, Install the front camera: Schritt 30, Bild 1 von 2 Google Pixel 10a Loudspeaker Replacement, Install the front camera: Schritt 30, Bild 2 von 2
    • Use a spudger or your finger to align and press the front camera into its cutout.

    Frag FixBot

    Kommentar hinzufügen

  31. Google Pixel 10a Loudspeaker Replacement: Schritt 31, Bild 1 von 2 Google Pixel 10a Loudspeaker Replacement: Schritt 31, Bild 2 von 2
    Frag FixBot

    Kommentar hinzufügen

  32. Google Pixel 10a Loudspeaker Replacement, Connect the battery: Schritt 32, Bild 1 von 2 Google Pixel 10a Loudspeaker Replacement, Connect the battery: Schritt 32, Bild 2 von 2
    • Use your finger to align and press the battery press connector over its socket.

    • Don't try to force the connector into place. If you're having trouble, reposition it and try again.

    Frag FixBot

    Kommentar hinzufügen

  33. Google Pixel 10a Loudspeaker Replacement, Install the battery connector cover: Schritt 33, Bild 1 von 2 Google Pixel 10a Loudspeaker Replacement, Install the battery connector cover: Schritt 33, Bild 2 von 2
    • Hook the left edge of the battery connector cover in place, then lay the cover down flat.

    Frag FixBot

    Kommentar hinzufügen

  34. Google Pixel 10a Loudspeaker Replacement: Schritt 34, Bild 1 von 1
    • Use a Torx Plus 3IP screwdriver to install the 1.9 mm‑long battery connector cover screw.

    Frag FixBot

    Kommentar hinzufügen

  35. Google Pixel 10a Loudspeaker Replacement, Install the wireless charging assembly: Schritt 35, Bild 1 von 3 Google Pixel 10a Loudspeaker Replacement, Install the wireless charging assembly: Schritt 35, Bild 2 von 3 Google Pixel 10a Loudspeaker Replacement, Install the wireless charging assembly: Schritt 35, Bild 3 von 3
    • Lay the wireless charging assembly onto the frame.

    • Use your fingers to press around the perimeter to engage all of its clips.

    • Stop if the assembly feels like it won't clip in. Check if anything underneath it may be out of place.

    Frag FixBot

    Kommentar hinzufügen

  36. Google Pixel 10a Loudspeaker Replacement: Schritt 36, Bild 1 von 2 Google Pixel 10a Loudspeaker Replacement: Schritt 36, Bild 2 von 2
    • Use a Torx Plus 3IP screwdriver to install the fifteen 5.0 mm‑long wireless charging assembly screws:

    • Thirteen gray screws

    • Two silver non-magnetic screws

    Frag FixBot

    Kommentar hinzufügen

  37. Google Pixel 10a Loudspeaker Replacement, Test your repair: Schritt 37, Bild 1 von 1
    • Now is a good time to test your repair:

    • Power on your phone and check all functions.

    • Run a diagnostics test with the built-in Pixel Diagnostic tool.

    • If the screen or fingerprint sensor doesn't work correctly, you may need to reconnect the screen connector.

    • Fully power off your phone before you continue with reassembly.

    Frag FixBot

    Kommentar hinzufügen

  38. Google Pixel 10a Loudspeaker Replacement, Clean the frame: Schritt 38, Bild 1 von 3 Google Pixel 10a Loudspeaker Replacement, Clean the frame: Schritt 38, Bild 2 von 3 Google Pixel 10a Loudspeaker Replacement, Clean the frame: Schritt 38, Bild 3 von 3
    • Take your time cleaning the frame. A clean frame allows replacement adhesive to lay evenly, ensuring a better bond.

    • Use your fingers, spudger, or tweezers to remove the adhesive from the frame perimeter.

    • If you scrape up a piece big enough to grip with your fingers, you can pull long sections of the adhesive up. Pull slowly and straight in the opposite direction of the adhesive.

    • Use some high concentration (>90%) isopropyl alcohol and a lint-free cloth (or coffee filter) to remove any adhesive residue.

    Frag FixBot

    Kommentar hinzufügen

  39. Google Pixel 10a Loudspeaker Replacement, Replace the camera bezel adhesive: Schritt 39, Bild 1 von 2 Google Pixel 10a Loudspeaker Replacement, Replace the camera bezel adhesive: Schritt 39, Bild 2 von 2
    • Inspect the adhesive blocks surrounding the rear cameras. If they're clean and unwrinkled, you can reuse them and skip down three steps.

    • Use the point of a spudger to pry up and remove the seven adhesive blocks surrounding the rear cameras.

    Frag FixBot

    Kommentar hinzufügen

  40. Google Pixel 10a Loudspeaker Replacement: Schritt 40, Bild 1 von 3 Google Pixel 10a Loudspeaker Replacement: Schritt 40, Bild 2 von 3 Google Pixel 10a Loudspeaker Replacement: Schritt 40, Bild 3 von 3
    • Peel the clear liner from the camera bezel adhesive.

    • Carefully align and lay the adhesive in place. Use the rear cameras to help with alignment.

    Frag FixBot

    Kommentar hinzufügen

  41. Google Pixel 10a Loudspeaker Replacement: Schritt 41, Bild 1 von 3 Google Pixel 10a Loudspeaker Replacement: Schritt 41, Bild 2 von 3 Google Pixel 10a Loudspeaker Replacement: Schritt 41, Bild 3 von 3
    • Use your fingers to press the camera bezel adhesive onto the frame.

    • Peel and remove the top blue liner from the adhesive.

    • There will still be a thin liner covering the adhesive.

    Frag FixBot

    Kommentar hinzufügen

  42. Google Pixel 10a Loudspeaker Replacement, Replace the rear cover interior adhesive: Schritt 42, Bild 1 von 2 Google Pixel 10a Loudspeaker Replacement, Replace the rear cover interior adhesive: Schritt 42, Bild 2 von 2
    • Inspect the interior adhesive blocks on the rear cover. If they're clean and unwrinkled, you can reuse them and skip down two steps.

    • Use a spudger to scrape and remove the interior adhesive blocks from the rear cover.

    Frag FixBot

    Kommentar hinzufügen

  43. Google Pixel 10a Loudspeaker Replacement: Schritt 43, Bild 1 von 3 Google Pixel 10a Loudspeaker Replacement: Schritt 43, Bild 2 von 3 Google Pixel 10a Loudspeaker Replacement: Schritt 43, Bild 3 von 3
    • Peel the clear liner from the interior adhesive sheet.

    • Align and press the adhesive onto the rear cover. Use the camera cutout to help with alignment.

    • Slowly peel and remove the large liner.

    Frag FixBot

    Kommentar hinzufügen

  44. Google Pixel 10a Loudspeaker Replacement, Install the rear cover adhesive: Schritt 44, Bild 1 von 1
    • Without peeling any liners, hold the rear cover adhesive over the phone to figure out how it'll sit on the frame. Use the camera cutout to help with orientation.

    Frag FixBot

    Kommentar hinzufügen

  45. Google Pixel 10a Loudspeaker Replacement: Schritt 45, Bild 1 von 1
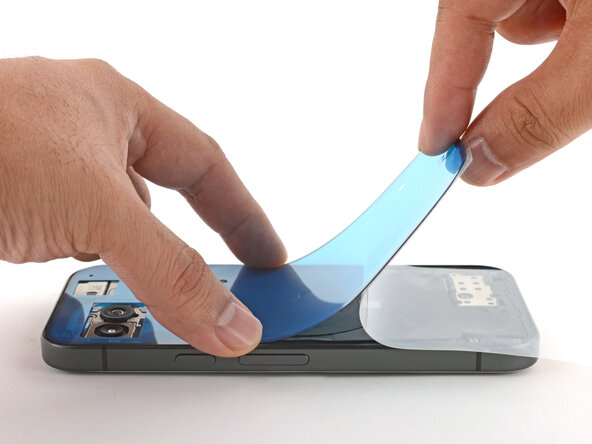
    • Peel down the top half of the clear liner to expose the adhesive—don't fully remove the liner yet.

    Frag FixBot

    Kommentar hinzufügen

  46. Google Pixel 10a Loudspeaker Replacement: Schritt 46, Bild 1 von 3 Google Pixel 10a Loudspeaker Replacement: Schritt 46, Bild 2 von 3 Google Pixel 10a Loudspeaker Replacement: Schritt 46, Bild 3 von 3
    • Take your time aligning the adhesive to the frame. If you apply it incorrectly, you'll need to restart with new adhesive.

    • Align and lay the top edge of the adhesive onto the frame.

    • Press down along the top edge to secure the alignment.

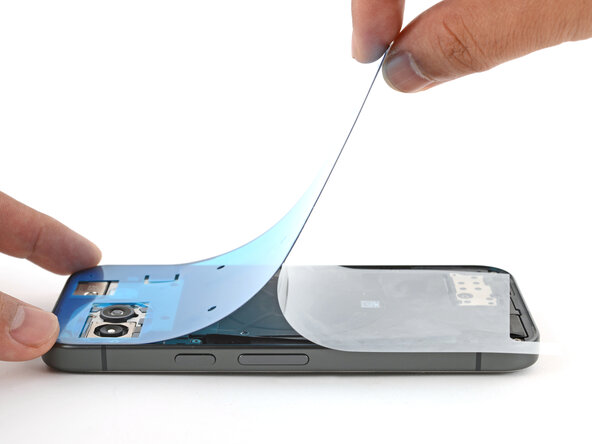
    • Slowly peel away the clear liner as you press the rest of the adhesive in place.

    Frag FixBot

    Kommentar hinzufügen

  47. Google Pixel 10a Loudspeaker Replacement: Schritt 47, Bild 1 von 2 Google Pixel 10a Loudspeaker Replacement: Schritt 47, Bild 2 von 2
    • Use a spudger to press the adhesive onto the entire frame perimeter.

    Frag FixBot

    Kommentar hinzufügen

  48. Google Pixel 10a Loudspeaker Replacement: Schritt 48, Bild 1 von 2 Google Pixel 10a Loudspeaker Replacement: Schritt 48, Bild 2 von 2
    • Peel up and remove the large liner from the rear cover adhesive.

    Frag FixBot

    Kommentar hinzufügen

  49. Google Pixel 10a Loudspeaker Replacement: Schritt 49, Bild 1 von 1
    • If you installed replacement camera bezel adhesive, remove all remaining liners from it.

    Frag FixBot

    Kommentar hinzufügen

  50. Google Pixel 10a Loudspeaker Replacement: Schritt 50, Bild 1 von 1
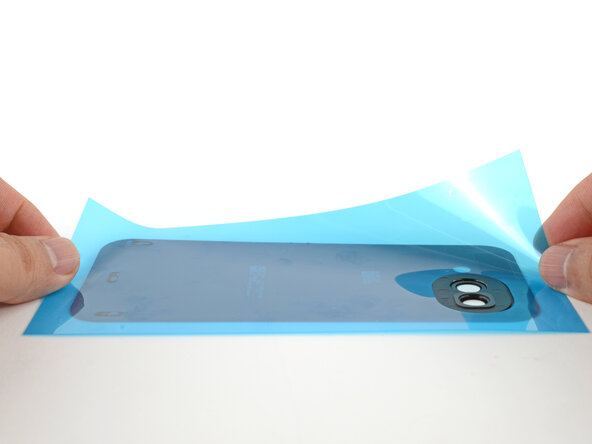
    • Remove the perimeter adhesive liner.

    • Carefully inspect the frame for any remaining liners and remove them.

    Frag FixBot

    Kommentar hinzufügen

  51. Google Pixel 10a Loudspeaker Replacement, Inspect the rear camera glass: Schritt 51, Bild 1 von 2 Google Pixel 10a Loudspeaker Replacement, Inspect the rear camera glass: Schritt 51, Bild 2 von 2
    • Make sure the rear cover camera cutouts are clean. Carefully wipe them with a lint-free cloth if needed.

    • Remove any lens caps or liners from the rear cameras. Make sure the lenses are clean. Gently wipe them with a lint-free cloth if needed.

    Frag FixBot

    Kommentar hinzufügen

  52. Google Pixel 10a Loudspeaker Replacement, Install the rear cover: Schritt 52, Bild 1 von 3 Google Pixel 10a Loudspeaker Replacement, Install the rear cover: Schritt 52, Bild 2 von 3 Google Pixel 10a Loudspeaker Replacement, Install the rear cover: Schritt 52, Bild 3 von 3
    • Lay the rear cover over the frame.

    • Firmly press around the perimeter to secure the adhesive.

    • You can also hold your phone and squeeze firmly around the perimeter to strengthen the adhesive bond.

    • For an even more secure bond, lay your phone screen-down on a clean and flat surface underneath a few books overnight.

    Frag FixBot

    Kommentar hinzufügen

  53. Google Pixel 10a Loudspeaker Replacement, Insert the SIM card tray: Schritt 53, Bild 1 von 2 Google Pixel 10a Loudspeaker Replacement, Insert the SIM card tray: Schritt 53, Bild 2 von 2
    • Insert the SIM card tray into its slot on the Pixel.

    Frag FixBot

    Kommentar hinzufügen

Abschluss

Congratulations on completing your repair!

Take your e-waste to an R2 or e-Stewards certified recycler.

To run a diagnostics test with the built-in Pixel Diagnostic tool, click here.

Repair didn’t go as planned? Try some basic troubleshooting, or ask our Answers community for help.

Rückgängig: Ich habe diese Anleitung nicht absolviert.

Arthur Shi

Mitglied seit: 01/03/18

337.150 Reputation

849 Anleitungen geschrieben

0 Kommentare zur Anleitung

Kommentar hinzufügen

Seitenaufrufe:

Letzte 24 Stunden: 0

Letzte 7 Tage: 13

Letzte 30 Tage: 60

Insgesamt: 160