Einleitung
Zu Schritt 1 der AnleitungApple has literally been calling their iPod Touch 6th Generation "the best iPod touch yet." While they are giving their music box some of the iPhone's newest duds, only teardown will tell if this iPod is up to repairability snuff. Join us for some sweet disassembly, and some spicy X-ray action.
As always, keep in touch (get it, haha) with us by following iFixit on Facebook, Twitter, and Instagram.
Was du brauchst
Werkzeuge


Mehr anzeigen …
Einführungsvideo
-
-
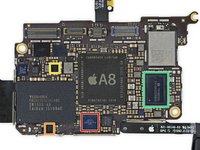
With the same A8 processor and M8 coprocessor as the iPhone 6, it's hard not to get excited about the next-generation iPod Touch. Let's check specs:
-
4-inch 1136 x 640 pixels (326 ppi) Multi-Touch IPS Retina display
-
802.11a/b/g/n/ac Wi‑Fi + Bluetooth 4.1 wireless technology (a whole .1 better than the 5th gen!)
-
Six-axis gyro + accelerometer
-
8 MP, 1080p iSight camera with ƒ/2.4 aperture and 1.2 MP, 720p HD Facetime camera with ƒ/2.2 aperture
-
Shiny new model number: A1574
-
-
-
Being that the iPod Touch hasn't seen a full-blown update since 2012, we'd like to see what we're up against.
-
Fortunately, we brought friends. With superpowers.
-
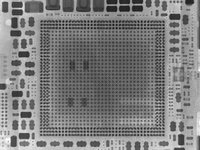
Cry havoc and let fly the X-rays.
-
-
-
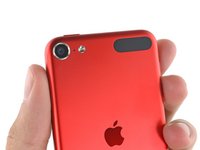
This new Touch now comes in gold, in addition to blue, pink, (Product)Red, silver, and space gray.
-
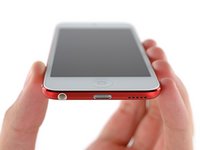
The bottom of the device contains no surprises with a now-familiar Lightning port, headphone jack, and speaker grille.
-
Unlike recent iPhones, this Touch lacks a Touch ID sensor. Although it sacrifices Apple Pay, this is good news for repairability since Touch ID buttons are paired to their corresponding processor.
-
On the other side, the inside, we catch a glimpse of the home button and Lightning connector.
-
-
In diesem Schritt verwendetes Werkzeug:iSclack$24.99
-
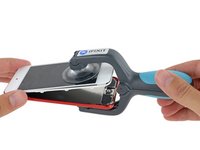
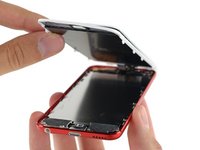
Heat. iSclack. Repeat—this digitizer/LCD panel is no match for our opening procedure.
-
With the display assembly out of the way, we're one step closer to the innards.
-
-
-
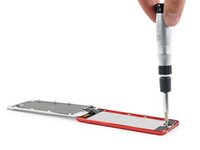
We're eager to delve deeper into this new Touch, so we grab a screwdriver and set to work on extracting the EMI shield.
-
Lifting the shield, we get a glimpse of familiar territory. So far things look pretty darn similar to the 2012 vintage.
-
-
-
-
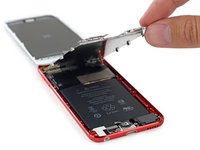
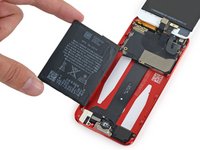
We've been down this road before, and we're pretty confident in our technique for getting the battery out. Unless of course, something has changed...
-
This Touch totes a 3.83 V, 3.99 Wh battery with a rating of 1043 mAh, as opposed to the 3.7 V, 3.8 Wh, 1030 mAh rated battery found in the 5th Generation Touch.
Here's a video describing how to desolder and swap the battery. Just remove the two stickers, and you'll see the three ribbon cable contacts.
-
-
-
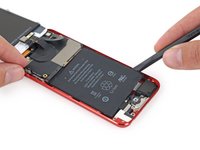
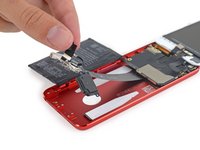
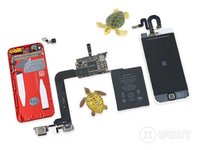
After the battery comes the lower assembly, home to the Lightning connector, speaker, microphone, headphone jack, and home button switch. Say that five times fast.
-
In lieu of that wiggly yellow flex cable, a new, straight ribbon cable connects the lower assembly to the underside of the logic board.
-
-
-
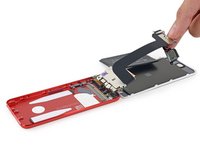
A little bit of careful spudgering goes a long way.
-
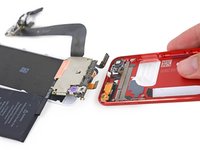
We pop off these connectors and are free to separate the two assemblies—the rear case assembly, and the "everything else" assembly.
-
Leftover in the rear case:
-
Antenna assembly
-
Battery adhesive (oops)
-
Snarled volume button/power button/rear flash/microphone cable assembly
-
-
-
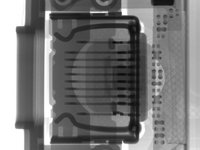
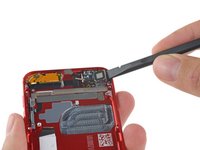
With a gentle flick of the wrist, the rear-facing camera is free and ready to pass inspection alongside its cousin, the iPhone 6 camera...
-
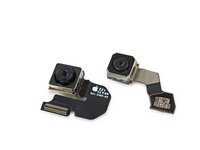
For your viewing pleasure: the 8 MP iPhone 6 camera (left) and the 8MP iPod Touch camera (right).
-
Physical size serves as a pretty accurate indicator of relative quality. Despite the equal pixel count, the Touch's camera lacks some of its cousin's finer features, such as the sapphire crystal lens cover and auto image stabilization.
-
The Touch's ƒ/2.4 aperture also falls short of the 6's ƒ/2.2.
-
-
-
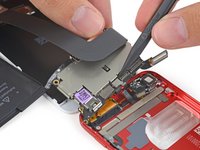
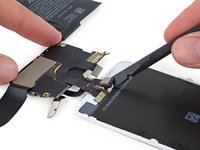
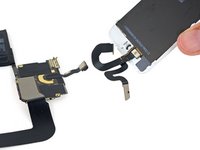
Turning our attention to the "everything else" assembly, we quickly set to work on liberating the front-facing camera, and find ourselves facing a tangle of display cables. It's a good thing our teardown engineer has the touch it takes to handle this messy bundle.
-
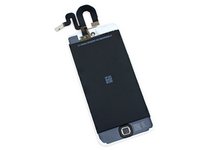
With some deft tweezing, we are able to extract the front panel.
-
The display is almost the same as previous Touches, but hey, it has a white bezel now!
Would this lcd work for the 5TH gen? Or is the frame dramatically different?
We haven't tested it, but physically there doesn't seem to be any difference between the 5th and 6th gen front panels.
1610A2 not display controller. This is Lightning port controller ! and 6573 is diplay PMU.
We've updated the 6573. Good catch! Thanks.
Possible to put a nano-sim in here somewhere?
did they outfit t6g with the capability of 3g/4g sims?
Millions to who figures it out....
I'll bite... after that, all you need is somewhere to hook up an aerial and GSM radio... then you'll have something a lot like an iPhone 5C.
Adam C -
So i didn't see this listed, but is it safe to assume the battery is still soldered to the mainboard?
Yep, it's definitely still soldered. The assembly in the layout (battery/logic board/ports) is as separated as it gets without desoldering.
Hi. Will the new iPod touch 6th Gen dock onto an iPod touch 5th Gen docking cradle which has audio out (the cradle has 2 pins; one for audio (into the headphone socket), the other charging (lightning connector). I have an iPhone 5 and want to be sure the iPod Touch 6 will dock properly on both connections on the dock I have for iPhone 5.
where can i purchase the lcd digitizer for the ipod touch 6th generation????????
is it true? I curently looking for screen of itouch 6th gen and i cant find . im thinkibg to use itouch 5th gen sceeen instead. Is it really work? does the graphics change or anything change ? pls answer me thank you
Looks like they kept the same Cirrus Audio controller since the last refresh 3 years ago, which is not really acceptable since these cannot power decent size headphones properly due to it being underpowered. This is why I have to use a FiiO E18 portable amp / DAC to bypass the internal amp to power headphones properly.
-
-
-
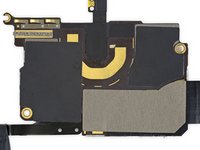
Let's touch some of these chips, shall we? This logic board is packing:
-
Apple A8 APL1011 SoC + SK Hynix RAM H9CKNNN8KTMRWR-NTH 1 GB LPDDR3 RAM (Same as iPhone 6, but underclocked to 1.10 GHz per core)
-
NXP Semiconductors LPC18B1UK ARM Cortex-M3 Microcontroller (better known as the M8 Motion Coprocessor)
-
Toshiba THGBX3G7D2KLA0C 128 Gb (16 GB) NAND Flash
-
InvenSense MP67B 6-axis Gyroscope and Accelerometer
-
Universal Scientific Industrial 339S0231 Bluetooth/Wi-Fi Module (Probably based on Broadcom BCM4354)
-
Broadcom BCM5976 Touchscreen Controller
-
Texas Instruments 343S0645 Touchscreen Controller
Do have a schematic diagram for this iPod
Thanks
-
-
-
More chips, more fun.
-
Apple 338S1116 Cirrus Audio Codec
-
NXP Semiconductors 1610A2 Display Interface Controller
-
Texas Instruments TPS65730A0P Power Management IC
-
Apple 338S00040-AZ Power Management IC (presumably a variation of the 338S1251-AZ PMIC found in the iPhone 6)
-
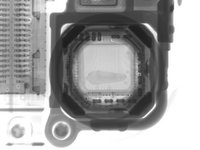
X-ray bonus round! Let's not forget our closer look at the uber-powerful A8 processor.
-
-
-
iPod
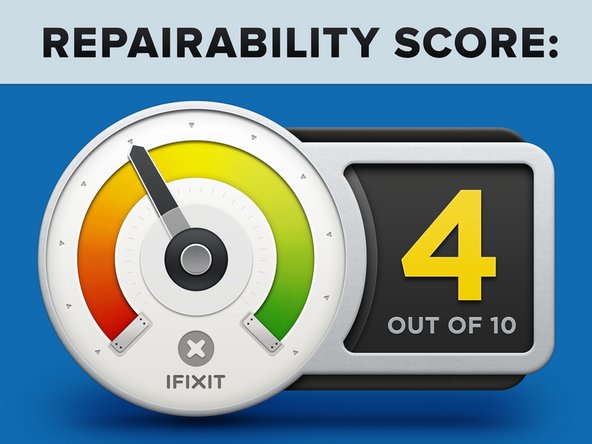
turtleTouch 6th Generation Repairability Score: 4 out of 10 (10 is easiest to repair) -
While very difficult, opening the case and replacing components is not impossible.
-
The battery is adhered with pull tabs that should aid in battery replacement.
-
Many components are soldered together, requiring either a very difficult or a very expensive repair if any one part breaks.
-
There are no external screws. Instead, a combo of clips and adhesive makes it difficult to open the case.
-
Ribbon cables connected to the logic board run over the top and connect on the bottom, making it difficult to remove the board or disconnect the cables.
-
And of course, a big high-five to our pals at Creative Electron for their awesome images and expertise!
-


25 Kommentare
The top shield pops off but then the support assembly that holds the shield will cover some components. It was a real pain trying to clean out corrosion in the upper right corner. Can be removed via hot air though.
Joe -
iFixit didn't mention the new, much larger (and therefore louder) speaker thanks to the removal of the Apple Loop connector! That's a real win!
What about the Hard Drive? I didn't see one any where in there. I have a 32GB model and I would like to upgrade to a SSD, is that possible? Mine constantly needs to be rebooted for some reason (in fact now it won't even reboot). Is there a way to fix it?
There is no hard drive. All memory is solid state (IC’s) soldered to the logic board.
one can upgrade the SSD, in this unit it is the large IC labelled TOSHIBA. I came here for the layout/orientation of the SSD/NAND chip haha
The Toshiba chip?????
Um are you referring to an iPod classic? Those have hard drives but the iPod touch just has storage soldered on the motherboard that can’t be upgraded.
This iPod has flash storage, the only iPods to have a HDD were the Classic and Mini lines.
Do you want to install woofers and tweeters with the ssd ?
I wanted to post this a long time ago: In step 6 they say "(Although we're scratching our heads about how to peel out a tab that's under the logic board)." It's quite simple!
Remove the screws for the lower assembly.
Pull the first battery tab out.
Remove the screws for the logic board so it is floating.
Lift the battery on the right edge a *little* bit along with the logic board and slide the lower assembly toward the right, up and over the edge of the housing. You just slide the jack assembly out the right side while also sliding the ribbon out from under the logic board. The whole asm will sit outside the housing.
Now you have to start lifting the board from the right a *tiny* bit. Don't pull hard or you'll tear ribbons. You have to disconnect the antenna and 2 ribbons while holding the phone on its edge. Almost no room....
After that the logic board with the jack ribbon and LCD can be rotated to the left, outside the case and lay on the table.
Now you can pull the 2nd adhesive tab easily!
I need schematic diagram for iPod touch 6th generation
Hello,
Can you tell me if it is still required to go through the elaborate battery removal technique that the link referred to? Or is it a simpler procedure as it seems to be in this posting?
I have also wondered if it may be possible to extend the power connection wires to the outside and connect a battery externally for easier future replacement. The iPod 6 is thinner than the iPhone 5, and rigid cases made for the iPhone have a gap when inserting an iPod 6. Perhaps that gap could house an external battery?
Thank you.
how much is the logic board on an ipod 6.
How much is logic board on a ipod 6.
I replaced the screen on my Ipod 6th gen and it went swell but now. I have 2 issues. The front camera ha stopped working and the screen has lines on it when the EMI shield is on.
Found some wrong information. Please kindly make it sure if i am right
1st— ( NXP Semiconductors 1610A2 Display Interface Controller ) infact this U2 IC which is Charging related and you marked this as Display IC
2nd—(Texas Instruments TPS65730A0P Power Management IC ) this is actually Display Interface Controller and you marked as Power Management IC
Hope fully you guys would Check my comment and make it Correct to the world
ThankYou
Ishak
ishak.mk@yahoo.com
can the 1610A2 U2 of this ipod work on iPhone 5s ?
hello guys , does the 1610A2 ic chip work on iPhone 5s ?
thanks for sharing the post.
Included with the repair kit was a double sided tape matching the size of the ipod itself, yet I see no info in the video or written instructions as to what that extra adhesive part is for…
nice guide
can you do a battery replacement guide?
Does anyone have a screw location guide for the screw length for the gen. 6?