
Oral-B iO Akku tauschen

Einleitung
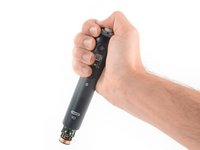
Zu Schritt 1 der AnleitungBenutze diese Anleitung, um den Akku deiner Oral-B iO auszutauschen.
Wenn dein Akku aufgebläht ist, musst du entsprechende Vorsichtsmaßnahmen treffen. Entlade deine Zahnbürste aus Sicherheitsgründen aus unter 25%, bevor du mit der Reparatur beginnst. Dadurch wird das Risiko verringert, dass sich der Akku entzündet oder explodiert, falls er versehentlich während der Reparatur beschädigt wird.
Du brauchst für diese Reparatur die Ladestation deiner Oral-B iO.
Was du brauchst


-
-
Drehe die Ladestation deiner Oral-B iO um.
-
Richte die drei Vertiefungen auf der silberfarbenen unteren Abdeckung der iO mit den Kerben unten an der Ladestation aus.
-
Drücke die Zahnbürste mit leichtem Druck in die Ladestation und drehe sie etwa 90° gegen den Uhrzeigersinn, um das Gewinde an der unteren Abdeckung zu entriegeln.
-
-
-
Drehe die untere Abdeckung aus der Zahnbürste heraus.
-
Entferne die untere Abdeckung.
Hallo, beim entfernen des Deckels ist Vorsicht geboten, es befindet sich eine Feder im Innere
Posso utilizzare ogni tipi di batteria Aa?
-
-
In diesem Schritt verwendetes Werkzeug:Tweezers$4.99
-
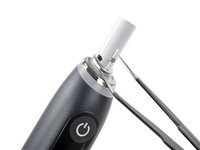
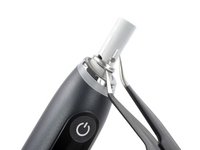
Schiebe eine Pinzette mit einer der Spitzen oder einen kleinen Schlitzschraubendreher unter den Ring.
-
Heble damit den Metallring vorsichtig nach oben.
Die Zahnbürsten sind heutzutage auch nur noch Müll. Halten nicht lange und verdrecken, das ist unglaublich. Egal ob oral-b oder Phillips Sonicare. Beides nicht gut durchdacht.
Das Motto des 21. Jahrhunderts, Geld machen und Rohstoffe verschwenden. Mit minderwertiger Produktion.
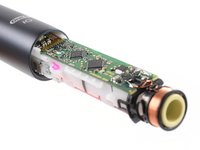
It is normal to find the circuit wet after openning the toothbrush?
No! Finding the circuit wet is a sign of water damage. I suggest replacing the internals or unfortunately buying a new one.
-
-
-
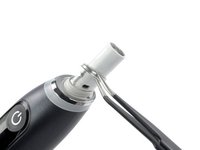
Entferne den Metallring mit deinen Fingern oder einer Pinzette.
-
-
-
Entferne den Bürstenkopf von deiner Zahnbürste.
-
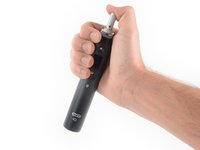
Halte die Zahnbürste in einer Hand und drücke die Oberseite der Zahnbürsten-Baugruppe mit dem Daumen herunter.
-
Ziehe die Zahnbürsten-Baugruppe unten aus der Zahnbürste heraus.
Was kostet eine neue Batterie bzw. Akku
Du findest sie bei ebay für zwischen 3 und 10 Euro.
Bjr pour brosse à dent ORAL-B IO 9S on me dit qu'il n'est pas possible de changer la batterie, il faut changer le tout pour 155€. Qui peux me dire si je peux faire ce changement (ma brosse à dent n'oscille pas es ce à cause de cela) Oral B ne vend pas de batterie pourquoi, il préfère sans doute qu'on achète une nouvelle brosse à dents.Merci pour vos réponses
-
-
-
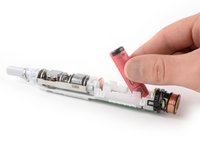
Hole den Akku aus seiner Vertiefung am unteren Ende der Zahnbürsten-Baugruppe heraus.
-
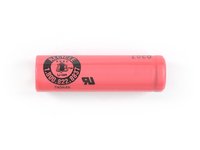
Entferne den Akku.
Does this fix do any damage to the brush and where can I find and buy the replacement battery for the brush?
Looks like it’s impossible to find that exact battery (in Canada at least). Does anyone know if any other battery model should be a viable substitute?
Did anyone try if a higher capacity battery with protection is working? Like a Keeppower P1450C3 1100 mAh.
The drawback of the IO is its weak battery life. Not even a week is possible while my old Genius 3764 Type was able to run for 1-2 weeks without charging (ok came without this nice display and LEDs).
The Sanyo measures 14,0 mm x 50,0 mm. The 1100 mAh with protection measures 14,3 mm x 52 mm.
I try it with the Keeppower P1450C3 1100 mAh. It work, but it fits really hard ;).
Does it give you roughly 50% more use? Should give you almost 14 days of battery, 2min use twice a day ?
Ein wichtiger Schritt wurde übersehen, oben muss der kleine Crome/Metallring ab, nach dem das innere Teil ausgebaut wurde. Dann den Akku tauschen und das Gehäuse gut sauber machen. Jetzt die Technik wieder in die Außenhülle einschieben. Dabei drückt es oben die kleine Gummidichtung nach außen. Das ist richtg so. -jetzt unten alles verschließen und zuletzt den Metallring vorrichtig von oben draufschieben, bis er einrastet. Setzt ist die Bürste auch wieder wasserdicht.
Habe das zu spät gelesen und irgendwie die alte Anleitung gehabt von ifixit... Jetzt ist die Zahnbürste kaputt :( Display ausgefallen
I used the iFixit Prying and Opening Tool Assortment pack I bought from MicroCenter in Madison Heights, MI, to replace the battery in my Oral-B iO9 Electric Toothbrush.
The instructions worked extremely well with their soft plastic and hard plastic tools, I didn't damage my toothbrush, and the new battery I ordered from E-Bay worked extremely well in my toothbrush.
Here is the battery I ordered from E-Bay in March 2023 for my Oral-B iO9 Electric Toothbrush:
E-Bay - Oral-B iO9 Electric Toothbrush Battery Replacement: (NEW!!! 2 pc SANYO UR 14500 AC Li-ion 740mAh Rechargeable 3.7v FLAT-TOPS) - https://www.ebay.com/itm/155327347466
After watching two youtube videos and trying to get the battery out, I've realized that everyone's bottom cap doesn't come off the same. After using pliers and watching a video which I scratched the metal cap slightly and also the bottom of the brush head, that all I really had to do was twist it counterclockwise and pop it off with either my fingernail or something flat. Hope this helps someone out. I'll post back soon to report how the new battery is working out.
habe den Akku herausgehebelt, alles lief nach Plan, hab einen neuen Akku eingesetzt, alles verschlossen, aber Akku lädt nicht, es tut sich auf der Ladestation jetzt überhaupt nichts mehr. Zahnbürste funktioniert nicht mehr.
Da ich zwei Braun IO habe, wollt ich den Zustand des neuen Akku überprüfen und in die andere Zahnbürste einbauen, (diese funktionierte bis dahin auch tadellos). Siehe da, Akku eingebaut, nix geht mehr. den alten "funktionierenden" Akku eingebaut, und nun geht gar nichts mehr. so eine Sch..... jetzt hab ich unsere beiden Zahnbürsten ruiniert, ich weiß zwar nicht wie, alles lief nach Plan und Anweisung.
Habe lediglich den Akku mit einem metallischen Gegenstand entfernt, kann es daran liegen?
Bitte um Hilfe
Metallwerkzeuge sollten aus Sicherheitsgründen nicht verwendet werden, da Akkus einigermaßen heikel handzuhaben sind. Aber wenn du vorsichtig warst, dürfte das nicht der Grund für deinen Totalausfall sein. Du könntest mit einem Multimeter testen, ob auf den Akkus noch Strom ist. Hast du sie richtig herum ins Gerät eingesetzt, die Akkus? Und ich kenne mich mit der Zahnbürste nicht aus, ist es möglich, die Funktion ohne das Gehäuse zu testen? Und: Was war das für ein Ersatzakku? Könnte dieser zu viel oder zu wenig Spannung haben und vielleicht irgendwas am Gerät kaputt gemacht haben?
Ich hatte das selbe Problem. Stundenlanges googeln hat nichts gebracht. Hatte an einem Tag zwei io9 mit neuen Akkus versehen, weil die Geräte nichts mehr machen wollten. Meine wollte nach dem zweiten Mal lade mit neuem Akku nichts mehr machen. Geladen hat sie aber. Irgendwann kam ich auf die Idee die io9 einfach mal über die App zurückzusetzen. Siehe da, der Akku war voll und läuft seitdem fürs erste wieder. Vielleicht hilft dir das auch.
Vom Grunde her ist es aber eine Frechheit, dass ein so teures Produkt in unserm Falle nicht mehr als 1 Jahr ordnungsgemäß funktioniert hat.
Sven, danke für deinen Kommentar! Hoffentlich hilft das ein par Leuten.
I couldn’t charge it either after replacing the battery but pressing the power and mode button simultaneously until the brush turns of help. As soon as it started up again charging was possible.
welche batterien funktionieren als austauschbatterie? handelsübliche akkus jedenfalls nicht :(
Die verbauten Akkus sind Sanyo UR14500AC 740mAh. Wenn du danach googelst, findest du Ersatz. Viel Erfolg!
Just to leave a feedback: I follow exactly the step on this tutorial, the only thing I found difficult is to use the battery charger to remove the bottom cover, I had to make ticker the pin with a Scotch tape because was to loose and was going rounding. Now the brush is working properly with Sanyo battery Sanyo UR14500AC 740mAh 👍🏻
Will this work on iO Series 7-10 with the magnetic base?
I'm pretty sure the bottom of the toothbrush and the base are different than non-magnetic iO bases. So will it work?
-


Schalte, wenn möglich, deine Zahnbürste ein und teste deine Reparatur, bevor du sie wieder verschließt.
Entsorge deinen Elektromüll fachgerecht.
Lief die Reparatur nicht wie geplant? Versuche es mit einigen grundsätzlichen Lösungsansätzen oder frage in unserem Forum nach.
Schalte, wenn möglich, deine Zahnbürste ein und teste deine Reparatur, bevor du sie wieder verschließt.
Entsorge deinen Elektromüll fachgerecht.
Lief die Reparatur nicht wie geplant? Versuche es mit einigen grundsätzlichen Lösungsansätzen oder frage in unserem Forum nach.
Rückgängig: Ich habe diese Anleitung nicht absolviert.
80 weitere Personen haben diese Anleitung absolviert.
Besonderer Dank geht an diese Übersetzer:innen:
100%


Diese Übersetzer:innen helfen uns, die Welt zu reparieren! Wie kann ich mithelfen?
Hier starten ›


68 Kommentare
can you tell what is the size of battery (dimensions) ? it’s LiOn but what is the form factor of it?
14500 is the form factor. See comment below
My toothbrush got knocked over on the counter and it started doing this weird loop of booting but not going into the menu, and doing and doing it. Until it shows the battery is at 0%. Just ordered the battery and hopefully that was just the issue and that the knocking over was just coincidental. I opened it up and no parts just randomly fell out and checked the circuit board it and nothing looked like it got knocked out of place.
Hi Martin, what was the problem with your toothbrush?
Did you replace anything or resolderered anything?
I have the same a toothbrush that felt to the floor and now it is not responsive. I have not measured on the battery for power - but it just worked. But now it is dead. And the internal seems fine.
Curious what battery to replace with?
Ich verstehe irgend wie den Punkt. „Drehen sie die untere Abdeckung heraus“ nicht. Ich sehe auf Bild kein Gewinde. In welche Richtung soll man drehen? Nach Links weiter drehen geht nicht. Nach Rechts geht auch nur bis 90 Grad. Vielleicht kannst du mir hier helfen.
VG
Hallo Gleichlaufartisten Live,
wenn du die Kappe am unteren Ende mit Hilfe deiner Ladestation gelockert hast, solltest du durch leichtes weiterdrehen und ziehen die Kappe entfernen können.
Genau das geht nicht da die Kappe wasserdicht versiegelt ist Ich habe das Teil mit Hilfe einer Rohrzange gelockert und herausgenommen
Beim Zusammenbau wär halt ein Dichtmittel gefragt um das Eindringen von Wasser zu verhindern
Aron -
It is a Sanyo UR14500AC cell. I have just taken my apart to have a look. Fairly easy. I would say any 14500 form factor li-ion battery will be fine.
The Sanyo batteries are difficult to source, and I found only one EU seller had stock, and (because of Brexit) shipping costs were high. I am going to try Sony Murata US14500VR2 which are plentiful and cheap, at least in the UK, and will feedback my results. They are the correct specification and have flat terminals. These batteries seem to be used by many vapes and torches (flashlights)
Hi Mark, did the Sony us14500vr2 work for you?
Rachel O -
Thanx for the tutorial. Got some difficulties in setting up the rubber seal on the upper neck of the brush but finally got it right after one failed attempt
very informatieve tutorial, thxs a lot!
Have barely started unfortunately, because I cannot get the bottom cap loose in any way- apart from using pliers s which might damage it.
Carefully warming up bottom cap with hot water no effect.
Any suggestions perhaps?
It's probably got calc in the screw thread - mine did. I just had to press the toothbrush and charging base together with considerably more than "mild pressure" - I would describe it as considerable but controlled force; don't use brute force, as you especially want to avoid the charging base and toothbrush slipping since that will damage both like when a screwdriver slips in a screw.
Feanor -
I used a Vapcell L10 14500, as it's 1050 mAh compared to the 800mAh Sanyo that came with the toothbrush.
My battery wasn't properly dead, but I wasn't really getting the milage out of it compared to what is advertised and in reviews. Some have quoted longer than two weeks on a single charge - brushing twice a day; I was getting nowhere near that. I'm hoping this bigger battery will get me much closer.
How long has everyone else found they are getting out of their iO brushes?
We bought ours in February 22, and the battery is empty by 33% now. We had def. had some longer runs before and there was no issue using it for 2 weeks or even more. Now it is just frustrating because it shuts of, while displaying 1/3 of charge. I have now come up on this article and am considering to change the battery, as the service of these is very expensive. While the cost of a new battery is at max 5 euros.
My Oral-B io9 also is shutting down mid brush with 40-50% battery left from the morning session. Either the battery is toast or it's a software glitch. I will monitor it with more attention. The brush is exactly 1 year old and I have taken really good care of it, charging only up to 90% and down to 20%.
Daniel -
What type did you use? Unprotected or protected?
Thanks
This guide is missing a really important aspect of disassembly - and, going by the photo of the toothbrush before disassembly, it appears as if the author had previously disassembled the toothbrush, fell for the same pitfall I have been struggling with and reassembled it incorrectly.
Before dissassembling your toothbrush, note that there is a metal ring which sits at the base of the toothbrush neck, above the rubber gasket for the neck. I'm not talking about the cosmetic chromed plastic above the LED that glows blue/green/red during use depending on pressure, I'm talking about the metal ring above it. If you compare your pre-disassembly toothbrush, you can see yours will have a ring which is missing from the author's image.
When you disassemble the toothbrush this ring will likely remain on the toothbrush mechanism, and force its way past the gasket.
It will then sit incorrectly on the neck and, if you just jam the toothbrush back into its housing on reassembly, it will then be on the wrong side of the gasket and I'm sure wouldn't seal properly.
To reassemble, remove the metal ring from the toothbrush mechanism; don't force it, you will likely need to gently squeeze the sides to get it over the ridges in the toothbrush neck.
Then thoroughly clean all the built-up calc off all the seals to ensure it doesn't leak after reassembly and fail. With fingernails, scrape the calc off the mechanism neck (don't use cleaner here as the liquid will likely get onto the electronics). You can use gentle citrus cleaner and an old toothbrush on the metal ring, casing gasket, base gasket and thread.
(Just don't drop the little ring down the sink like I did and needed to disassemble the U bend!)
Gently push the mechanism/body into the housing, ensuring it sits correctly in the housing rails. If it gets stuck at the start it's not lined up correctly.
Feanor -
The gasket will be pushed outwards. Once the mechanism sits correctly in the casing you then need to gently re-seat the base, using the charger as a "screwdriver" in reverse of disassembly - but, again, be careful as correct positioning is essential.
At this point, the little metal ring is placed over the screwdriver neck and clips into position. Reassembly is now complete.
Is there scope for editing / adding to other people's guides on here? If not I'll try to do a separate reassembly guide when I have to take it apart again after I get a new battery.
Feanor -
Hallo Dominik,
ist deines Wissens bei allen Elektrozahnbürsten der Serie Oral B IO (Nr. 4-9) ein Akkuwechsel möglich? Grüße Richy
Hi Richy,
leider habe ich nur eine iO 9 vorliegen und kann deshalb keine genaue Aussage darüber treffen. Da die Zahnbürsten 6-9 aber alle gleich aufgebaut sind, sollte der Akkuwechsel bei all diesen Geräten möglich sein (ich bin nicht sicher ob sich etwas bei der neuen iO 10 geändert hat, in diesem Fall wäre ich vorsichtig, ebenso bei 4 und 5, da diese eine andere Ladestation haben und sich deshalb eventuell nicht auf dem selben Weg öffnen lassen).
Beste Grüße
Dominik
Guten Tag
Nach dem Zusammenbau möchte die Zahnbürste nicht mehr angehen? Auf der Ladestation lädt sie auch nicht mehr?
Was kann schiefgelaufen sein und gibt es eine Möglichkeit das Gerät noch zu retten?
Akku falsch herum eingesetzt?
Habe sie eine Lösung dafür gefunden?
Veo que entre el paso 4 y el 5 ya no tiene el cepillo ni el display ni los botones, estaría bien añadir un paso de como los has quitado antes de empujar el interior del cepillo hacia atras, gracias y gran trabajo.
Hi José!
There is no need to remove the buttons or the display for the battery replacement. This guide was made with a teardown device and those were removed in between. However it isn‘t mandatory in order to remove the battery.
I am using IO 6 and thats a problem, the charging station doesn't have these notchers.......anyone has any ideas how to remove the bottom cap with other tools??
Hi yes i did it today with an adjustable spanner. Grip tight and turn anti clockwise does the job lovely.
I know this comment is old, but if anyone else is wondering, you can just use the charger it came with. Just like using the charger normally (unplugged from the wall of course), put the toothbrush on the charger, then you can twist it off. It's the same way you'd do a battery replacement on the older Braun models
hi i cant move the bottom its very tight any idlers how to undo it please
Für welche der inzwischen wohl 10 verschiedenen "Series" bei der IO gilt diese Anleitung? Ich würde mir gerne eine neue kaufen, aber nur, wenn ich an dieser dann irgendwann auch den Akku tauschen kann. Vielen Dank! :)
In einem Kommentar drüber heißt es:
leider habe ich nur eine iO 9 vorliegen und kann deshalb keine genaue Aussage darüber treffen. Da die Zahnbürsten 6-9 aber alle gleich aufgebaut sind, sollte der Akkuwechsel bei all diesen Geräten möglich sein (ich bin nicht sicher ob sich etwas bei der neuen iO 10 geändert hat, in diesem Fall wäre ich vorsichtig, ebenso bei 4 und 5, da diese eine andere Ladestation haben und sich deshalb eventuell nicht auf dem selben Weg öffnen lassen).
Ich habe gerade die IO9 geöffnet und wollte einen Akku von Keepower "Akku 14500 mit 3,7 Volt Spannung und 1100mAh Kapazität, Li-Ion-Akku PCB geschützt P1450C3" einbauen. Im Gerät original ist eine Sanyo UR14500AC mit 740 mAh. Der gelieferte Akku von Keepower ist aber rund 2mm zu lang und passt daher nicht (auch nicht mit Quetschen) ins Akkufach. Scheinbar sind die Akkus auf dem Markt einfach unterschiedlich lang. Sehr ärgerlich. Man muss also neben dem Formfaktor auch auf die tatsächliche Baugröße achten!!!
Die Sony US14500VR2B 680mAh max. 715mAh 3,6V - 3,7V Li-Ion-Akku 49,05x13,95mm wird weiter oben genannt und ist in der Beschreibung von Akkushop auch für Oral B IO geeignet. Die bestelle ich jetzt. Schade, ich hätte gerne die höhere Kapazität in der Zahnbürste.
Super Beschreibung. Es war erfolgreich. Vielen Dank.
Hi, had a look across the instructions, comments and replies. I’m with an iO9. Issues after 1 year and got it replaced with a brand new one by Oral B. Here I am again with this one, 2 years later, same issue - barely lasting more than 4 days (8 x 2min brushes (daily mode)) and going from 60% battery to 0 just like a switch. I live in Dubai. Any suggestions on getting a battery + which one, so I can do this first time fixit? Thank you.
Hallo zusammen,
wie schön dass es endlich ein Forum gibt wo man Anleitungen zu reparieren findet. Nun zu meinem Problem. Ich Scheiter leider schon an Punkt 1. Den Bajonett Verschluss bekomme ich leider nicht mit Hilfe der Ladestation geöffnet. Ein Werkzeug habe ich leider auch nicht dazu, dabei wäre es so einfach - ein runde platte mit 3*120 Grad Stegen - okay gibt es halt nicht. Hat jemand eine gute Idee wie man den Deckel ab bekommt. Bin für jeden Tipp dankbar.! Vielen Dank
Super Anleitung - nur oben im ersten Punkt - ".....drehe sie nach links - die Zahnbürste oder die Ladestation" - mein Verständnis die Zahnbürste - richtig? Nochmals vielen Dank
Oben schreibt jemand:
Habe nun die untere Abdeckung entfernt. Das silberne Endteil habe ich doppelt mit dickem Klebestreifen umwickelt, und mit einer Rohrzange war es dann ganz einfach.
Vielleicht hilft dir das weiter. Und ja, es geht beim links drehen um die Zahnbürste.
Immer gern. Viel Spaß beim Putzen. ;)
Hello, i lost the metal ring, can´t find any possibillity to order a new ring, any help? thanks
thanks for the tutorial.
But I have a problem:
I replaced the battery with a compatible 14500 3.7v 850 mAh
the toothbrush works with the new battery, unfortunately it does not recharge it
Do you have any suggestions to help me?
Thank you
Push and hold the power and mode buttons when the toothbrush goes off. After putting it on the charging base it will goes on and recharge
Vielen Dank. Ist gut erklärt und hat problemlos geklappt.
Peter F.
Top Anleitung - alles hat geklappt.
Beim Zusammenbau ist darauf zu achten, dass die untere Kappe genau in der richtigen Position wieder eingesetzt wird, damit die Membran nicht verdeckt wird und man darf natürlich die Feder (die hier nicht gezeigt wird) nicht vergessen.
Thank you for a great guide!
I'd just like to add two things:
- The guide says to "Push the toothbrush into the charging station with mild pressure". I had to apply rather extreme pressure to get it to open. A pro tip is to push the charger and toothbrush against a rubber surface if you have one available. That will make it easier to apply the pressure needed to unscrew the bottom cap.
- If you're in the U.S. I can highly recommend the Tenergy Li-ion 14500 Cylindrical 3.6V 750mAh Flat Top Rechargeable Battery (without tabs). I can confirm it works and recharges perfectly, even though the original battery is a 3.7v, and this is "only" a 3.6v.
I could not charge the brush after replacing the battery so I held the power and the mode button pressed simultaneously until the brush shuts off and after restart I was able to charge the battery again 👍👍
Sehr schöne und sehr gut verständliche Anleitung. Einen Mini-Verbesserungsvorschlag hätte ich: bei den benötigten Werkzeugen stehen 1 Spudger (was auch immer das ist) und zwei Pinzetten. In Schritt 3 wird beschrieben: „Hälfte der Pinzette oder einen kleinen Schlitzschraubendreher“ - ich brauche also nicht zwingend eine Pinzette… vielleicht könnt Ihr das ja bei den benötigten Werkzeuge konkretisieren…
Ansonsten funktioniert meine Zahnbürste wieder, und dank Euch zum Selbstkostenpreis 😊!
Very nice tutorial. One point: the polarity is not given in the battery compartment. Your photo on battery removal shows "plus" towards the top. Would be nice to confirm in the text.
Hat perfekt funktioniert. Die untere Abdeckung ging etwas schwierig ab, was aber an Verkalkung lag. Ich habe dann mehrfach hin und her gedreht und mit einer trockenen weichen Zahnbürste im entstanden Spalt den Kalk entfernt. Dann ging die Abdeckung perfekt ab.
Vielen Dank für die Anleitung.
Followed instruction , thouroughly cleaned and re-assembled. Works perfectly again :)
A useful note might be that the bottom cap needs to be vertically taken out by your fingernail after the initial twisting of unlock. I originally thought it needed to be completely twisted out and got extremely confused for a while.
Pity that this is made to look so easy, when it actually is NOT! Mine won't open - the plug on the charging base is just a little smaller than the socket on the toothbrush, so that twisting it, just twists the whole lot and doesn't hold the base. Seems like this is the usual experience when I look online for other people's experience and ideas. My battery is dead, won't last 15 seconds on full charge, so the toothbrush is useless. Very disappointing for a very expensive device.
Thank you for the tutorial. I replaced the battery, it worked initially. However when I placed it on the charger, it recognised it (it lighten) but it did not charge. Charge was at about 30%. I placed it in the travel container/charger and then it charged fully. Now after using it for a week it is 0% again and it does not charge in either of the charges. Do you know what could be the problem?
Thank you for this description! Amazon provided batterys for Oral-B and spudgers from I-Fix-It. Before I closed the toothbrush I put a little bit of silicon grease on the winding.
Posso usare qualunque batteria AA energie è ok?
Hi
Mein Deckel läßt sich nicht aufdrehen. Es gibt dafür keinen Ersatz und will es auch nicht mit Gewalt machen.
Was jetzt?
LG
Ela
An Lu - Antwort
I’ve used a wrench. With its help I managed to open it.
Artur Krysiak -
Leichter Druck hilft vielleicht bei einem neuen Gerät. Bei mir war viel Druck nötig, was die Nasen auf der Unterseite der Ladestation auch etwas beschädigt hat. Nach dem ersten Lösen habe ich den unteren Deckel dann durch Schritt 5 "herausschiessen" können. Im Zuge dessen habe ich die Komponenten (nicht das Innenleben) mit 2/3 Wasser und 1/3 Essigessenz in 3 Minuten in einem Ultraschallreiniger auch noch eben grundgereinigt.
Bjoern Mueller - Antwort
The bottom needs deeper groves or taller tabs on the bottom. Mine kept slipping off trying to turn the toothbrush
Dan Turner - Antwort
Das Öffnen mit der umgedrehten Ladestation ist unmöglich.
Helmut Herrmann - Antwort
Habe nun die untere Abdeckung entfernt. Das silberne Endteil habe ich doppelt mit dickem Klebestreifen umwickelt, und mit einer Rohrzange war es dann ganz einfach.
Helmut Herrmann - Antwort
Danke dafür!
Barbara Lemke -
Ich habe meine iO eine halbe Stunde in Essigwasser (etwa 0,5cm hoch) stehen lassen, danach ging es ganz leicht. Vor dem Zuschrauben später habe ich etwas Silikonfett auf die Dichtung geschmiert. Noch kann man die iO jetzt mit zwei Fingern aufdrehen - der Kalk wird sie später wieder schwergängiger machen
Geo Tag - Antwort
ich dachte zuerst, bei mir würde es sich auch nicht öffnen lassen. Hab dann gemerkt, dass es schon ausreichend aufgedreht war und nur noch (kräftig) rausgezogen werden musste. Man hat hier also kein ganzes Gewinde zu erwarten, sondern wirklich nur Haken, die einrasten.
Theo - Antwort
A mí no me abre, no hay manera. Desde hace más de un mes el display se me quedó en negro y las muescas se me están desgastanto de tanto intentarlo
María - Antwort