Einleitung
Wenn das Display deines iPhone 12 mini zerbrochen ist, der Touchscreen nicht reagiert oder kein Bild anzeigt, kannst du es mit Hilfe dieser Anleitung austauschen.
Die Einheit aus Ohrhörer-Lautsprecher und Sensoren auf der Rückseite des Displays ist ab Werk mit deinem iPhone gekoppelt, deswegen musst du sie bei einem Displaytausch vom alten auf das neue Display übertragen. Darin ist auch der "Flood Illuminator" enthalten. Der Flood Illuminator ist Teil des biometrischen Face ID Systems. Seine Funktion geht verloren, wenn das Originalteil beschädigt ist, oder falsch eingebaut wird. Es funktioniert auch nicht mit einem neuen Ersatzteil, sei also bei der Reparatur besonders vorsichtig und beschädige keines dieser Teile. Wenn etwas davon kaputt geht, kann nur Apple selbst oder eine von Apple autorisierte Werkstatt die Funktion wiederherstellen.
Hinweis: Bei iOS 17.6 und früher funktioniert True Tone nach einem Displaytausch nicht mehr, selbst wenn Originalteile von Apple verwendet werden. Ab iOS 18 kannst du das Display mit Hilfe von Apples Repair Assistant neu kalibrieren, um True Tone an Originaldisplays von Apple wiederherzustellen.
Du musst einzelne Bauteile ankleben, wenn du das Gerät wieder zusammenbaust.
Was du brauchst
-
-
Schalte dein iPhone aus, bevor du mit dem Zerlegen beginnst.
-
Entferne die beiden 6,7 mm langen Pentalobe-Schrauben an der Unterkante des iPhone.
-
-
-
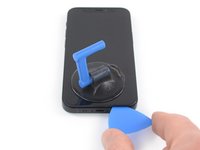
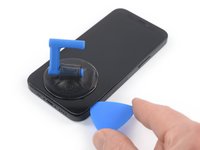
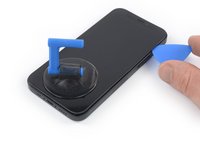
Zeichne mit einem Permanentmarker 3 mm von der Spitze des Plektrums entfernt einen Strich.
Got to step 2 and realized the fix kit doesn't include an opening pick! Looks like a guitar pick, and I have those lying around. Is that expected? Looks like the pick is used in many steps below. There's a little blue crowbar that isn't mentioned in the instructions. Perhaps that replaces the opening pick?
Hi! I can't see which guide you were using when writing this comment. Can you reply here with which guide and fix kit you used?
I see you posted this in Meta. I hope it's resolved soon! In the meantime, a guitar pick may work well enough for your repair.
what fix kit?
My fix kit didn't include an opening pick either
My AliExpress refurbished screen came with a pick that has a coin-like circle that pops out, so no modification was necessary
It's not an Ifixit KIT if it doesn't include everything. You'll need to order the opening pic separately. Or head to Walmart like myself and look for guitar pics. Hopefully, this will work just as well.
No pick in mine as well. It’s really not clear that you have to order this separately when ordering an IPhone SE 202/2022 screen repair kit. Is this the case?
Frustrated, I ordered a compact package where everything was encapsulated. Useless suction tools could not separate the screen. If it is unable to decouple the screen, then why sucking suction tools you have provided.
For my kit the triangle pick was stuck inside the box with the screen not with the other tools maybe it's also there for you
Y’all are getting far, FAR too detailed with some of this stuff…. Measuring and marking the pick that you won’t actually use to open the device?!? lol that’s kinda funny. Just heat it up, grab a spudger, and the back just pops right off! The iFixit tech need to stick to the KISS method more often, you know KEEP IT SIMPLE STUPID!!! Like l, for reals, I’ve been doing this stuff for YEARS and using iFixit guides regularly and this is just ridiculous at this point!
Will the phone still work if the sensor assembly on the back of the screen is damaged?
-
-
-
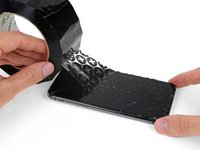
Klebe überlappende Klebestreifen auf das Display, bis es vollständig bedeckt ist.
-
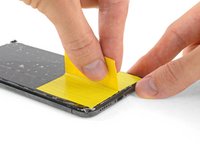
Falls der Saugheber nicht hält, kannst du ein Stück festes Klebeband (z.B. Panzertape) zu einem Griff falten und das Display damit anheben.
-
-
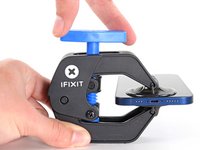
In diesem Schritt verwendetes Werkzeug:Clampy - Anti-Clamp$24.95
-
Drücke den blauen Griff zurück, damit die Arme der Anti-Clamp frei beweglich werden.
-
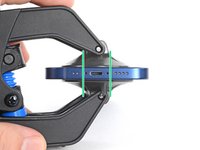
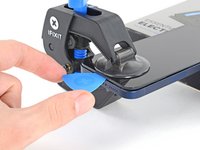
Schiebe die Arme entweder über die linke oder die rechte Kante des iPhones.
-
Bringe die Saugheber nahe an der Unterkante des Displays an, einen auf der Vorderseite, den anderen auf der Rückseite.
-
Drücke die Saugheber zusammen, so dass sie auf den Oberflächen haften.
-
-
-
Drücke den blauen Griff vorwärts, um die Arme wieder zu verriegeln.
-
Drehe den Griff eine volle Umdrehung im Uhrzeigersinn, oder bis du merkst, dass sich die Saugheber dehnen.
-
Achte darauf, dass sich die Saugheber weiterhin gegenüber stehen. Wenn sie sich nicht mehr gegenüber stehen, dann löse die Saugheber ein wenig ab und schiebe sie in die richtige Position.
-
-
-
Lege dein iPhone auf einen stabilen Gegenstand, z.B. ein Buch mit festem Einband. Es sollte frei und parallel zur Arbeitsfläche liegen, dadurch wird die Arbeit bei nachfolgenden Schritten leichter.
-
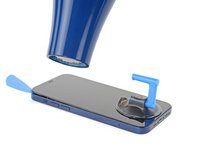
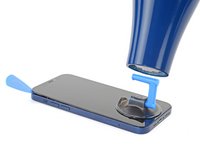
Erwärme die Unterkante des iPhones mit einem Haartrockner. Sie sollte so heiß sein, dass du sie gerade noch anfassen kannst.
-
Warte eine Minute, damit sich der Kleber lösen und ein Spalt entstehen kann.
-
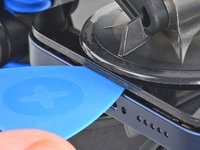
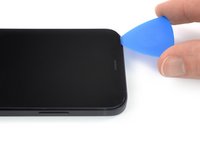
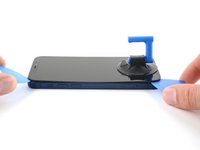
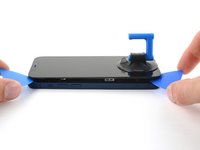
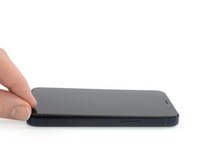
Wenn mithilfe der Anti-Clamp ein ausreichend großer Spalt entstanden ist, setze ein Plektrum in den Spalt unter die Kunststoffblende am Display ein.
-
Überspringe die nächsten drei Schritte.
-
-
-
Erwärme die Unterkante des iPhones 90 Sekunden lang (bzw. so lang, bis du sie gerade noch anfassen kannst)mit einem Haartrockner oder einem Heißluftgebläse.
you need to clarify that you're heating the metal frame, not the glass. I gently heated the glass front with a heat gun and proceeded to pull the display apart, destroying it. :-(
-
-
-
Wenn du einen einzelnen Saugheber benutzen willst, dann bringe ihn so nah wie möglich an der Unterkante des Smartphones an.
-
Wenn dein Display stark gesplittert ist, dann haftet der Saugheber vielleicht besser, wenn du die Scheibe mit durchsichtigem Paketband abklebst. Anstelle des Saughebers kannst du auch sehr starkes Klebeband befestigen. Wenn das alles nicht hilft, dann klebe den Saugheber mit Sekundenkleber an der zerbrochenen Scheibe fest.
I would recommend starting with a bottom corner, not the bottom middle. If the adhesive isn't softened enough, you will pull the middle out but the sides will still be stuck on, causing extreme flex to the panel and damage to the panel down the middle (white bars down the middle in a worst case). I did this to my phone.
-
-
-
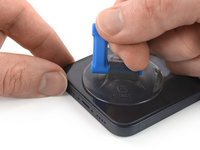
Ziehe den Saugheber fest und gleichmäßig nach oben, so dass ein kleiner Spalt zwischen dem Display und dem Rahmen entsteht.
-
Setze ein Plektrum in den Spalt unter der Kunstoffblende am Display ein.
I ended up separating my screen rather than getting under the scren casing.. BE CAREFUL TO MAKE SURE YOU ARE UNDER THE PLASTIC PART - otherwise you just ruin your screen... No mention of this precaution here and as a result, my phone is more broken than when I started
The plastic frame should stay with the display.
Broke the screen. Too bad. I've done maybe 5 battery replacements before. But this one is very very tight. Got a new phone. :P
Same thing, I broke my screen too. I think the warning should be in all caps and show more clearly where is the right place to put the pick and where is not — without the need to click on the link.
Judging by amount of people who reported it here (and should also account for those who didn't bother to report), I'd say that there is a problem with instructions.
It is honestly not so hard if you know what does mistake looks like and that it is possible to separate the screen so easily from the frame. I repaired more than a dozen phones — screens and batteries — and this is the first time I made such a mistake that costs 100+euros.
-
-
-
Erwärme die rechte Kante des iPhones (die Kante mit der Einschalttaste) 90 Sekunden lang (bzw. so lange, dass du sie gerade noch anfassen kannst) mit einem Haartrockner.
The pictures show the left side. I know that the left side is the correct one to heat, but for others it might be confusing. 😊
@dviosz You mean the right edge! The picture shows the left edge but the right edge is the correct one to heat. As described in the text next to it. Opening the phone from the left will damage it!
Yeah, sorry, you are right! (tried to make something less confusing and created more confusion by accident… 😃 )
THIS ONE HERE (lolz)
weebeast -
-
-
-
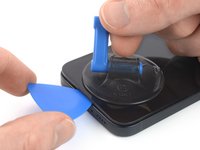
Schiebe das Plektrum um die untere rechte Ecke herum und an der rechten Seite des Smartphones nach oben, um den Displaykleber aufzutrennen.
Be very careful your tool does NOT go in between the screen and the screen frame but rather in between the screen frame and the phone frame. If not you will damage the screen and need a new one. This has happened to MANY people. The screen is attached to the screen frame with an adhesive that can also be accidentally pried apart if not done carefully. This is probably more likely if your tool is too thin, if you dont heat enough, or dont suction and pull enough to create a big enough separation between the screen frame and the phone frame.
Yes, this happens to me, too. It took a long time until I could remove the screen using a heat gun with a heat gun set to 120°C (after trying first with 90° and 100°). Now the right side of the display shows white stripes and the touch doesn't react. -> New display necessary...
-
-
-
-
Erwärme die Oberkante des iPhones 90 Sekunden lang (bzw. so lange, dass du sie gerade noch anfassen kannst) mit einem Haartrockner.
-
-
-
Setze das Plektrum an der rechten oberen Ecke des Glasscheibe ein.
-
Schiebe das Plektrum um die obere rechte Ecke herum. Aufgrund der Rasten spürst du wahrscheinlich etwas Widerstand.
-
Schiebe das Plektrum an der Oberkante entlang und trenne den restlichen Kleber auf, mit dem das Display befestigt ist.
-
-
-
Erwärme die linke Kante des iPhones 90 Sekunden lang (bzw. so lange, dass du sie gerade noch anfassen kannst) mit einem Haartrockner.
-
-
Welches Ersatzteil benötige ich, wenn die obere Verbindung gerissen ist?
I accidentally tore the cables off. What can I do?
The display flexy is in the middle of the left side, please update the picture showing the flexy connected and highlight in red, so other users don't damage it as I did :(
Updated -- thank you! Does this look better?
-
-
Setze ein zweites Plektrum in die untere linke Ecke des iPhones ein.
-
Verdrehe beide Plektren gleichzeitig, bis sich die Rasten an der linken Seite lösen.
Don't go from just one corner (like on the right side). I've done that (forgot this step) and broke my screen.
-
-
-
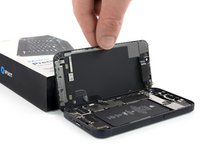
Drehe das iPhone so, dass die rechte Kante zu dir zeigt.
-
Öffne das iPhone so, wie man einen Buchdeckel von rechts her aufschlägt.
-
Lehne das Display gegen einem stabilen Gegenstand, so dass es während der Reparatur senkrecht stehen bleibt.
-
-
In diesem Schritt verwendetes Werkzeug:Magnetic Project Mat$19.95
-
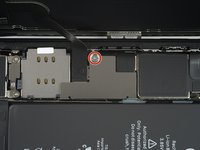
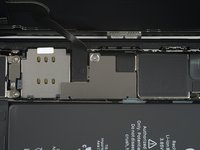
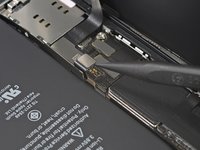
Entferne die beiden 1,25 mm langen Y000 Schrauben, mit denen die Halterung an der Abdeckung am Stecker des Akku- und Displaykabels befestigt ist.
hallo, ich sehe in Schritt 17 nur EINE markierte Schraube... (?)
This Shield is garbage and once it's taken out it's next to impossible to get back in. I'm not even going to put the shield back in I'm just going to put kapton tape over it and call it good.
-
-
In diesem Schritt verwendetes Werkzeug:Tweezers$4.99
-
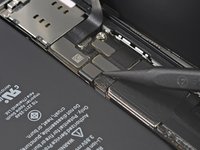
Entferne die Halterung des Display- und Akkukabelsteckers mit einer Pinzette.
-
-
-
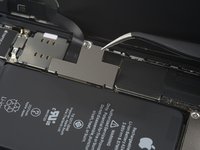
Heble den Akkustecker mit einem Spudger oder dem Fingernagel aus seinem Anschluss auf dem Logic Board hoch.
-
Biege den Stecker ein wenig vom Logic Board weg, damit er sich nicht wieder versehentlich verbinden und während der Reparatur das Gerät mit Strom versorgen kann.
-
-
-
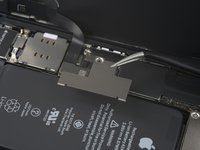
Heble den Stecker am OLED-Displaykabel mit einem Spudger oder dem Fingernagel aus seinem Anschluss auf dem Logic Board hoch.
-
-
-
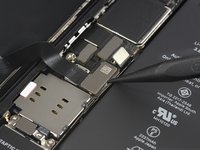
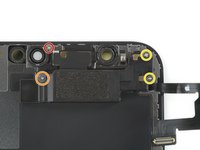
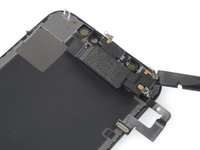
Entferne die fünf 1 mm langen Y000-Schrauben, mit denen die Abdeckung der Frontsensoreinheit befestigt ist.
what 3 are the small ones? I don't know anymore
in case anyone else reads this, the 3 small ones screw directly onto the board. the two longer ones screw into standoffs (the two top screws, based on the picture above)
Skyejobs -
-
-
-
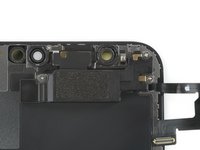
Trenne den Stecker am Kabel zur Frontsensoreinheit mit einem Spudger oder dem Fingernagel ab.
-
-
-
Entferne eine 1,1 mm lange Tri-Point Y000 Schraube.
-
Entferne eine 1,8 mm lange Tri-Point Y000 Schraube.
-
Entferne zwei 1,6 mm lange Kreuzschlitzschrauben #00.
-
-
-
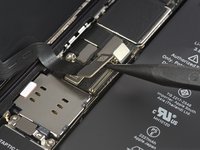
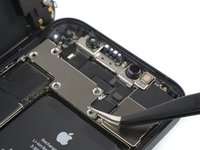
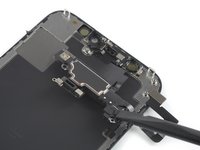
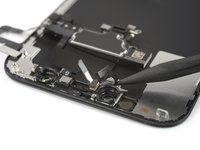
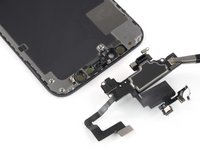
Schiebe das flache Ende eines Spudgers unter die obere rechte Ecke des Ohrhörer-Lautsprechers und klappe ihn zur Rückseite hin.
-
-
-
Erwärme den oberen vorderen Rand des Displays 1-2 Minuten lang mit einem Haartrockner, einem Heißluftgebläse oder einem iOpener, um den Kleber darunter aufzuweichen, mit dem die Sensoren befestigt sind.
-
-
-
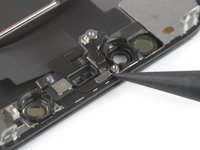
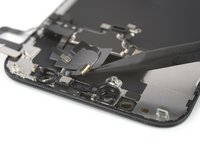
Hebe den Näherungssensor mit der Spudgerspitze hoch und löse ihn aus seiner Vertiefung heraus.
-
-
-
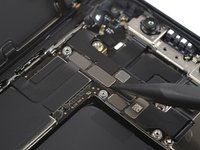
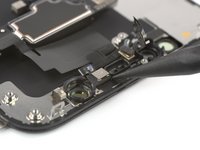
Schiebe einen Spudger unter das breite Flachbandkabel zur Sensoreinheit und trenne es vom Display ab.
-
-
In diesem Schritt verwendetes Werkzeug:Tweezers$4.99
-
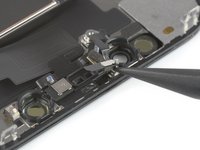
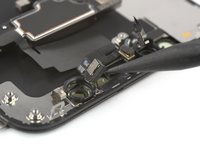
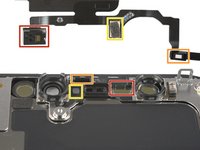
Heble den Flood Illuminator mit einer Pinzette oder einem Spudger aus seiner Vertiefung heraus.
-
-
-
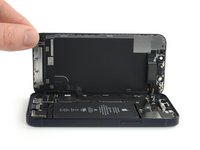
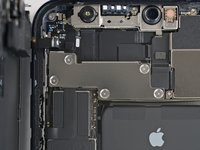
Entferne die Baugruppe aus Ohrhörer-Lautsprecher und Frontsensoren.
-
Flood Illuminator
-
Näherungssensor
-
Mikrofon
-


Vergleiche das Ersatzteil mit dem Originalteil. Eventuell musst du fehlende Bauteile übertragen oder Schutzfolien entfernen, bevor du es einbauen kannst.
Um dein Gerät wieder zusammenbauen, folge den Schritten in umgekehrter Reihenfolge.
Je nach eingebautem Ersatzteil kannst du es möglicherweise mit Apples Repair Assistant neu kalibrieren, verfügbar ab iOS 18. Führe ein Update des Gerätes durch, navigiere zu Einstellungen → General → About → Parts & Service History, tippe auf Neustart und Reparatur abschließen. Folge dann den Anweisungen auf dem Bildschirm.
Entsorge deinen Elektroabfall fachgerecht.
Hat die Reparatur nicht den gewünschten Erfolg gebracht? Versuche einige grundsätzliche Lösungen oder frage in unserem iPhone 12 mini Forum um Hilfe.
Rückgängig: Ich habe diese Anleitung nicht absolviert.
46 weitere Personen haben diese Anleitung absolviert.
Besonderer Dank geht an diese Übersetzer:innen:
100%


Diese Übersetzer:innen helfen uns, die Welt zu reparieren! Wie kann ich mithelfen?
Hier starten ›


11 Kommentare
The only way to pair the new sceen to the phone to retain Tue Tone is to buy a dedicated board that copy the data from the original screen to the new.
This guide was impeccable! The hardest part is definitely getting the screen glue off. Ended up separating the frame of the screen from the display itself. All worked out in the end though!
same! I was wondering why the inside of my phone looked different than the pictures before realizing the screen assembly has two layers and I accidentally removed only the top one instead of both.
Likewise, worked out for me anyhow.
macro -
The same thing happened to me. So a simple battery replacement turned into a display replacement :D
Should the phone turn ON and screen work with out speaker/sensor module?
Yes it will!
I wish they would include the way to put the water resistant gasket on, not all of us know what to do.
one of the steps above (in reverse order) links to a different guide for replacing the water resistant gasket
macro -
So I have an iPhone 12, just the basic model. When I removed the screen assemble, the camera/speaker/mic setup was not attached to the old screen. I thought maybe I broke a cable, but there doesn't appear to be any screw points for the camera assemble on the old screen. Also, the upper cable when you hinge the old screen open isn't attached to the screen. Finally, there do not appear to be any clips on the old screen, and the replacement screen does have clips, but they do not appear to go into anything in the iPhone 12 body. The replacement screen also has screw points for the camera assemble to attach to. Do I not have an iPhone 12?
This is the iPhone 12 MINI guide iPhone 12 Display tauschen this is the iphone 12 guide
is it oem apple battery, because at some photo shows(Ifixit) and another shows (apple) ... wait your answer?
karim - Antwort
BEWARE! This screen isn’t the same as older iPhone models’ screens. The iPhone mini 12-screen comes with a thin plastic frame around the screen on its back. Thus, make sure you don’t insert the pick in between the screen and its plastic frame, as you’ll seperate the screen and leave the plastic frame still sitting in the phone’s metal housing (this cost me 100 dollars…). Carefully heat the sides of the metal housing and do not heat directly on the glass, as doing so will potentially loosen the glue from the plastic frame stuck to the screen. My suggestion is that you watch a video of this repair as this step-by-step-guide is undercooked.
Dan - Antwort
This is an excellent comment. Following this step-by-step guide to the letter will break your screen; it's by far the worst iFixit guide I've seen to date.
Dormouse -
Ive finished mine and Soooo absolutely dont do this yourself🙌🏽 unless your a mechanic because first of all they didnt send me all of the right tools🤗 and secondly the battery they gave me has an overly large component so it wont fit into my phone. And the absolute HASSEL i had to go through to even just get the package was insane it was a whole month of struggling just for the stuff to not even be right, in conclusion will NEVER order from here again..🤗
Chanell - Antwort