Einleitung
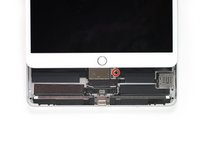
Folge dieser Anleitung, um das Display eines iPad Air 3 (sowohl das Wi-Fi als auch des Cellular Modell) auszubauen oder zu ersetzen.
Der Touch ID Sensor des Home Buttons ist mit dem Logic Board gekoppelt. Um die Touch ID Funktion beizubehalten, muss der originale Home Button auf die neue Frontpanel-Baugruppe übertragen werden.
Auf ein paar Fotos ist ein unterschiedliches Modell zu sehen, die Vorgehensweise ist jedoch die gleiche.
Was du brauchst
-
-
Du musst das Tablet bei dieser Reparatur wahrscheinlich wiederholt erwärmen, damit sich der Kleber nicht abkühlt und wieder fest wird.
-
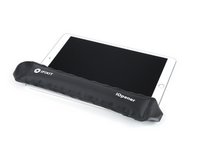
Bereite einen iOpener vor und lege ihn etwa zwei Minuten lang auf die Unterkante des iPad Displays.
-
-
In diesem Schritt verwendetes Werkzeug:Clampy - Anti-Clamp$24.95
-
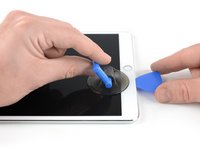
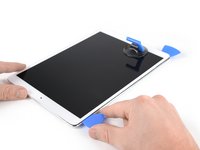
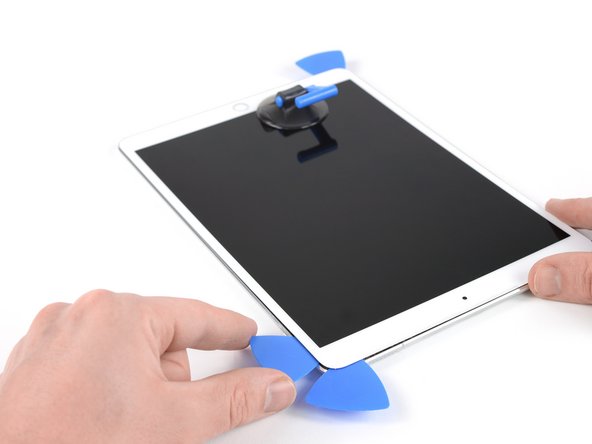
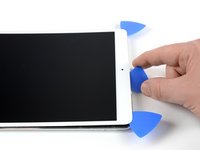
Bringe einen Saugheber in der Nähe des Home Buttons an und drücke ihn gut fest.
-
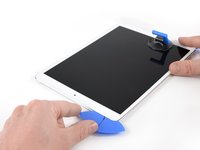
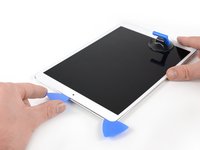
Ziehe fest am Saugheber, damit ein kleiner Spalt zwischen der Frontscheibe und dem Rückgehäuse entsteht.
-
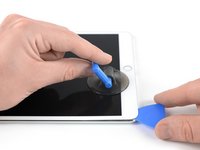
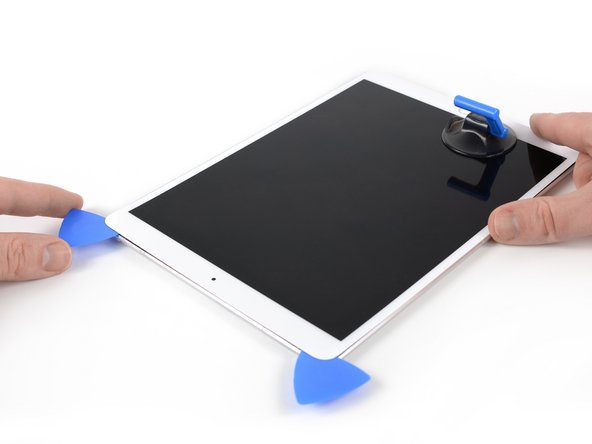
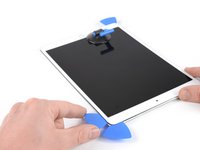
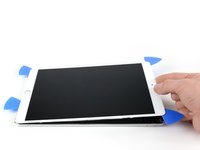
Wenn der Spalt groß genug ist, dann schiebe ein Plektrum hinein.
i used a proper suction tile puller (small one from DIY store used to hold bathroom tiles) to lift the screen off after heating around the edge using a heat gun. Be careful - It didn't damage anything. The tiny suction things that come with those iPhone kits are not strong enough for this. The one in picture might be good, but looks similar to the kits ones that have key ring.
The suction cup that comes with the iPad battery replacement is plenty large enough and strong enough.
CAUTION, do not push the picks in more than a the width of the replacement screen adhesive strips. You will damage the $200 screen, maybe break the glass. The screen is multiple layers and the picks can get in-between the layers if you push too far in. I got into trouble at the lower left corner. After getting the screen loose, I found that I only need a 2-3 millimeters on the sides and bottom, and four or five millimeters in the corners.
These comments need to be highlighted and added to the guide. The pictures showing the pick placement are very misleading. The thickness of the adhesive is only 2mm as you had mentioned! Waiting now for my replacement screen. Apples products look amazing but now I realize I would have been way better off just living with a one hour battery and or buying a new ipad.
-
-
-
Schneide durch den Kleber unter dem Display, indem du das Plektrum an der Kante des Displays entlang zur unteren linken Ecke schiebst.
-
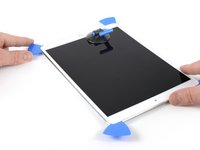
Lasse das Plektrum vorläufig stecken, damit sich der Kleber nicht wieder verbinden kann.
-
-
-
Erwärme die linke Kante des iPads etwa zwei Minuten lang, oder bis sie fast zu heiß zum Anfassen ist.
-
Erwärme, falls nötig, den iOpener einige Sekunden lang oder bis er fast zu heiß zum Anfassen ist. Sei aber auch vorsichtig und erhitze den iOpener nicht zu stark, er könnte sonst platzen.
-
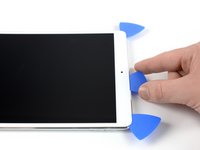
Setze ein zweites Plektrum in der unteren linken Ecke des iPads ein.
-
Schiebe das Plektrum an der linken Displayseite entlang, um den Kleber darunter aufzutrennen.
-
Lasse das Plektrum nahe der oberen linken Ecke stecken, damit sich der Kleber nicht wieder verbinden kann.
-
-
-
Erwärme die Oberkante des iPads etwa zwei Minuten lang, oder bis sie fast zu heiß zum Anfassen ist.
-
-
-
Setze ein drittes Plektrum in die obere linke Ecke des iPads ein.
-
Schiebe das Plektrum zur oberen rechten Ecke hin und schneide den Kleber unter der Oberkante des iPads auf.
-
-
-
Erwärme die verbliebene rechte Kante des iPads etwa zwei Minuten lang, oder bis sie fast zu heiß zum Anfassen ist.
-
Setze ein viertes Plektrum in der oberen rechten Ecke des iPads ein.
-
Schiebe das Plektrum hinunter bis zur unteren rechten Ecke, um den Kleber aufzutrennen.
-
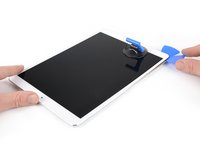
Schiebe das Plektrum um die untere rechte Ecke herum - wobei du eventuell zum Erwärmen unterbrechen musst - und schneide den restlichen Kleber an der Unterkante auf. Halte aber vor dem Home Button an.
We must be very careful when we are prying left and right size bezel to peel off the screen as there very little gap between edges and LCD. Slightly inside push can crack LCD. We need to pay full care and raising edges very very slowly.
-
-
-
Setze ein fünftes Plektrum an der Oberkante des iPads in der Nähe (aber nicht genau auf) der Frontkamera ein.
-
Verdrehe das Plektrum vorsichtig, so dass sich die Displayeinheit vom iPad ablöst.
-
Wenn nötig, musst du nochmals erwärmen und/oder restlichen Kleber, der das Display am Ablösen hindert, aufschneiden.
Be very gentle when twisting. My screen broke in this step. I would not twist it but try to remove glue further as there is a aluminium support of the screen in the wide area beneath the light sensors and there is glue on that also preventing in easy lifting the screen. Just be careful not to damage the light sensors and camera.
-
-
-
-
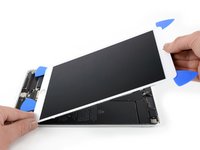
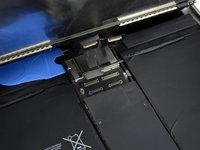
Hebe die Displayeinheit an der Oberkante an und schiebe sie vorsichtig hoch (zur Frontkamera und zur Kopfhörerbuchse), bis unten die Schraube am Akkustecker sichtbar wird.
How do you go about getting to this battery connector as it is covered by a large metal shield above the logic board, if you do not disconnect the battery you risk frying the back light.
The metal shield is not relevant for this. You can leave it in place or remove it if it comes of. Once the screw of the plate is removed you will be able to lift the print a little bit and put someting between the battery connector and the board connector. The connector is beneath the print. Look further on to see a deck card is used for this.
-
-
In diesem Schritt verwendetes Werkzeug:Magnetic Project Mat$19.95
-
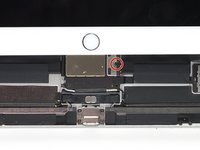
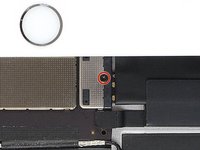
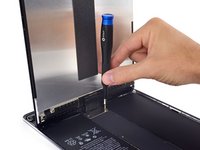
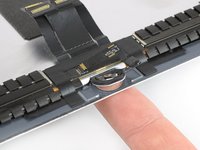
Entferne die 1,9 mm Kreuzschlitzschraube, die den Akkukabelstecker befestigt.
What size Phillips bit?
-
-
This picture looks nothing like my A2152 battery connector. I can’t really tell what is happening here.
This is an iPad Pro not an iPad Air which is different.
Dan -
-
-
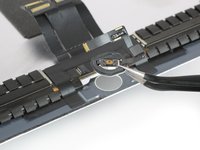
Um den Akku abzutrennen, musst du einen Zinken des Akkublockers oder die Spitze eines Plektrums unter den Stecker der Stromversorgung schieben, damit der Stromfluss sicher unterbrochen ist.
-
Lasse den Akkublocker während der gesamten Reparatur stecken.
I found it very hard to fit something under the battery power connector. I did not have a battery blocker, so I tried a playing card. I was not able to slide it between the springs. The section of the battery power connector, above the cantilever springs, did not seem to want to give at all, like in the picture above. If other people had success, I would love to hear how.
I didn’t have success either, but i kept myself grounded, and avoided battery contact as much as possible.
I used a playing card cut to shape. I had to make a couple, to try a few times.. It does go in eventually. Not deep, but enough to break connection. You can test by trying to switch on iPad.
It took some time but I was able to get it under the back part and slide it forward.
You must disconnect the battery before plugging the new screen. I think i didn't break the circuit in first attempt and shorted the screen, the result was half of the screen didn't work. I used a playing card. Second attempt was successful with new screen.
I believe I have a good solution to this problem. I was dissatisfied with the thickness of the battery blocker, or even a thin guitar pick, for that matter; both required force and I feared bending the springs or leaving the connection intact.
What worked for me was cutting a small strip of non-conductive, static-proof film (the kind that RAM and other sensitive components come in). There was every reason to trust in its non-conductivity but just to be sure, I used a VOM to test; its resistance was out of the VOMs range, meaning that its conductivity was nil. I used a spudger to gently lift the logic board off of the battery contacts and slid the non-conductive strip in between; went without a hitch.
When reassembling, I laid the strip on the battery contacts, laid the logic board on top, installed it, connected the display panel and gently drew the slip out and installed the battery screw. Worked like a charm.
These are some extremely misleading set of instructions and picture. Much better if you have the battery discharged, so don't need to worry about blocking the connector. But DO NOT force anything in the through the socket and certainly do not try to bend up the soldered cover, as it appears to be happening in the picture. You will break the connector, most likely resulting in ipad shutting down every 3 minutes from the notorious "thermal sensor missing" panic system crash.
-
-
-
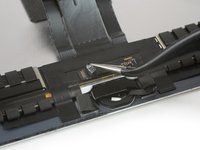
Hebe das Display an der Oberkante langsam an, achte darauf, die angeschlossen Flachbandkabel nicht zu stark zu belasten.
-
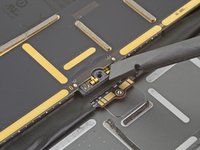
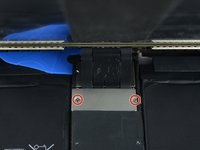
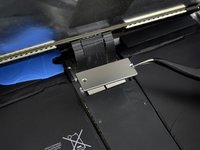
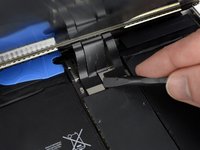
Entferne die beiden 1,3 mm Kreuzschlitzschrauben, mit denen die Steckerabdeckungshalterung des Displays befestigt ist.
-
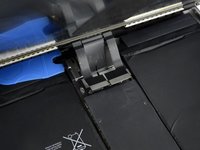
Entferne die Steckerabdeckungshalterung.
Here it is very precocious steps to do. Flx cables to connectors are small in size and we cannot lift the display vertically. Therefore, we may struggle to unscrew the metal shield. We need to use smaller size of philip screw driver or place vertically the display to create enough gap between philip screw driver and the cover bracket. Similarly, when we are replacing new display we need to be carefully connect four flex cable with connectors with logic board.
agree, with re-assembly very tiny screws and awkward positioning, the back two cables pop off if not careful.
I did this step using just the tip of the PH000 screwdriver, it made it much easier to get my hands into the small space, the replacement screen from ifixit had tighter cables that I was not comfortable stretching out to go to a 90* angle to screw back on. Make sure your tip is magnetized for best results :)!
Meaning no disrespect for this excellent guide, I found this photo to be a bit misleading; at least in my case. It clearly shows about 90˚ between the case and the display. I tested the limits with the one I was repairing and could find no way to raise the display far enough to clear a screwdriver without jeopardizing the cables. I resorted to the same solution that Amber Wooldridge discovered; using a PH000 bit and hand-tightening. I had a tiny needle-nosed plier that I used to tighten them a bit (but very gently).
-
-
-
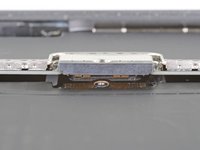
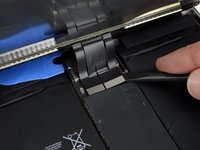
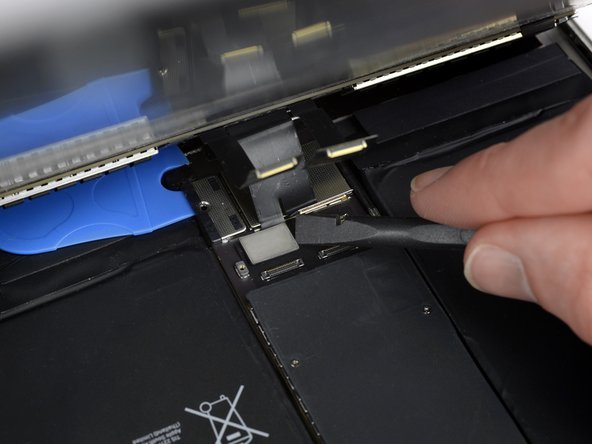
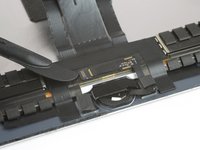
Heble die beiden sichtbaren Flachbandkabelstecker vorsichtig mit dem Spudger gerade aus ihren Anschlüssen hoch und trenne sie ab.
-
-
-
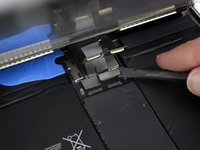
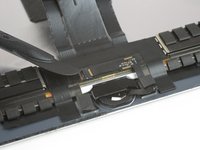
Heble sie mit dem Spudger vorsichtig hoch und trenne sie ab.
I went to replace the LCD assembly on an ipad Air 3, and one of the flex cables on the new LCD assembly broke in half. The flex cables on the old assembly work well and are intact. Is it possible to transfer the old flex cable(s) to the new assembly, or can I solder the broken pieces of the new flex cable together? I have also contacted the part supplier about this and am awaiting a response.
-
-
-
Entferne die Displayeinheit.
Definitely test your iPad’s functions before sealing it up. I needed to reopen the display to reconnect the display connectors in order to have the display functioning properly. As a result, the adhesive strips did not work as well and I needed to tape some of the edges closed with a small section of strong clear packing tape.
I stuck the adhesive to the chassis first. That was messy because the plastic that covers the adhesive seems to be for screen side first. So you end up exposing both sides and those collect dust. I now realise you're supposed to put the adhesive on screen first. Not sure if it would have made much difference in the outcome (mine screen is not stuck in some places).
I found this out too. I had two sealing kits and they were both meant to be fixed on the screen first. I did not managed to get the screen to stick with the body as well. Now used some B6000 glue in addition.
agrior -
-
-
-
Erwärme mit einem iOpener oder einem Haartrockner ungefähr eine Minute lang den Bereich um den Home Button, damit der Kleber aufweicht, der die Bestandteile des Home Buttons befestigt.
-
-
In diesem Schritt verwendetes Werkzeug:Tweezers$4.99
-
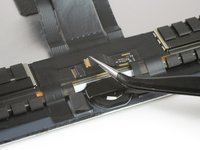
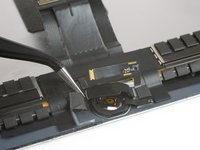
Ziehe mit einer Pinzette alles Klebeband vom ZIF-Verbinder des Home Buttons ab.
-
Hebe den scharnierartigen Sicherungsbügel am ZIF Verbinder mit einem Spudger, einem Öffnungswerkzeug oder dem Fingernagel hoch.
-
-
-
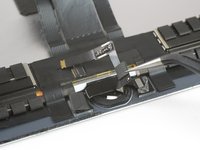
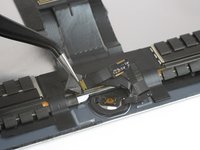
Ziehe das Flachbandkabel des Home Buttons mit einer Pinzette gerade aus dem ZIF-Anschluss heraus.
-
Ziehe das Flachbandkabel vorsichtig von der Abdeckung des Home Buttons weg und biege es ein wenig nach oben.
-
-
In diesem Schritt verwendetes Werkzeug:Halberd Spudger$2.99
-
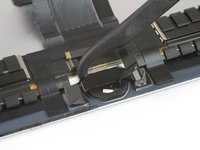
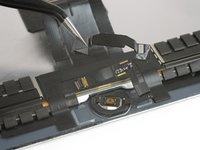
Setze den Haken eines Halberd Spudgers oder das flache Ende eines normalen Spudgers unter die Halterung des Home Buttons und heble sie vorsichtig in Richtung Unterkante des iPads, bis sie sich ablöst.
-
-
In diesem Schritt verwendetes Werkzeug:E6000 Adhesive Glue$2.99
-
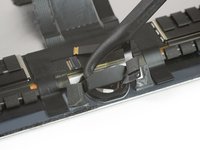
Hebe die Halterung des Home Buttons an der linken Seite an.
-
Ziehe sie vorsichtig zum Display hin hoch, achte dabei darauf, dass du nicht das Kabel des Home Buttons beschädigst.
-
Schabe soviel von den Kleberresten ab wie möglich, reinige es dann mit Azeton oder hochkonzentriertem Isopropylalkohol (mindestens 90%ig).
-
Befestige die Halterung mit hochfesten Kleber, Sekundenkleber oder hochfestem doppelseitigem Klebeband. Achte darauf, dass die Halterung richtig ausgerichtet ist, bevor du den Kleber abbinden lässt, sonst wird der Home Button beim Drücken nicht klicken.
-
Eventuell musst du die Halterung des Home Buttons beim Abbinden des Klebers mit Schraubzwingen festklemmen.
You cannot use Tesa or double side tape under bracket. There is some greater technique or material we need to use. I tried super glue even, though, I really not work what original clicking sounds. It happens almost all digital home button related all iPad. We need to strive to find its accurate solution.
What width/size Tesa tape (mm) do we require?
I ordered tesla tape without noticing the width and ended up with 2mm tape. I used three strips of it for this step, so 6mm would be perfect for the home button bracket. Having said that, the 2mm size is probably better if you need it for attaching the display, but I never needed it for that because I loved how the pre-cut adhesive strips in step 16 worked really well.
hdh607 -
-
-
-
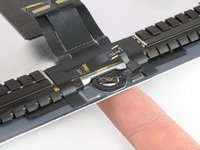
Drücke den Home Button mit der Fingerkuppe und schiebe ihn von der Vorderseite des Displays her durch.
-
Entferne den Home Button.
When we lift home button at very last stage, there is also ring/round plastic bracket that we need to peel off and re-attached to home button when transferring to the new display.
Do you glue the plastic ring on both sides , So is it glued to the lcd but also to the home button ?
Thanks for the tutorial, but it ends way to soon. The instructions on installing the new home button are vague, and there is nothing about when to remove the battery blocker or what adhesive is acceptable to use to reattach the screen. Would be great to see this tutorial cover everything from start to finish.
The responsive click is present, but does not have any function on the screen. Is there any correlation between the click and functionality, or did I maybe destroy the cable ?
If it physically clicks but does not invoke any action then maybe the cable does not sit properly inside the ZIF-connector or the cable might be damaged. Try to re-connect and make sure it’s in the ZIF-connector all the way.
I'v transferred a home button to a new screen and stuck it down with b-7000 adhesive. When I go to test and put the screen in place, I push the button but it seems to not stay stuck to the new screen. What should I do? I also have a white plastic ring that was part of the button. Should I have left it on there or remove it?
I changed the LCD but now its completely dim.
What might be the cause?
Either the cable is not installed correctly or You have blown the backlit ic. You will have to send it for micro soldering to replace the chip. Always make sure you disconnect the battery before any repair is performed.
-
-
-
Nur das Display bleibt übrig.
When replacing the screen; the adhesive that came with the new screen is not that great or maybe i'm doing something wrong with it. The first time i used it, i heat gunned the edge, and parts of the screen still wouldn't stick. So i used a second set, and tried not to touch the adhesive, i used tweezers alot. It was a bit better second time, but, the case we have wraps around the edge of screen, and is basically holding giving extra confidence to hold screen on.
-


Vergleiche dein neues Ersatzteil mit dem Originalteil, möglicherweise musst du Teile übertragen oder Schutzfolien von deinem neuen Teil abziehen, bevor du es einbauen kannst.
Um dein Gerät wieder zusammenzubauen, folge den Schritten dieser Anleitung in umgekehrter Reihenfolge.
Entsorge deinen Elektromüll fachgerecht.
Lief die Reparatur nicht wie geplant? Versuche es mit ein paar grundsätzlichen Lösungsansätzen oder bitte in unserem iPad Air 3 Forum um Hilfe.
Rückgängig: Ich habe diese Anleitung nicht absolviert.
18 weitere Personen haben diese Anleitung absolviert.
Besonderer Dank geht an diese Übersetzer:innen:
100%

Annika Faelker hilft uns, die Welt in Ordnung zu bringen! Wie kann ich mithelfen?
Hier starten ›

2 Kommentare
I used this guide to remove and replace a cracked screen from iPad Air 3 successfully. My comments are in the sections above , i summarise here (1) i used a proper suction tile puller (small one from DIY store used to hold bathroom tiles) to lift the screen off after heating around the edge using a heat gun. (2) You must disconnect the battery before plugging the new screen. I think i didn't break the circuit in first attempt and shorted the screen, the result was half of the screen didn't work. I used playing card. (3) The adhesive that came with the new screen is not that great or maybe i'm doing something wrong with it. The first time i used it, i heat gunned the edge (adhesive on), and parts of the screen still wouldn't stick. So i used a second set, and tried not to touch the adhesive, i used tweezers alot. It was a bit better second time, but, the case we have wraps over screen, holds it on.
I used the guide as well and the replacement went well except the home button. The touch-id sensor is working, but until I have new glue, I need to use Assistive touch. Guess I need to glue the home button a bit more.