Einleitung
Folge dieser Anleitung, um die Rückseitenkamera deines iPhone XR auszutauschen.
Hinweis: In dieser Anleitung wird gezeigt, wie man die Displaykabel vollständig ablöst und die Displayeinheit entfernt, um besser an die Rückkamera heranzukommen. Es ist allerdings auch möglich, die Rückkamera zu entfernen, ohne vorher die Displaykabel zu trennen. Wenn du schon viel Erfahrung in der Reparatur hast, kannst du diesen Schritt auch überspringen, um Zeit zu sparen. Du musst dann aber darauf achten, dass das Display gut abgestützt wird und die Displaykabel nicht beschädigt werden.
Was du brauchst
-
-
Schalte dein iPhone aus, bevor du anfängst.
-
Entferne die beiden 6,7 mm langen Pentalobe Schrauben an der Unterkante des iPhones.
-
-
-
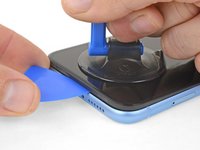
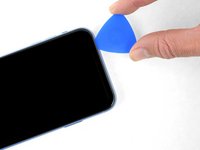
Zeichne mit einem Permanentmarker 3 mm von der Spitze des Plektrums entfernt einen Strich.
-
-
-
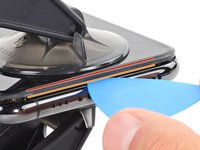
Überdecke die Glasscheibe des Displays komplett mit überlappenden Streifen von durchsichtigem Paketband.
-
Wenn das Glas so stark zerbrochen ist, dass der Saugheber in den nächsten Schritten nicht gut haftet, dann versuche ein starkes Klebeband ("Panzerband") zu einem Griff zu falten und so auf die Scheibe zu kleben, dass du sie damit hochziehen kannst.
-
-
In diesem Schritt verwendetes Werkzeug:Clampy - Anti-Clamp$24.95
-
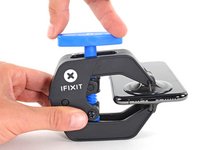
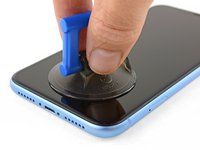
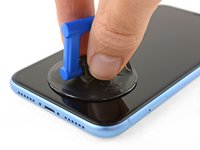
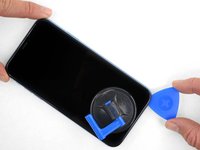
Drücke den blauen Griff zurück, damit die Arme der Anti-Clamp frei beweglich werden.
-
Schiebe die Arme über die linke Kante des iPhones.
-
Bringe die Saugheber nahe an der Unterkante des Displays an, einen auf der Vorderseite, den anderen auf der Rückseite.
-
Drücke die Saugheber zusammen, so dass sie auf den Oberflächen haften.
-
-
-
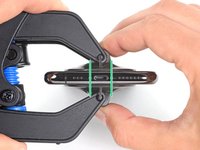
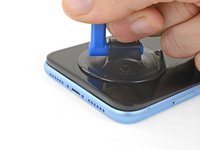
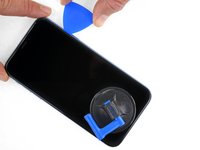
Drücke den blauen Griff vorwärts, damit die Arme wieder fest sind.
-
Drehe den Griff eine volle Umdrehung im Uhrzeigersinn, oder bis du merkst, dass sich die Saugheber dehnen.
-
-
-
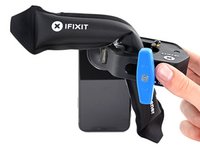
Erwärme einen iOpener und führe ihn durch die Arme der Anti-Clamp.
-
Forme den iOpener so, dass er auf der Unterkante des iPhones liegt.
-
Warte eine Minute, damit sich der Kleber allmählich ablösen und sich ein Spalt bilden kann.
-
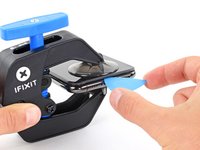
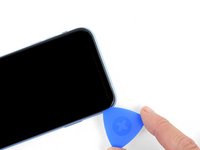
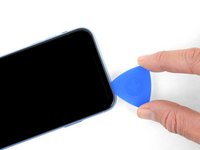
Wenn die Anti-Clamp einen ausreichend breiten Spalt erzeugt hat, setze ein Plektrum unter das Display ein.
-
Überspringe die nächsten drei Schritte.
Please UPDATE THIS STEP to say 'insert the opening pick underneath the PLASTIC FRAME OF THE SCREEN' and not the screen. Way too many people are taking this as the way to do it then posting their screen looks different when it's open when they've actually removed the screen leaving the frame in place. It's not rocket science.
Thanks for the suggestion! We updated this step to clarify that.
-
-
-
Benutze einen Fön oder eine Heißluftpistole oder bereite einen iOpener vor und erwärme damit etwa eine Minute lang die Unterkante des iPhones, um den Kleber darunter aufzuweichen.
An alternative to the Iopener or heat gun is to heat water to EXACTLY 80 degrees F (cooking thermometer is great for this) and pour into a reinforced ziplock type bag. Leave the bag on the screen, but be sure that none of the hot water rests on the zipper portion, as the water is hot enough to soften that seal and leak out on to your device! This meat had is my personal favorite as the heat is distributed very equally and precisely as compared to a heat gun, but is more accessible than the Iopener.
-
-
-
Wenn du einen einzelnen Saugheber verwendest, setzte ihn an der unteren Kante des iPhones auf, aber nicht im gebogenen Bereich des Glases ganz unten.
-
-
-
Ziehe fest und gleichmäßig am Saugheber und erzeuge dadurch einen kleinen Spalt zwischen Frontpanel und Rückgehäuse.
-
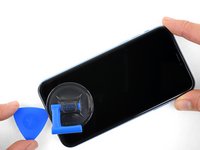
Setze ein Plektrum in den Spalt unter dem Display und der Kunstoffblende ein, nicht am Display selbst.
-
-
-
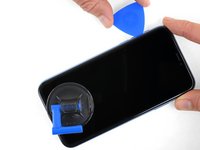
Schiebe das Plektrum um die untere linke Ecke und die linke Kante des iPhones nach oben, und durchtrenne so den Kleber, mit dem das Display befestigt ist.
I think it's important to note that depending on how a screen was damaged, make sure to insert the pic under the black bezel directly under the actual screen. This bezel is a frame around the digitizer. I unknowingly inserted the pic between the bezel and the screen, and separated them both. I did this all the way around the phone. So I basically had to struggle to keep together two different sections of the display assembly because of this mishap, until I removed all the ribbon connectors. It made things much more difficult.
-
-
-
-
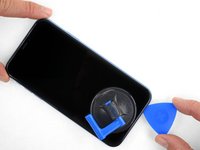
Setze dein Plektrum wieder an der Unterkante des iPhones ein und schiebe es an der rechten Seite nach oben, um den Kleber durchzutrennen.
My replacement screen for the XR has a black rim but it looks pink. Is that normal?
Step 11 says not to insert your pick around the right side to avoid damaging cables, then Step 12 says to insert it on the right side. Help, I'm confused!
Hi there!
Thank you for the feedback! The wording in step 11 was definitely ambiguous, so we have changed it! You only need to avoid the marked spots rather than the right edge.
-
-
-
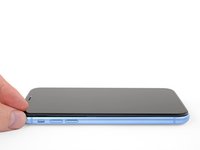
Schiebe das Plektrum um die obere Ecke des Displays und ziehe das Display gleichzeitig, eventuell mit einer leicht wackelnden Bewegung, nach unten in Richtung Lightning Anschluss.
-
Schiebe das Plektrum zur gegenüberliegenden Ecke und durchtrenne den gesamten restlichen Kleber, mit dem das Display noch befestigt ist.
-
-
-
Öffne das iPhone, indem du das Display von der linken Seite her hochklappst, wie einen Buchdeckel.
-
Lehne das Display gegen einen Gegenstand, damit es abgestützt ist, während du daran arbeitest.
sure looks like the "hinge" is on the right hand side to me.. not left...!
If you leave the suction cup attached to the screen during the “hinging” process, it makes for a very handy holder for the screen until it’s completely detached.
-
-
In diesem Schritt verwendetes Werkzeug:Magnetic Project Mat$19.95
-
Entferne die drei 1,2 mm Y000 Schrauben, mit denen die Abdeckung des Akkusteckers befestigt ist.
-
Entferne die Halterung.
Definitely make sure all three lobes of your tool are aligned before use (it’s a little harder to tell with this style of bit) and apply even and adequate pressure to ensure it grabs as you spin the driver to prevent disfiguring the lobes/slot of the screw head.
Unfortunately my Y000 tool was perhaps not the best fit (tolerance a bit off) in these screws and I ended up stripping out the heads of all three of these. I started to panic but after I sanded the tip of my Y000 bit down a little with super fine grit (1000CW-C) sand paper to flatten the domed tip (visible with macro lens) and give it a bit more bite I was able to remove and reinstall without issue—in fact I had to remove and install them twice since I forgot my adhesive tape during reassembly, so the screws survived and the sanded bit worked.
+1 to above comment. I bought a cheap kit from Amazon and the Y000 screw driver is not good for this job. I’m concerned that I may have disfigured the heads and i type this comment in the midst of my fix :D Be gentle and assess if you can remove at least one screw with your driver before rummaging through all three and other similar screws holding display connector as well.
Update to above comment. I got hold of a Y0.8 screw driver bit (lucky to find an ORIA screw driver kit in my office) and it works like wonders :) Now back to work…
-
-
-
Heble den Akkustecker mit der Spudgerspitze aus seinem Anschluss.
-
Biege den Stecker leicht vom Logic Board weg, um zu vermeiden, dass er sich versehentlich wieder mit dem Anschluss verbindet und so dein iPhone während der Reparatur mit Strom versorgt.
-
-
-
Entferne die beiden 1,2 mm Y000 Schrauben, mit denen die Halterung des Displaysteckers befestigt ist.
-
Entferne die Halterung.
What if the screw is damaged and you can’t get one out?
-
-
-
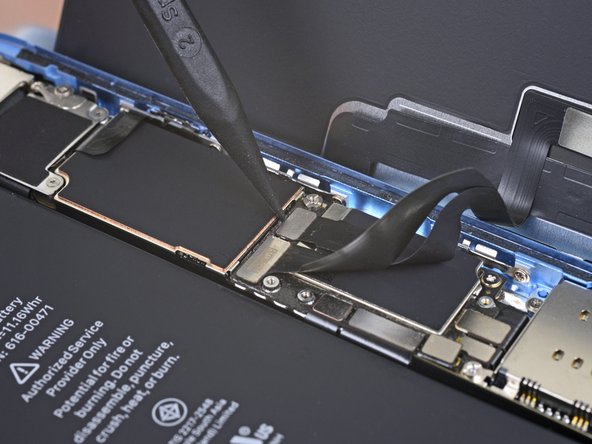
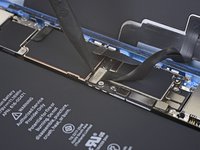
Heble das Touchscreenkabel mit der Spudgerspitze hoch und löse es ab.
-
-
-
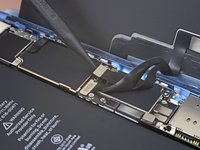
Trenne den Stecker des Displaykabels mit der Spudgerspitze.
The new display cable isn’t snapping in but I was just able to snap in the old one. Did I break the new one somehow?
Same it is really frustrating, just keeps slipping up and its bound to get damaged
-
-
-
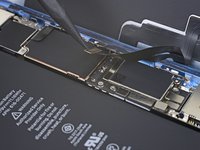
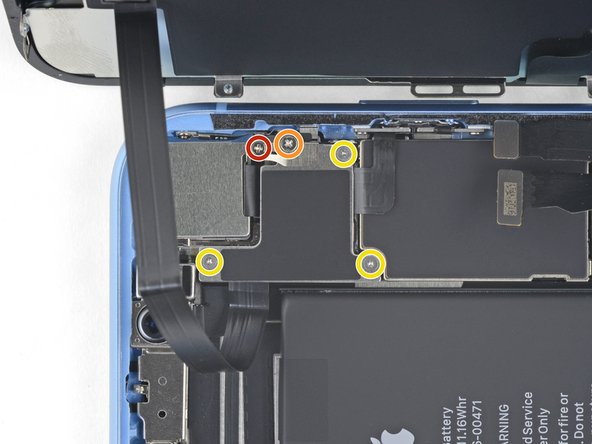
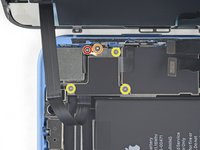
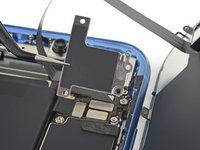
Entferne die fünf Schrauben, mit denen die Halterung des Logic Board Steckers am Rückgehäuse befestigt ist:
-
Eine 1,3 mm Kreuzschlitzschraube #000
-
Eine 1,5 mm Kreuzschlitzschraube #000
-
Drei 1,2 mm Y000 Schraube
-
Entferne die Halterung.
I’m not sure it makes much if any difference, but we went ahead and swapped the order for you guys. Thanks for your comments!
I just repaired another XR, and you are right! It doesn’t make any differnerce in the order these screws come out. I still damaged this fragile piece. As I work on more of these, I’ll figure out a way to remove this screw without damaging the clip. For now everyone, just use extra caution when removing the 1.3mm phillips screw! Thanks Jeff
I’ve now done at least 6 of these so far and I have fairly consistent good results by taking the 2 Philips head screws out first, then doing the Y screws.
Stow -
Is this piece important for the repair if broken? I have broken it on a home repair. What is it used for? Is it a grounding connection or is it completely unimportant. More information needed please
I’m wondering that too. Is this piece important?
I can confirm that taking out the 1.3 mm screw first then the 1.5 mm screw works the best. If done correctly, you should be able to to remove the rest of the screws and pull the panel off with the clip still attached to the panel. For reassembly, start with the 1.5 mm screw then the 1.3 mm screw.
I don’t remove the small screw at all. I just slide out the metal cover plate and slide back in to reassemble.
this is what i have done as well. Care is still needed to avoid damaging this part. However, it is seemingly far less prone to damage or loss and thus less risky for this repair process.
I too broke this shield. In looking over this problem I believe it’s best to loosen, but not remove, either screw first then the other. To be clear, loosen the red or yellow screw but only just to break it free, then the second screw. Then remove both and the others and the shield should remain in one piece. I put it back with the broken part (on the red screw) and made sure the two are in contact so there’s conductivity as these shields serve a purpose other than just holding in connectors. My phone works fine with this fix.
Is this small bracket important if broken??
Mine is broken
Mine is broken and my apple pay doesn’t work. Something to do with NFC antenna this little clip??
I'm guessing so. I replaced a screen on a phone I bought from a friend. I noticed this bracket was broken when I disassembled the phone but didn't think much of it. When I reassembled it my NFC also does not work. Bummer. A lot of people in these comments have asked if it is crucial that this bracket be connected. Can someone from iFixit or other please reply to those comments?
Kyaw-Zin is right because the shield contains of two tin parts. But there is another option:
1. Unscrew the yellow and orange screws first.
2. Lift the shield gently that it can turn about 20° anticlockwise.
3. Open the red screw and let the shield turn with it the first degrees.
The first time I did this repair, I didn’t see the comments ahead of time and broke the bracket, even removing the 1.3mm screws first. The second time I did the repair, I was prepared and being extra careful, but the simple act of turning the 1.3mm screw head was enough to break it. If I ever have to do this repair again, I’ll just leave the screw in and try to slide the plate out with the screw (and bracket, hopefully) still in tact, as per Kyaw-Zin Win.
None of the screw driver bits I got fits the 1.3mm and 1.5mm screws. How do I remove them?
Same issue as above. The bits provided in the kit do not work with the 1.3mm and 1.5mm screws
Further to above comment about bit not working. Had to go and purchase another PH000 from Home Depot and that worked
I’ve broken that little bracket attached to the red screw. Is it important and can I get a replacement????? Thanks all
Broken the clip. Is this important??
Don't remove the 1.3 Phillips screw! Twisting this screw will break the smaller bracket that is clipped to the larger. Remove all the other screws. Block the smaller bracket from moving as you gently slide the larger bracket horizontally toward the battery until free. The smaller bracket can stay in place while the screen is replaced. When reassembling, support the small bracket by backing with a spudger or similar tool.
I just broke the smaller bracket also :( I didn´t notice these comments until now :(
It looks like part of the antenna for NFC, as all except NFC works on my iPhone now.
It should be repairable using some wire wrap wire, either twisted around the two screws that connected that part of the bracket (or soldered in place). I will try and report back if it works.
Success!! I managed to re-construct the small arm of the bracket by screwing the 1.3mm screw back in with some 0.3mm enamel wire soldered into what was left of the small bracket arm on the screw, then the other end of the enamel wire I wrapped under the 1.5 wire screw's head (enamel exposed to bare metal), then screwed both screws down. also I lifted up the small metal arm with a screw driver (to make sure it reconnects with the display grounding square) ..and NFC worked again (slightly different antenna pattern mind (need to place cards slightly higher up the rear of the phone). Anyway works again :)
do you think it would be possible to repair without the use of microsoldering?
i brought a new bracket set for the xr and replaced the old one but even with that nfc/apple pay still doesn't work. i'm questioning if i put a wrong size screw or something else
-
-
-
Heble den Stecker der Frontsensorgruppe mit der Spudgerspitze aus seinem Anschluss.
During testing, make sure your proximity sensor is not on upside down, as it’s easy to connect upside down. Your phone will boot loop if it’s on incorrectly.
-
-
-
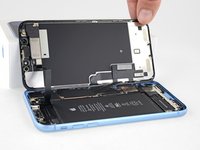
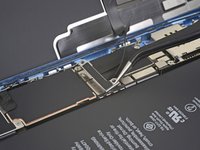
Entferne die Displayeinheit.
unclear if this is where screen removal ends
I had the same question, but the answer is yes. Steps 21-30 are removing parts from the original screen that need to be reattached onto the new screen. You are no longer working inside the frame, but on the back of the screen itself.
I apologize for missing these comments initially, but yes that’s correct, the screen is removed now and the rest of the guide goes on to other parts, either in the phone or on the back of the screen. Good luck with the repair!
The alternate method of removing the battery should be highlighted as a standard option. There is so much more work and potential to damage the parts than if you left them in place and carefully with plenty of heat remove the battery. I so wish I had seen this before!
-
-
In diesem Schritt verwendetes Werkzeug:iFixit Precision 4 mm Screwdriver Bit$2.99
-
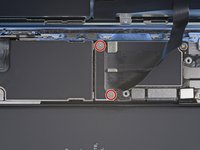
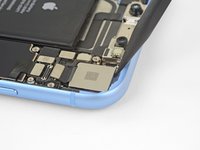
Entferne die zwei Schrauben, mit der die Abdeckung der Rückkamera befestigt ist:
-
Eine 1,6 mm Kreuzschlitzschraube
-
Eine 2,4 mm Abstandsschraube
-
-
-
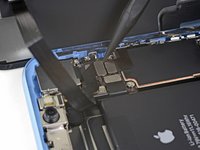
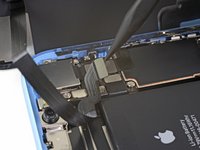
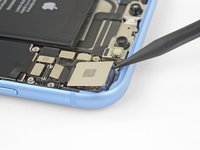
Benutze ein Öffnungswerkzeug oder deinen Fingernagel, um den Kabelstecker der Kamera zu trennen, indem du ihn einfach aus seiner Halterung hebelst.
-
-
-
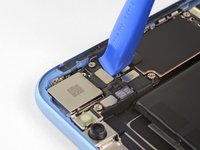
Positioniere die Spitze eines Spudgers an die linke obere Ecke der Kamera, zwischen die Kameraeinheit und den Rahmen des iPhones.
-
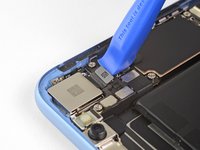
Versuche nun vorsichtig, die Kamera aus dem iPhone zu hebeln.
-


Um dein Gerät wieder zusammenzubauen, führe diese Schritte in der umgekehrten Reihenfolge durch.
Entsorge deinen Elektromüll sachgerecht.
Hat die Reparatur nicht ganz geklappt? In unserem Forum findest du Hilfe bei der Fehlersuche.
Um dein Gerät wieder zusammenzubauen, führe diese Schritte in der umgekehrten Reihenfolge durch.
Entsorge deinen Elektromüll sachgerecht.
Hat die Reparatur nicht ganz geklappt? In unserem Forum findest du Hilfe bei der Fehlersuche.
Rückgängig: Ich habe diese Anleitung nicht absolviert.
34 weitere Personen haben diese Anleitung absolviert.
Besonderer Dank geht an diese Übersetzer:innen:
100%


Diese Übersetzer:innen helfen uns, die Welt zu reparieren! Wie kann ich mithelfen?
Hier starten ›

One of my gaskets was as shown in your second photo, the other had been worked into the threads (as if smeared) probably from the factory and was completely unusable.
In place of replacements (unsure of where to purchase) I just used a clear silicone caulking on both screws upon reassembly to offer at least some water seal. I wish these gaskets were included with the gasket waterproofing sealant kit!
Erica - Antwort
Is there any place to buy these screw gaskets? I haven’t seen it mentioned anywhere but one of mine was pretty much chewed up. Silicone should work but I’d prefer the oem solution.
Chilinh Nguyen - Antwort
I found a place on Amazon that sells them. It's cheapest to get a full set of screws than to get just these. $5-$6 USD.
J Olin -
Can it be dead?
Lulu navarro - Antwort
If I transfer the data from the old to the new battery with an icopy, don't I get an error message?
David Julian Krause - Antwort
how am i supposed to know if the battery is below 25% if the screen won't turn on?
Beth Jackson - Antwort
Spoiler alert! I just followed all the steps and if you bought the anti-clamp you might save a lot of time and some unreversible steps.
I recommend that you read all the steps before beginning and follow the steps up to the point where the guide removes the screen (step 23). After that read again the precautions of step 41 and try the next thing:
- Using something like the iOpener hot bag, heat up the back side of the phone where the battery is glued to for some minutes
- Alternatively use a 3d printer heat bed at 60 degrees Celsius
- Once the back of the phone is hot to the touch, enough to make it uncomfortable to the touch, find a portion of the battery with a smooth surface and attach the anti-clamp to it and the back of the phone
- Follow the steps 4 and 5 to detach the battery from the frame
If this procedure works you will not have to remove some elements such as:
- lower speaker black tape (step 28)
- lower speaker water proof gasket (step 33)
I hope that someone find this helpful. Happy fixing!!
Julio Beltran - Antwort