
Google Pixel 4a Akku tauschen

Einleitung
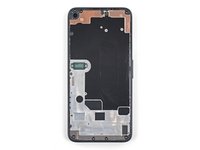
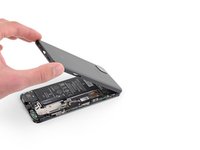
Zu Schritt 1 der AnleitungDiese Anleitung wurde von iFixit-Mitarbeitern erstellt und nicht von Google unterstützt. Erfahre hier mehr zu unseren Reparaturanleitungen.
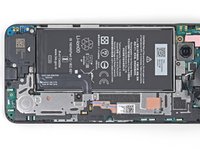
Diese Anleitung zeigt, wie der Akku im Google Pixel 4a ausgetauscht werden kann.
Entlade zur Sicherheit den Akku auf unter 25%, bevor du mit der Reparatur beginnst. Du reduzierst dadurch das Risiko, dass sich der Akku entzündet oder sogar explodiert, falls er während der Reparatur versehentlich angestochen werden sollte. Wenn der Akku aufgebläht ist, dann musst du geeignete Vorsichtsmaßnahmen treffen.
Das Display des Pixel 4a ist nicht verstärkt und daher zerbrechlich. Wenn du das Display wieder verwenden willst, dann beachte ganz besonders die Warnhinweise im Verlauf der Anleitung.
Was du brauchst
Fix Kit
Dieses Kit enthält alle Ersatzteile und Werkzeuge, die für die Anleitung benötigt werden.

Ersatzteile


Werkzeuge


Mehr anzeigen …
-
-
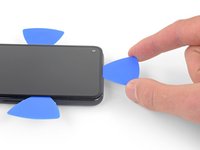
Setze ein SIM-Auswurfswerkzeug, - Bit oder eine aufgebogene Büroklammer in die kleine Öffnung am SIM-Einschub ein.
-
Drücke fest hinein, dann kommt der Einschub heraus.
-
Entferne den SIM-Einschub.
-
-
-
Beachte die beiden Nähte an der Kante des Smartphones:
-
Displaynaht: Diese Naht trennt das Display vom restlichen Smartphone. An dieser Stelle muss angesetzt werden.
-
Rahmennaht: hier trifft der Kunststoffrahmen auf die Rückseite. Er ist verschraubt. Hier darfst du nicht hebeln.
-
Merke dir vor Reparaturbeginn folgende Stellen am Display:
-
Flachbandkabel zum Display: Setze das Öffnungswerkzeug nicht tiefer als angegeben ein, ansonsten riskierst du Beschädigungen am Kabel.
-
Schmaler Kleberand: Wenn du an diesem schmalen Kleberand hebelst, ohne das Plektrum anzuwinkeln, kannst du das OLED-Panel beschädigen.
Coll down guys and gals.
1) go below the Display and not between the backcover/middle (see the other comments)
2) just take care about the flex/display cable position (which is iirc about on the middle i.e. 2nd 3rd from the bottom ON THE LEFT side dear OP)
Everything else is just separting the glued on Display from the Phone.
See the other comments
Cool down guys and gals.
1) go below the Display and not between the backcover/middle (see the other comments)
2) just take care about the flex/display cable position (which is iirc about on the middle i.e. 2nd 3rd from the bottom ON THE LEFT side dear OP)
Everything else is just separting the glued on Display from the Phone.
See the other comments
I've measured it: The cable starts arround 1.4-1.6 cm from the lower half from the bottom on the left side.
So You can cut the bottom left corner and of course the upper left one but for safety's sake, watch out for the camera.
You can go up to 5cm down from the upper left side till You're near the cable.
When you say left side, is this your left when the phone screen is facing you?
jaunie -
The third image her shows the back of the screen, not the body of the phone
I wanted to add yet another warning: Be extremely careful in the lower left edge of the screen!
I tried to be gentle, and inserted the pick very little, but still, after reassembly, my screen remained black (while the rest of the device continued working – if you have USB debugging enabled, you can still use it using the
scrcpytool). There was no visible damage; I suspect that I damaged the ribbon cable in the lower left in an invisible way.A new screen fixed the problem. Still, this increased the cost of repair by ~$100. I think the guide should highlight the danger even more. Please be careful – one guide on YouTube I found afterwards avoids inserting the pick in the lower left corner entirely, and just "wiggles it free".
-
-
-
Erwärme den rechten Displayrand eine Minute lang mit einem erwärmten iOpener, um den Klebstoff aufzuweichen.
I did the boiling water method. 3 min in water worked fine. I applied to right side and left side for 90 seconds
EN : Heat is definitely not the best way here. I have tried the iOpener and my hot air station to no avail.
Best way is to use a plastic dropper and apply a few drops of isopropyl alcohol. The dropper is definitely the most useful tool of the battery fix kit to remove all the adhesive precisely and without damaging anything.
FR : Chauffer n'est clairement pas la meilleure méthode ici. J'ai essayé l'iOpener et ma station à air chaud en vain.
La meilleure méthode est d'utiliser une pipette en plastique et d'appliquer quelques gouttes d'alcool isopropylique. La pipette est clairement l'outil le plus utile du fix kit batterie pour enlever précisément tout l'adhésif sans rien endommager.
-
-
-
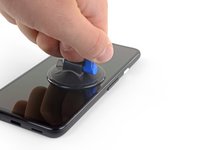
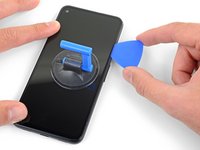
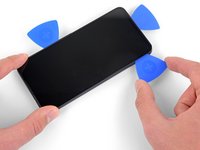
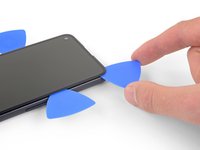
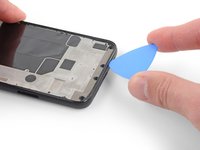
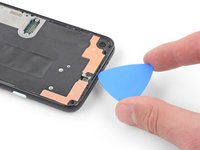
Platziere einen Saugheber so weit wie möglich an den rechten Bildschirmkante.
-
Hebe den Saugheber mit einer starken, gleichmäßigen Kraft an.
-
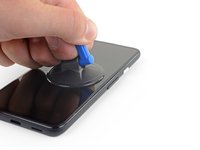
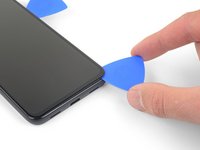
Setze die Spitze eines Plektrums nicht weiter als 1 mm in die Bildschirmnaht ein.
It's pretty easy. Insert it just below the screen between the Display and the Display “holder” or mold.
I highly recommend not using the mediator that is too thick and too rigid, as the screen is super fragile. Instead, I used a piece of X-ray film. It's thinner, more flexible, and sharper, making it easier to cut through the adhesive along the screen.
I followed your advice and it's working great, i just cut some small piece of a X-ray film I had and after some heating it's easy to cut the adhesive, I just used the mediator to hold it opened
EN : I bought the anti-clamp for this step because I was scared to break my screen but I finally ended up using the suction cup delivered in the battery fix kit which is way more simple to use and it's easier to see when you lift the screen.
Place the suction cup exactly as shown then apply a few drops of isopropyl alcohol into the screen seam next to the suction cup. Once the adhesive is soaked with alcohol, you should be able to lift the screen with the suction cup really easily. Then insert the opening pick or a thin plastic card under the screen.
FR : J'ai acheté l'anti-clamp pour cette étape car j'avais peur de péter mon écran mais finalement j'ai utilisé la ventouse fournie dans le fix kit batterie qui est bien plus simple à utiliser et on voit mieux quand on soulève l'écran.
Placez la ventouse exactement comme indiqué puis appliquez quelques gouttes d'alcool isopropylique dans la jointure de l'écran juste à côté de la ventouse. Une fois que l'adhésif est imbibé d'alcool, vous devriez pouvoir soulever l'écran avec la ventouse très facilement. Puis insérez le médiator ou une fine carte en plastique sous l'écran.
-
-
-
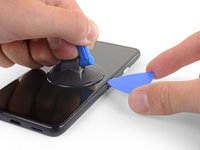
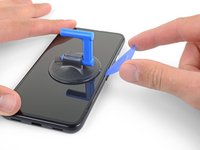
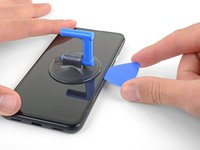
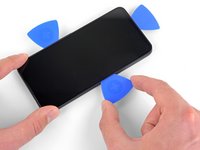
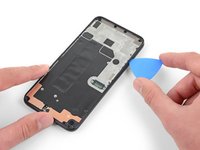
Sobald sich das Plektrum 1 mm weit im Spalt befindet, klappe es nach oben, so dass es einen steilen Winkel bildet.
-
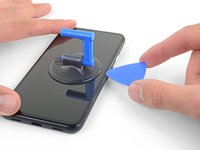
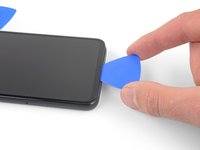
Schiebe das Plektrum vorsichtig in einem steilen Winkel etwa 6 mm in das Smartphone. Das Plektrum sollte unter das OLED-Panel hineinrutschen.
This took me a while, I ended up sharpening the tip of the pick with a razor so I could push it through the seam and slicing a few times, heat->sharpen-> slice until I finally got it to move, and once it slid under carefully heated up areas and sliced with ~2mm of the pick.
Thanks for this tip, I also shaved down my initial pick and that (plus several rounds of reheating and re-trying) eventually got me there!
This sounds also harder than it is. Push it in 1mm and just lift the other end in a wider angle like 70° degree from the horinzontal position. There “shouldn't” be much you can do wrong. Because except for the Data cable (flex) at a certain position, I can't remeber anything important but isolating tapes that I have scratched.
It's just the Screen glued to the mold. That's it.
Oh, and I wonder here where do You all get such thins plectrums? I have also the flat plastic version and the thin plastic cards but none of them were thin enough for this!!
I ended up using the backside i.e. the dull side of a Razorblade. I didn't saw any alternatives to this. Did You hear this OP?
Any!!
the display flex is directly on the bottom of the phone. BE VERY CAREFUL when going around the bottom to not hit the display flex!!!
Be very, VERY careful when inserting the pick or whatever you're using. That OLED panel is super fragile. When I was replacing the battery, I damaged my screen and had to replace it, as well. The new screen worked, thankfully. I tried to be very careful but somehow still damaged the screen. I couldn't detect any damage to the screen except there was a very small fleck of the iridescent material. That's the only thing I could tell.
FYI: The phone would boot up into SOME kind of mode. I could feel it vibrate when I held down the power button or used the fingerprint sensor. If you're in that position, it's a good chance a new screen will get your phone up and running. At least, that was the case for me.
-
-
-
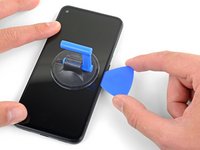
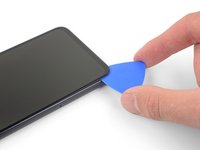
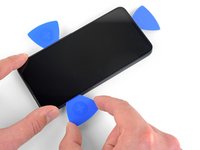
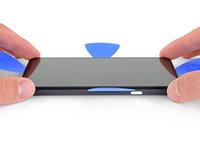
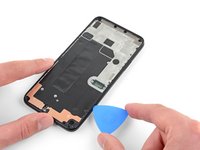
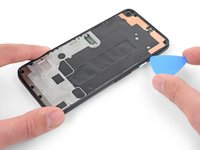
Schiebe das Plektrum an der rechten Kante des Displays entlang, um den Kleber zu durchtrennen.
-
Lasse das Plektrum in der oberen rechten Ecke stecken, um zu verhindern, dass sich der Kleber wieder verbindet.
The display flex is directly on the bottom of the phone. Be very careful when goign around the bottom to not hit the display flex!!!
-
-
-
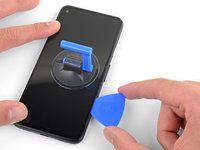
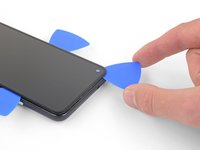
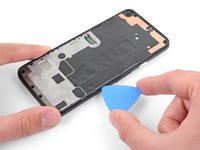
Führe ein weiteres Plektrum schräg in den rechten Rand des Handys ein, wo sich bereits ein Spalt gebildet hat, um eine Beschädigung des OLED-Panels zu vermeiden.
-
Schiebe das Plektrum um die Unterseite des Handys herum, um den Kleber zu durchtrennen.
-
Lass das Plektrum entlang der Unterkante stecken, um ein erneutes Verkleben zu verhindern.
Top and bottom edge adhesive were much stronger than this suggests. Corners were very hard to detach. I killed my screen b/c I cracked it at the top. Worked better with heating around whole perimeter like an iPhone.
WARNING: Be very careful prying the bottom left and right corners! In fact do not insert anything there because there is only a 0.8mm clearance between the screen and the edge, and there's a 0.5mm space between the screen and front glass where if you insert a pick between the screen will crack and break! I had to replace the screen after only doing a battery repair...
Unfortunately I did not properly read the comments here. So for the unafraid people like me:
DO NOT insert something into the bottom right! Especially not like it is shown in the image at this location!
Instead I suggest start releasing the screen from right, then left side, then top and as the last step release the bottom, but start with the left corner. Do not pry too much and use a bit more heat as suggested.
There is a small image of this critical right corner in Step 16 (the part at the top is the display and the left corner at the top is the critical right corner here). You'll see the orange cable in the corner which is easy to damage...
I can second the warnings - especially at the lower corners the OLED screen is extremely sensitive to breaking - as has happened in my attempt when inserting the pick 2 mm.
The display flex is directly on the bottom of the phone. Be very careful when goign around the bottom to not hit the display flex!!!
Unfortunately despite being very delicate on the bottom right corner I ripped off a tiny bit of the digitizer cable and that resulted in a not working screen... went from spending 50€ for a battery replacement to a 150€ total expense battery + screen... :-( My advice is to not even pry the bottom corner, pry all around, then apply heat carefully until the screen is detaching.
Don't listen to the advice that you don't need to reheat. The bottom corners are very strong and you absolutely don't want to go in more than 1 mm to avoid cutting the display flex. Proceed as follows:
1. Heat and get a pick into the right side (more than 1 mm is never needed, in my case the picks all stayed angled upwards while I did the cutting)
2. Put another pick in right away in the same spot
3. Immediately heat the top corner
4. Move one of the picks towards the top corner cutting all adhesive and let it rest there
5. Heat the bottom right corner
6. Move the other pick to the bottom right corner cutting adhesive (not more than 1 mm, make sure to angle the pick sideways!!)
7. Put another pick in on the right side and move it to the bottom too
8. Heat the bottom and bottom-left corner
9. Very carefully move the first bottom pick around the corner and cut everything on the bottom side
10. Don't insert any new picks on the bottom, always go around the corners with an existing pick
11. Go around the bottom-left corner
12. Insert a new pick on the left side once there is a gap and cut the rest
Do not even try to insert anything on the right corner. I pulled screen upwards fine without touching that corner. Just heat both sides and insert picks everywhere but that corner. Although be extra careful with 5 cm from top to bottom on the left side, there is also a cable there, although not that easy to brake as the one on the right bottom corner. I managed to replace battery successfully like that
I broke the display because I didn't read this comments.
Don't slide into the bottom left and right corners!
I wanted to add yet another warning: Be extremely careful in the lower left edge of the screen!
I tried to be gentle, and inserted the pick very little, but still, after reassembly, my screen remained black (while the rest of the device continued working – if you have USB debugging enabled, you can still use it using the
scrcpytool). There was no visible damage; I suspect that I damaged the ribbon cable in the lower left in an invisible way.A new screen fixed the problem. Still, this increased the cost of repair by ~$100. I think the guide should highlight the danger even more. Please be careful – one guide on YouTube I found afterwards avoids inserting the pick in the lower left corner entirely, and just "wiggles it free".
EN : Do not apply heat, just buy a bottle of isopropyl alcohol. Corners are indeed harder to unglue so apply a few more drops of alcohol and it should be easy.
FR : Ne chauffez pas, achetez une bouteille d'alcool isopropylique. Les coins sont effectivement plus durs à décoller donc appliquez un peu plus d'alcool et ça devrait être facile.
I also broke my screen at this stage. EUR 50 and 2 hours lost
-
-
-
Setze ein weiters Plektrum in die Unterkante des Handys in einem Winkel ein, in dem sich bereits ein Spalt gebildet hat, um eine Beschädigung des OLED-Panels zu vermeiden.
-
Verwende das Plektrum, um die linke Kante des Handys zu durchtrennen.
-
Lass das Plektrum entlang der linken Kante des Handys stecken, um ein erneutes Verkleben zu verhindern.
The display flex is directly on the bottom of the phone. Be very careful when goign around the bottom to not hit the display flex!!!
-
-
-
Setze ein weiters Plektrum in verbleibende Seite des Handys in einem Winkel ein, in dem sich bereits ein Spalt gebildet hat, um eine Beschädigung des OLED-Panels zu vermeiden.
-
Schiebe das Spektrum um die Oberkante des Handys herum, um den Kleber zu durchtrennen.
The display flex is directly on the bottom of the phone. Be very careful when goign around the bottom to not hit the display flex!!!
-
-
-
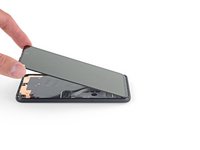
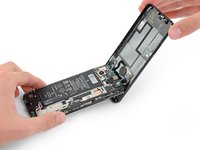
Wenn der Kleber rund um das Handy durchtrennt ist, kann das Display an der rechten Kante des Handys, wie ein Buch, geöffnet werden.
-
Verwende ein Plektrum um etwaige Klebstoffrückstände durchzutrennen.
When I was doing this I found the corners especially the bottom right corner was very glued on!! There are very sensitive cables here and I found part of the old screen's cables (it might not matter if you're replacing the entire screen anyways) were glued onto the phone frame. I came really close to tearing mine, but I saw another review about reapplying heat to get this part loose.
-
-
-
Hebe das Display an der Oberkante an und klappe es über die Unterkante, bis es mit der Glasseite nach unten abgelegt werden kann.
FR : Précision : La nappe a un bout d'adhésif sur la structure du téléphone, il faut bien faire attention de le décoller. Je viens de tuer la nappe de mon écran qui était fonctionnel...
EN : Advice : The ribbon cable is fixed to the structure with a small piece of adhesive. It should be remove prior to anything else. I just killed the ribbon cable of my perfectly used to work screen...
On reassembly: this is where you peel off the colored part of the adhesive strips, and make sure to put your speaker mesh (if it's not attached to the screen) back in place. It should rest flat-side-down on the frame over the two horizontal indents in the frame edge, at least it should if I did it right ;)
If you are afraid of putting stress on the cable by laying the screen down you can just proceed to next steps while grabbing the screen. I did it like that
-
-
In diesem Schritt verwendetes Werkzeug:Tweezers$4.99
-
Mittels einer Pinzette wird nun das schwarze Klebeband entfernt, das den Bildschirmstecker verdeckt.
How critical is the tape that covers this connector? I realized upon sealing back up my device that I forgot to re-install it. I imagine it mostly is there to prevent dust and moisture ingress?
Did anything bad happen with yours? I just did the same thing now
Interestingly this tape was missing in my phone. Maybe that explains some of the display issues I occasionally had, like a thin green line on the right side of the screen which could be "pushed" away.
I think I ripped off the cable because it is undistinguishable from the tape! How screwed am I?
Don't bother trying to save the tape. More hassle than it is worth. Just replace with electrical tape
-
-
In diesem Schritt verwendetes Werkzeug:Magnetic Project Mat$19.95
-
Verwende einen T3-Torx-Schraubendreher, um die beiden 2,1 mm Schrauben zu entfernen, mit denen die Halterung des Bildschirmanschlusses befestigt ist.
-
Halte während der gesamten Reparatur die Schrauben gut geordnet und achte darauf, dass jede an ihren ursprünglichen Platz zurück kommt.
A T4 driver worked for me here.
It is definitely a T4.
Funny ... For me, it was T3. The screws must vary across different phones
T3 worked for me also
-
-
-
Mit einer Pinzette kann die Halterung des Bildschirmanschlusses abgenommen werden.
-
-
-
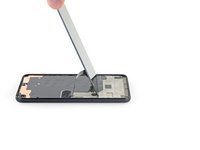
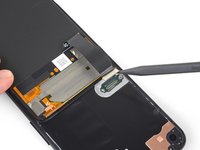
Verwende die Spitze eines Spudgers, um das Display-Flachbandkabel hochzuhebeln und abzutrennen.
No, why the tip? Use the other flat side that doesn't concetrate all the power on one point and Youre doing a propper job.
Only the tip is needed to lift a bit one of the sides and it will pop out. No pressure/power!
-
-
-
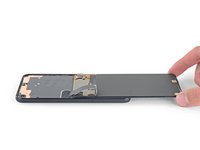
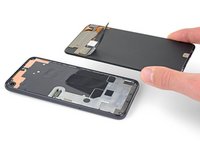
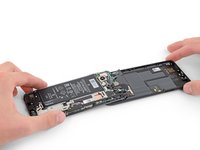
Entferne das Display.
-
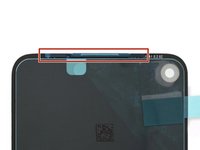
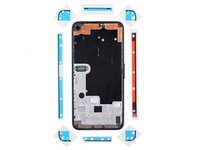
Überprüfe, ob das neue Display mit einem Gewebe über dem Lautsprecher und Klebestreifen an der Oberkante ausgestattet ist.
-
Wenn ja, benötigst du die Klebestreifen an der Oberkante nicht.
-
Wenn nein, entferne die große durchsichtige Schutzfolie vom Klebestreifen an der Oberkante und bringe ihn am Display (nicht am Rahmen) an. Achte darauf, dass der größere Ausschnitt für das Gewebe des Lautsprechers passt.
-
Folge dieser Anleitung, um vorgestanzte Klebestreifen zu anzubringen.
This step seems to imply that a screen replacement is necessary when replacing the charging port. Is the charging port replaceable without replacing the screen? I understand great care must be taken not to damage the original screen in the procedure, but can it be reinstalled?
Yes, it can be reinstalled.
Just a heads up: If you are like me and you have accidentally turned on your Pixel 4a at some point while trying to pry the screen, don't worry too much. I was able to just connect my display with the device on. Nothing will happen until you reboot, and then the screen will initialize.
It would help to add that the new screen is reattached after adding glue to phone body, not the screen. With the iFixit screen adhesive pieces, a guide to which piece goes where would help also. For that I used this picture: Google Pixel 4a Display Adhesive - Genuine. Yet that is not enough as there is a cover for (speaker?) which is not clear how to apply that.
The repair kit comes with Google Pixel 4a Display Adhesive - Genuine but there is no guide on how to apply that adhesive. I sent an email, but Ifixit won't make an instruction page for this.
To explain how the adhesive sold by iFixit works, the actual adhesive is the black strip which is held between two pieces of plastic. Line up the pieces with the clear plastic side down. Note that some pieces may be stuck in the box they came in, the plastic is staticky. I recommend that before attaching the new screen you put each piece in place. Remove the clear plastic and place the pieces in place with the colored plastic facing up. The goal is to have the black adhesive strip on the little ledge between the edge and the depression inside the phone. It's the place where you hopefully spent time cleaning out the original adhesive. Place the corners first, then the edges. Press them into place carefully. Before removing the colored plastic attach the phone screen cable and secure it. REMEMBER TO PLACE THE ELECTRICAL TAPE OVER THE CONNECTOR (I forgot to). Then remove the colored plastic, leaving behind the adhesive, and push the screen into place.
Of note: the seal peace at the top goes under the speaker screen, and the seal looks at first like it is reversed. To install that one accurately adhere it to the Screen itself not the body of the phone. align it where there is a see through circle along the seam and a hole in the adhesive. the sealant should run below the speaker screen. When readhering the screen to the body, remove the plastic guides around the body, then last the seal on the screen and align and install.
Super, c'est vraiment à la portée de tout le monde, il faut juste un peu de patience et d'audace.
Je viens de réussir le remplacement de mon écran et c'est impec !
Il n'y a que sur la première partie, où il faut insérer le médiateur, que ça a été compliqué pour moi. Impossible de l'insérer du côté des boutons (à droite donc), par contre quand je me suis décidée à tester en passant par l'autre côté, c'est venu tout seul.
Aussi il m'a fallu un certain temps pour comprendre que sur les adhésifs, seul le trait noir colle, et c'est donc à lui qu'il faut faire attention.
Pensez à vérifier que l'écran est fonctionnel avant de le recoller, à mon premier essai la nappe n'était pas bien insérée et j'ai du recommencer l'insertion. Voila, prendre son temps et vérifier que tout va bien à chaque étape et c'est très facile. J'ai mis un peu moins d'une heure.
After I clipped the screen in place, I realized that I had forgotten to reattach the screen bracket from step 14. Do you think this is dangerous? Can anyone assess this? In any case, the smartphone turns on and actually makes a good impression.
Many thanks in advance for your assessment!
Kind regards
Tom
If you're talking about the strip with two screws that holds the screen connector in place. It's not dangerous to forget it, BUT in a short time the connector will come off to remind you of your forgetfulness!!
Just some advice before you install the screen regarding the earphone grille/mesh at the top.
Something I experienced, was that the speaker grille did not end up being seated quite right when the phone display was stuck down. It is slightly bent, and the top edge is stuck out at a slight angle - it is quite sharp and does not take much to catch a finger on it, when the phone is out of a protective case.
I think this was because I laid the screen in, starting from the top and with it up at quite a steep angle, then working from top to bottom. I would suggest that when setting the new display within the device, that you align the bottom edge first instead.
I am not going to risk lifting the new display to try and re-seat this grille properly, the display cost me a bloody fortune (around 58% of the phone's original price) and I am not risking breaking it over something as minor as that.
nb. I definitely removed all the coloured plastic protective pieces before installing the new screen into the phone.
Just put everything together near perfectly re-using the existing screen so I want to share my experience:
1. This picture shows the correct lineup of the adhesive pieces. Every piece is unique including the corners: https://guide-images.cdn.ifixit.com/igi/...
2. I tried to save the speaker mesh, but it fell off so I had to use the new part
3. After removing the plastic cover from the mesh piece you have a slightly sticky surface. Make sure to attach the mesh in that direction on the INSIDE side of the screen. Line it up properly and it should stick nicely over the cutout
4. Immediately after attach the top adhesive piece from the picture to secure the mesh. Remove the big plastic cover first and stick it onto the screen and the mesh piece in that direction. Note the lineup from this picture: https://guide-images.cdn.ifixit.com/igi/... (the cutout on the adhesive has a perfect match on the display frame)
5. Attach everything else to the phone frame and not the display
Continued
Continued
6. Make sure to line up all the pieces first based on the picture. Every piece is unique, e.g. each corner has a unique hole and cutout pattern. This is important to get right or you will have the sides overlapping with the corners later. Also the left side piece has the big cutout to allow you to work the display connector without having to remove the adhesive cover too early
7. Always remember that the actual adhesive is the black part and you want it as perfect on the frame as possible. Always attach with the clear side down leaving the strong colored side up
8. Use the tweezers and get the adhesive on from one end to the other carefully. Touching the black adhesive will create a mess fast as does having to retry
9. Reattach the display fully and do a dry test before removing the adhesive covers
10. Gently hold the display up and use the tweezers to remove all adhesive covers
11. Flip the screen around and first attach on the bottom before doing the top
12. Let it rest over night putting some books on
Three other notes:
1. If you just replace the display it will already come with the mesh and the top adhesive piece pre-installed so you can skip that part. Just don't forget to remove the adhesive cover before sticking the screen on
2. It's EXTREMELY important to properly clean the display and frame first. A lot of adhesive especially remains on the display if you re-use it. Only use plastic tools and be very careful with pressure. Use 90%+ alcohol with some Q-tips to finish the job, but not too much. No alcohol should ever come into contact with a camera lense
3. Use the flat side of the spudger to go over the black adhesive pieces after first attaching them to make sure they are properly sticking to the surface
The adhesive kit is terrible. Now looking for where to buy some liquid glue to finish this job. Screen and kit are fine, it's just the adhesive strips that are terrible.
Just buy B-7000 from Amazon. Don't waste time with the adhesive kit
important note: don't pull the colored covers off the adhesive immediately! You want to get the ribbon cable and its cover reattached first. Then hold the screen hovering over the base with one hand and gently ease the tabs/covers off your adhesive with the other.
I changed a battery a month ago, so I had to disassemble and reassemble the old screen.
When you've never done these operations, it really requires a lot of observation, being quite manual and being very methodical. You have to follow the instructions to the letter, meticulously read all the comments. A few videos on the internet also help. But in the end, you can do it quite well.
I just changed a screen on another Pixel, it was already much easier and faster!!!
-
-
-
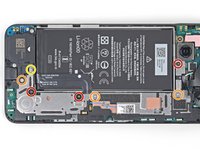
Entferne die acht 4,3 mm Torx T3 Schrauben, mit denen die Rückseite am Mittelrahmen befestigt ist.
-
-
-
Setze ein Plektrum in die Naht zwischen dem Mittelrahmen und der Rückseite ein.
-
Schiebe das Plektrum an der Unterkante des Smartphones entlang, so dass sich die Kunststoffrasten lösen, mit denen die Rückseite am Mittelrahmen befestigt ist.
It wasn't clear to me from the picture, but don't try to pry the midframe piece up from the back cover. Pry the vertical edge of the back cover just a little out from the edge of the midframe. This releases the clip rather than fighting the clip, and the midframe will pop up from the back cover.
Be very careful at the top edge of the cover where the headphones jack is located! The plastic is very thin at the top of the opening. I was not careful, and cracked the cover near the opening. Not the end of the world, but perhaps you will be more lucky now that you know about this pitfall!
Schritt 18, Achtung ! - mit dem Plektrum muss senkrecht von der Mittelwand gegen den Rand der Rückabdeckung gehebelt werden und auch so weitergeführt werden. Wenn das Plektrum wie gezeichnet etwas unter dem Mittelrahmen geführt wird, können sehr empfindliche Kontaktfeder zerstört werden - Totalausfall. Ich habe einen Kontakt mit einer Leitung überbrücken müssen. Jeder Praktiker wird das Plektrum senkrecht ansetzen.
Dem iOpener ist der Kleber auch nicht zu lösen, ein Fön muss benutzt werden.EN : The retaining clips are pretty hard to release on the bottom. Start from the left corner underneath the Sim card tray then go all the way up and all around the phone then finish with the bottom part shown on the picture.
FR : Les clips de maintien sont durs à libérer sur le bas. Commencez par le coin gauche juste sous le tiroir Sim puis remontez et faites tout le tour du téléphone puis terminez par la partie basse indiquée sur la photo.
-
-
-
Schiebe das Plektrum an der linken Kante entlang, so dass sich die Kunststoffrasten lösen, mit denen die Rückseite am Mittelrahmen befestigt ist.
-
-
-
Schiebe das Plektrum an der Oberkante und der rechten Seitenkante des Smartphones entlang, so dass sich die restlichen Kunststoffrasten lösen.
-
-
-
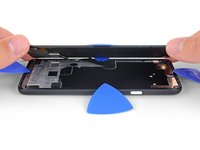
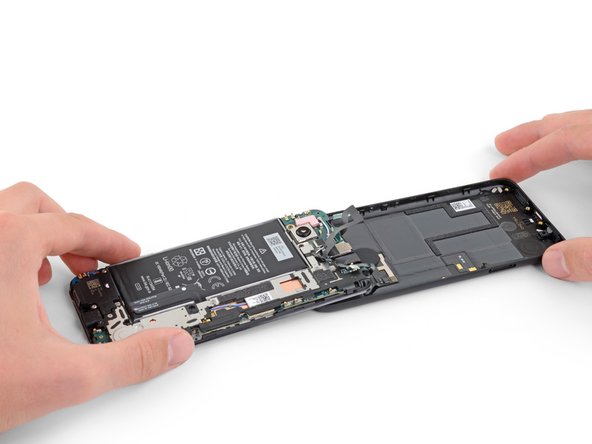
Fasse die Rückseite des Smartphones an der Unterkante an und schwenke sie vorsichtig um die Oberkante herum, so dass sie auf ihrer eigenen Rückseite liegt.
-
Lege die Rückseite auf die Arbeitsfläche. Lasse den Mittelrahmen leicht darauf liegen. Achte darauf, dass die angeschlossenen Flachbandkabel nicht zu stark belastet werden.
I can't stress enough (no pun intended!) the need for NOT stressing these cables and connectors more than absolutely necessary! Having successfully completed the entire battery replacement and then reconnecting the fingerprint sensor connector, that cable suddenly snapped in half, probably fatiguing from too much flexing. The phone still works of course, but without a fingerprint sensor. In my opinion, this was the most crucial part of the disassembly/reassembly.
-
-
-
Entferne die sieben Torx T3 Schrauben, mit denen die Halterung der Hauptplatine befestigt ist:
-
Drei schwarze 2,9 mm lange Schrauben
-
Drei 2 mm lange Schrauben
-
Eine 4,1 mm lange Schraube
-
-
-
Lasse die Halterung der Hauptplatine mit Hilfe der Spudgerspitze in der oberen rechten Ecke und der unteren rechten Ecke der Hauptplatine ausrasten.
on mine, the fingerprint sensor cable was lightly adherent to the bracket and I almost tore it when the bracket popped up. may want to add something about freeing this up before removing the bracket.
Similar to Erik, my fingerprint sensor cable was adhered to the bracket and mine did tear. I didn't use the fingerprint sensor, so hopefully this doesn't affect anything else with the phone. Now I know to read the comments! X_X
I had the same issues: The cable was attached to the bracket and I had to be very careful in pushing the bracket to the side and reach under it with the spudger to detach the fingerprint cable. And I also found the top clip of the bracket hard to unclip. It worked when I started with the lower one and then pushed the bracket to the side a bit. It seemed to be glued on the top corner.
My fingerprint sensor cable was also glued to the bracket, but it seems like a sturdy cable so was not easily damaged
Ok this was really bad for me I did not understand how the clip was oriented and tried to pull it up lightly first and then strongly, it finally came off but I bent and broke the bridge just a bit, and most importantly the RFID or fingerprint sensor cable (the circle in the back). I don't use it and nothing more was harmed managed to put everything back in place but
Beware of the clips, you have to pull them TOWARDS you, then the bridge will pop-up, don't apply strength upwards before unclicking the 2 clicks towards you (horizontal plane)This is also what worked for me. I put the lid over the rest of the board, to protect the cable (after reading the comments) and used the tweezers to carefully pull the piece towards me and then lifted it up.
this is the most frustrating step in the entire guide. i used tweezers and pushed to the left of the upper bracket to free it. no upward force is required to free it. be careful
My spudger tip was bending trying to release the bracket - I used a 1mm flathead screwdriver instead, from just below the clip, and it popped up beautifully and with no force. Cables all intact!
The fingerprint sensor cable is the smaller one and it is indeed glued to the top of the motherboard bracket. First free it with the spudger before proceeding.
Always remove the bottom-left clip first as it reduces force.
I should also note that if you hate re-attaching ribbon cables like me and want to ensure the fingerprint sensor cable won't break then it is enough to only remove the bottom-left clip, gently lift the motherboard up and to the side and use the spudger to detach the battery cable. Steps 26 and 27 can be skipped and you simply keep the back frame attached. Do Steps 28-30 before unscrewing the mid frame for easier pulling on the battery adhesives. After the battery cable is free flip the back cover again, then drop the IPA in if needed to free the battery fully.
Just be careful with pressure. After installing the new battery lift the motherboard up again and re-attach the battery cable which isn't too bad. Then clip the motherboard back into place and proceed.
Fingerprint sensor cable saved!
Free the smaller cable first. If you do this there is no risk of breaking fingerprint sensor. You will know what to do when you see it. After freeing cable you can pull the metal stuff upwards safely with any force you want. The risk is gone
Like for many others, this step didn't work well for me. The instructions should really clearly state that you need to pull towards the outside to unclip the motherboard bracket.This is what the clip on the upper right of the motherboard bracket looks like in profile. Also, my spudger tip bent and almost broke. I had to use a small screwdriver to be able to apply enough force to unclip.
Inordinately complicated and a severe design fault. Thank God they did not design a car battery.
Thanks to all the comments! Unglued my fingerprint cable before following @rkj tip on pulling the bracket towards you and it popped out like a charm. ifixit should highlight the comments or something if they have a lot of interaction going like this cause this probably saved me from a headache from an other wise smooth replacement.
EN : I strongly advise you to do steps 26 and 27 before doing this step. Don't touch the retaining clip shown on the picture, leave it for the end. Gently lift the bracket from the opposite side and release the 2 ribbon cables. My fingerprint sensor cable was also glued to motherboard bracket so be careful. Then remove the back cover. You can now easily remove the motherboard bracket.
FR : Je recommande fortement de faire les étapes 26 et 27 avant cette étape. Ne touchez pas le clip de maintien montré en photo, gardez-le pour la fin. Soulevez délicatement le cache côté opposé et libérez les 2 nappes. La nappe de mon lecteur d'empreintes était également collée au cache de la carte mère donc faites attention. Puis retirez la coque arrière. Maintenant vous pouvez facilement retirer le cache de la carte mère.
-
-
In diesem Schritt verwendetes Werkzeug:Tweezers$4.99
-
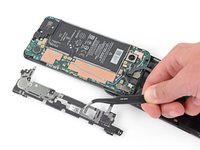
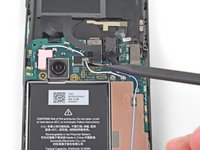
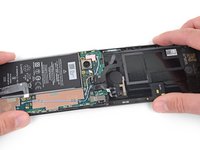
Entferne die Halterung der Hauptplatine mit einer Pinzette.
-
-
-
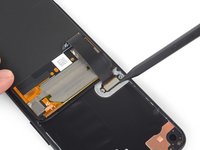
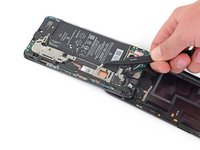
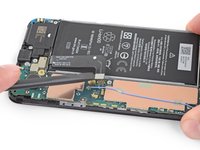
Heble den Akkustecker mit dem flachen Ende des Spudgers hoch und trenne ihn ab.
-
-
-
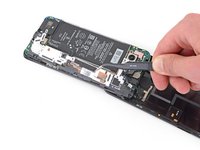
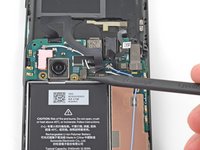
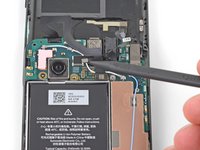
Löse die beiden Stecker an den Kabeln zum Fingerabdrucksensor und zu den Tasten mit der Spudgerspitze von der Hauptplatine ab.
-
-
In diesem Schritt verwendetes Werkzeug:Tweezers$4.99
-
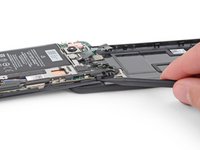
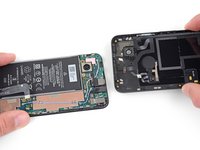
Drehe den Mittelrahmen herum.
-
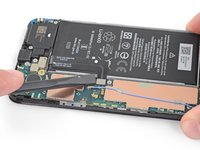
Entferne mit einer Pinzette die beiden schwarzem Klebebandstückchen, mit denen die Zuglaschen an den elastischen Akkuklebestreifen bedeckt sind.
-
-
-
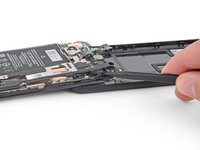
Hebe die Laschen der elastischen Klebestreifen so weit mit einer Pinzette hoch, dass du sie mit den Fingern greifen kannst.
-
-
-
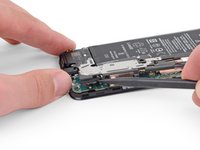
Ziehe eine der Zuglaschen langsam vom Akku weg in Richtung Unterkante des Smartphones.
-
Ziehe gleichmäßig und mit konstanter Spannung am Streifen, bis er zwischen Akku und Mittelrahmen herausrutscht. Es klappt am Besten, wenn du den Winkel beim Ziehen so flach wie möglich hältst.
-
Wenn der Streifen reißt, dann greife das Reststück mit den Fingern oder einer stumpfen Pinzette und ziehe ihn weiter heraus.
-
Wenn der Streifen unter dem Akku reißt und nicht gefasst werden kann, dann gib einige Tropfen von 90%igem Isopropylalkohol in den Spalt des entsprechenden Klebestreifens und kippe das Smartphone zur Oberkante hin, so dass der Alkohol zum Reststück des Streifens hin läuft. Lasse ihn eine Minute lang wirken, bis der Kleber weich ist, fahre dann fort.
Both tapes tore for me after having removed about half of them - they are extremely long. Maybe winding them around a pencil might work better. I had to drop some isopropanol (about 5 drops each) into the holes which worked fine to loosen the remaining adhesive.
I've replaced batteries on 6-7 devices before (4 different types of phone). The tabs have ALWAYS broken partway. And for most they broke under the battery and I had to resort to alcohol to remove. These were the first that came out easily without breakage. They seemed less fragile than past ones. Kudos to Google. :-P
in my case one of two broke, I tried to briefly remove the battery without alcohol and that worked as well. Probably depends on how much of the strip is left. My recommendation would be to seriously pull with same amount of force and don't let go in between until the whole strip's out.
In my case, both tapes broke and I don't have the alcohol and could not go further
-
-
-
Entferne den Akku.
-
Lasse den Alkohol eine Minute lang einwirken, bis der Kleber weich geworden ist. Heble dann den Akku an einer der langen Seitenkanten mit einem Plektrum hoch.
As the previous commenter suggested, please write instructions for reassembly.
I was thinking the same about the adhesive part… how do you reapply adhesive and the tabs removed? Do we need new adhesive tabs?
I found a lot of the adhesive remained on the body after removing the strips. I don't know if this is because my battery was swollen and overheating, but I'd expect many people reading this may be in the same situation.
I was eventually able to figure out re-attache the battery and screen, but as the other commenters have suggested a brief explanation of how to do this would be very helpful.
Otherwise it was a grate guide!
Another vote for reassembly. There are a lot of adhesive bits with a blue backing which I'm pretty sure are for attaching the screen, but one appears to be a pull tab for the battery (but only 1 not 2). There's also a long strip with a red backing. I have no idea where that one would go. Finally, one of the screen adhesives stuck to the inside of the box so it's unusable now.
I just used double sided tape to secure my new battery. just make sure you do a gravity test to make sure it doesn't fall out and shake it around a bit too if you want. read alot of other posts online of people who did the same. ill post back here if something happens but i think it should work fine
As others commented, a brief explanation of applying the new tabs would be nice.
But, to help you out...the adhesive strips are "keyed". There's a notch in the corner of the black pull tab part for each of them. Line them up so the black pull tab would align with the hole that you pull them through. When you've found that orientation, remove the backing on the side that will stick to the case and put it in (aligning the pull tab first). Also, to make it easier, only peel back a little of the thicker plastic to start and peel the rest as you place it down to prevent it from sticking unaligned. You ideally don't want any wrinkles else it will make it break if you remove it later.
Mine also came adhered to the box and were unusable. If this happened to you, contact ifixit and let them know and they'll ship you what you need. Be sure to tell them if both the battery adhesive and screen adhesive was affected so they send both if you need both. There should be two battery tabs (they're different sized near the top).
The shapes of the adhesive strips match the ones you removed, so if you are having trouble figuring out which is which or how to orient them, scroll back to step 29 and look at where the corners are cut on each pull tab. Setting the pull tab end to line up with the hole, each strip should run the length of the battery compartment. Using the iFixit-provided adhesive, in the version of the kit I used anyway, the case-side of the strips is the clear plastic - pull that off first - and then the blue plastic is the battery side. Don't pull this off until both strips are in place and you're ready to drop in the battery. There is a little overhang of blue plastic at the non-pull-tab end for easy lifting.
(But as others have said, this should be in the guide itself!)The battery tab adhesives are the two distinctively formed pieces. They only fit one way due to the unique size:
1. First clean up any old adhesive
2. Line the two pieces up on the phone body, the black latches go over the respective holes you previously pulled them from. Small latch to small hole, bigger latch to the bigger hole
3. Attach the adhesives with the clear side down and strong colored side up
4. They should line up perfectly with the holes when you start perfectly on the right and the corner to put them down, then carefully press them down going to the left side
5. Remove the colored covers using tweezers (a convenient latch to grab is near the holes that are on the plastic) and stick the new battery in, applying some pressure for a minute
I gave detailed notes about the display assembly and adhesives in the step 16 comments so check those out too if you struggle with that part
Make sure you read the instructions for battery calibration included with the battery! I almost missed those. Once assembled, charge to 100% and keep charging for 2 more hours before turning on. Then use the phone until battery runs out of charge completely, then charge to 100%, and proceed with normal usage.
-


Um dein Gerät wieder zusammenzubauen, folge den Schritten dieser Anleitung in umgekehrter Reihenfolge.
Entsorge deinen Elektromüll fachgerecht.
Lief die Reparatur nicht wie geplant? Probiere zunächst einige grundsätzliche Lösungen oder frage in unserem Forum nach Hilfe bei der Fehlersuche.
Um dein Gerät wieder zusammenzubauen, folge den Schritten dieser Anleitung in umgekehrter Reihenfolge.
Entsorge deinen Elektromüll fachgerecht.
Lief die Reparatur nicht wie geplant? Probiere zunächst einige grundsätzliche Lösungen oder frage in unserem Forum nach Hilfe bei der Fehlersuche.
Rückgängig: Ich habe diese Anleitung nicht absolviert.
83 weitere Personen haben diese Anleitung absolviert.
Besonderer Dank geht an diese Übersetzer:innen:
100%

Diese Übersetzer:innen helfen uns, die Welt zu reparieren! Wie kann ich mithelfen?
Hier starten ›

58 Kommentare
Do you stock the 4A and 4A 5G batteries? my local repair shops will not just sell me the battery.
Tricky. I don't suggest sweating to save the pieces of tape. Just attach new tape for the battery.
T3 Tip on my kit worked, don't know why it didn't for previous commentor.
Hello Azrael, as noted in the parts section of this guide, you will need Battery Adhesive Strips and Display Adhesive. Both are included in the Google Pixel 4a Battery Fix Kit and available in the iFixit US and EU store.
Thanks.
Do you think using a hair dryer to remove the screen would be better? Or a temperature controlled heat pad? The feedback I read online about the iOpener seems kinda annoying to use.
Azrael -
The iOpener is a good option for most people to make sure to apply heat precisely while making sure to not overheat the device. If you already have a heating mat, that would probably be the best option for controlled heating. A hair dryer should also work quite well, but be careful to avoid overheating.
Thanks! Any idea how easy it is to damage the speaker grills? I saw that the kit has them.
Azrael -
See the following note on step 9: "There's a mesh covering the earpiece speaker on the top edge of the screen. If you don’t have a replacement mesh, take care not to damage or lose this component." You should be careful during the opening procedure, but I'd assume you can reuse it after the repair.
I saw the note, which was why I asked, From experience with certain electronics, there are some components that have an extremely high rate of breaking once you remove it, so was wondering if you had any experience to share.
Azrael -
I don't have hands-on experience with the Pixel 4a, so I'm unable to give a definitive answer, sorry!
Ah, thanks for your help either way!
Azrael -
Unfortunately, my screen cracked a whole bunch from the bottom right corner as I was doing step 6 so I gave up there. There could have been some invisible chips or cracks there already that created a weakness or maybe I just wasn't doing it right. Disappointed, but the kit does seem to be fully featured.
After finishing the Battery replacement the screen stayed black, it just vibrates short when pressing the power button. charging seems to work since it gets warm. Display did not get damaged when opening, also there was no obvious damages in the areas with the cables.
Any idea what could be the reason for this?
I'm having the same problem. I also see my phone on my wifi network so it does turn on and connect. I just get a black screen though. Any help would be greatly appreciated!
Same problem here, Kai and Brian. Can I ask what you did to resolve it?
Same problem here. Have you solved it by now?
I also got the black screen after replacing the battery. Has anyone managed to solve this problem? If I buy a new screen, will it work?
Hold power and volume down to reboot. Black screen gone.
FAILED. Phone vibrates once when I try to turn it on. Display stays black
Communism always fails.
I had significant difficulty with the battery adhesive tabs just not pulling away. If you remove the large black piece of tape on the back of the metal midframe it will expose more of the back of the battery. There is a cutout which runs parallel to the two lines of adhesive. I used goo gone and very light cyclic pressure to gently weaken the adhesive strips and ultimately remove the battery.
So this is probably the first time i fcked up my own phones screen. The display flex is directly on the bottom of the phone. be very careful when goign around the bottom to not hit the display flex!!!
I would guess that this is why the blacksreens are appearing.
sadly I am also the one failed. The screen stays black without any cracks or other visible damage
Would absolutely not recommend this for beginners, even if you have experience tinkering with PC hardware. Just destroyed my phone by ripping off the screen connector cable, also the display is super sensitive to cracks once it is disassembled.
Mir ist ein Teil übrig geblieben aber weiß nicht von wo. Es ist mir beim der Rückabdeckung abnahme irgendwo rausgefallen.
Es ist ein Gummiteil mit den Maßen: 5mm X 5mm X 2mm. Es mit einem kleinem G beschriftet.
Ist das Teil wichtig? Vielen Dank für die Hilfe im Vorraus
LG
Mein Google Pixel startér nicht mehr. Habe die Batterie ausgewechselt nachdem diese leicht aufgebläht war. Jetzt weiß ich nicht wie ich das Handy starten soll. Bitte um Hilfe
Danke
I also got the black screen after replacing the battery. I was very careful when following the instructions so I'm quite disappointed. I now wish I had read the comments before going ahead with ordering the kit and doing the repair myself.
I wish this had a section on replacing the adhesives 😥
Decent guide. Make sure to read every comment on each step. Maybe watch a YouTube video or two to familiarize yourself with the procedure. Then you will be fine and not break anything (e.g. the display or fingerprint cable). I managed to replace my battery without breaking a single thing in the end. The kit is complete and works. Just make sure you have IPA (alcohol 90%+) and electrical tape. No way around needing it at some point
Great description! If you have some experience with repairs there is not much that can go wrong. I recomment to test, if the smartphone is running before applying the glue strips. With readig all the information and some preparation it took me nearly half a day to disassamble and reassamble the phone. Most time took the removement of old glue strips. Its a good idea to have some addtional alkohol pads (the ones that are used for disinfection of vaccination spots.
If you remove the old glue strips properly and careful apply the new strips with tweezers you can't tell afterwards that the dispay had been removed.
Great tutorial, this was my first repair and I got through it with no damage - phone is functional again and I didn't break the screen. I was extremely careful with the adhesive removal part - I marked a 1mm and 6mm depth line on the picks, which really helped me observe the guidelines on depth. iFixit could include depth markings in their parts molds if they ever redesign those picks! My only nitpick is the adhesive around the screen - the (otherwise very helpful) diagram shows the top adhesive upside down - mostly because it goes on the screen, not on the case. The written directions are correct, the diagram is slightly wrong. Also, be careful levering the screen up at first - they tell you to open it like a book, which is correct, but do not open it very much as you can stress the screen cable (you are not trying to open it like a book and lay it flat).
This was my first phone repair and it was successful! I do have a lot of experience working on laptops, and this is much more fiddley, if otherwise familiar. I definitely recommend reading through all of the comments first before starting. Took me closer to 4 hours, but I was carefully re-reading and double checking each step, since phone repair is new territory for me.
DO NOT PURCHASE - unless you plan to also replace the screen. This guide is horrible and they should force you to buy the screen as well. It is paper thin and will break when you remove the front glass as they are two separate pieces and your screen will crack. This phone is not repairable, I just wasted $50 and 2 hours of tedious work trying to fix mine. Now I can't even claim the trade in credit on a new phone because it bricked the screen. Even MORE E-WASTE!
I don't recommend wasting time with the screen adhesive in the kit. Just order B-7000 or similar from Amazon which is very easy to apply
Screen adhesive in the kit works well just apply it like on the drawing and when you remove the stickers, the black adhesive part just stays on the junction and the screen is ready to be sticked again on the adhesive. Putting B-7000 works obviously well, but might make it harder to reopen the phone in the future.
To all the people that AFTER REPLACING the battery got a BLACK SCREEN, then its simple. It happened to me. I could only hear some beeps and vibration response, and my daily morning alarm kept waking me up every morning (funny thing), I used the side buttons to deactivate it. After one month of searching posible causes, i can CONFIRM that the complete screen was damaged, i bought a screen complete replacement and IT WORKED. Explanation: It happens that the screen of the Pixel4a it 100% sensible to changes in temperature, high tactile pressure and more. So the probability of applying too much heat over the screen is high. (Yes, I used correctly the kit, but probably I took too long in the screen unmounting process, and that killed the screen (incredibly, it was not too hot for my hand, but for the screen....YES)) I recommend testing again the screen just after "successfully disconnecting it" from the header. So: black screen solution: You need a new screen.
Can someone confirm if you replace the battery, will it work as before the google battery fiasco? Ie, is the charging on the 4a based on the IMEI number of the phone, or the serial of the battery?
I replaced the battery few weeks before Google sent the announcement about Pixel 4a battery-related updates their program to replace battery for free or reimburse owners of selected devices. After I replaced the battery, everything worked great. When I received email from Google, I went to the form to check my IMEI, and I was told I am eligible for the replacement program. So I don't think it has anything to do with the battery serial. Before the replacement, I was not even able to turn on the phone, and I did not write down IMEI, so I am 2x grateful to iFixit for the parts and excellent instructions!
I changed the battery myself around the 10th of January, but was not aware of the horrible battery automatic update from Google. So now, with a new battery (type G025J-B, 3050mAh), I get the message in the battery settings "Battery replacement recommended bla bla.." and the battery discharges quickly, let's say a full charge lasts only a day with normal use. It charges quickly like before though, that didn't change, but the battery percentage quickly drops, sometimes by 3/4% at a time! So it is difficult to know which batteries are impacted in a good or a bad way, it's just that Google is pretexting this update for security reasons, but it is just impacting most of the Pixel4a users. A shame... their Pixel4a was just too perfect, so they decided to apply that update to make people changing their phones.. and good luck to get a new battery, I'm sure that they will be soon no stock of batteries left.
I ordered an ifixit battery kit for my Pixel 4a because of the google battery fiasco. Right after the update I had all the battery warnings and my pixel had just a few hours of battery life, so my phone was among those impacted by the update. Received the battery kit today, did the battery replacement. No more warning sign on top of the battery icon. No more Push notification telling me about a replacement. The battery no longer drains dramatically on idle, it just feels brand new. Hope this helps!
Valie -
Thanks a lot for this manual, I managed to replace the battery.
My remarks:
I nearly dropped out already at step 4. The sucktion cup that came with my ProTechToolkit did not stick properly, but the one that came with the battery replacement kit did.
My second favorite step was the one where you have to re-attach the two cables (fingerprint and keys). Took me half an hour :-o
Most favorite was attaching the sticky tapes. Finding correct positions was easy, but removing the colored trips from the sticky stripes without removing the stripes from the case was... hmmm...
After finishing I noticed that there were replacement sticky parts for the battery. I had used the old ones.
I did battery replacement but still I get the notification of replacement of my battery what should I do
I had my battery replacement but still it sends notification of replacement the battery
Just broke my screen with this guide and the ifixit repair kit. I found a couple parts misleading:
The screen adhesive is very weak and you should not need to re-apply heat.
In my experience, the screen adhesive was not weak at all. It was so strong that I had trouble getting a pick under the screen. I sanded down one of the picks to make it thinner and finally got it under the screen, but when I was cutting the adhesive the screen broke because the adhesive was still so strong. This was after heating and re-heating the iOpener multiple times.
With the pick 1 mm into the gap, pivot the pick upwards to a steep angle.
The end of the pick you hold should be upwards, as in the picture, but the part of the pick in the phone should actually be pointing downwards, otherwise it will slip between the OLED and the glass of the screen.
Good luck, this isn't easy.
I wanted to add yet another warning: Be extremely careful in the lower left edge of the screen!
I tried to be gentle, and inserted the pick very little, but still, after reassembly, my screen remained black (while the rest of the device continued working – if you have USB debugging enabled, you can still use it using the scrcpy tool). There was no visible damage; I suspect that I damaged the ribbon cable in the lower left in an invisible way.
A new screen fixed the problem. Still, this increased the cost of repair by ~$100. I think the guide should highlight the danger even more. Please be careful – one guide on YouTube I found afterwards avoids inserting the pick in the lower left corner entirely, and just "wiggles it free".
I'm using Pixel 4a but my Sim side is not working
Boakye John Owusu - Antwort
The pliers (came with the kit) end worked for this step
Gabriel Basilio Brito - Antwort
For some odd reason, I was unable to put the SIM tray back after a successful repair!? It stands out by half a milimeter now, it works, but it's like a button in terms of how much it overlaps now. So, be careful, I guess, although I am unsure what is causing this.
Roman - Antwort