Einleitung
Diese Anleitung wurde von iFixit-Mitarbeiter:innen verfasst und ist keine offizielle Reparaturanleitung von Google. Hier erfährst du mehr über unsere Qualitätsstandards.
In dieser Anleitung wird gezeigt, wie du eine Google Pixel 7 Display Reparatur selbst durchführen kannst.
Bevor du dein Handy auseinanderbaust, achte darauf, dass der Akku auf unter 25 % entladen ist. Das verringert das Risiko, dass sich der Akku entzündet oder sogar explodiert, falls er während der Reparation versehentlich beschädigt wird. Wenn dein Akku aufgebläht ist, musst du entsprechende Vorsichtsmaßnahmen treffen.
Achtung: Das Pixel 7 enthält Laser der Klasse 1. Wenn du es auseinandernimmst, könntest du unsichtbarer Infrarotstrahlung ausgesetzt sein.
Dein Ersatzdisplay sollte mit einem neuen Fingerabdrucksensor ausgestattet sein. Wenn er nicht vorhanden ist, musst du den bisherigen Fingerabdrucksensor auf das neue Display übertragen und ihn danach neu kalibrieren, sonst funktioniert er nicht richtig.
Ob dein Pixel 7 nach der Reparatur noch wasserdicht ist, hängt davon ab, wie gut du es beim Zusammenbau versiegelst. Die IP-Zertifizierung wirst du jedoch verlieren.
Um die Reparatur abzuschließen, wirst du Ersatzklebestreifen benötigen.
Was du brauchst
-
-
Schalte das Smartphone vollständig aus und entferne jegliche Kabel.
-
-
-
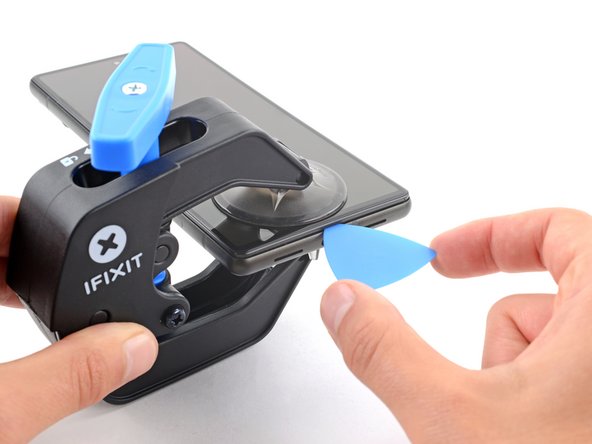
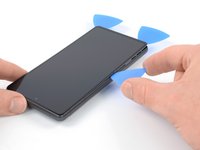
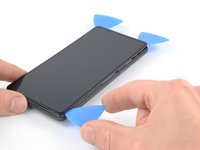
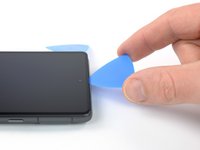
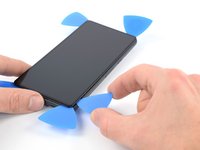
Achte darauf, dass du die Plektren an den richtigen Stellen einsetzt, damit sich das Display nicht vom Schutzrahmen, sondern vom Smartphone ablöst.
-
Rund um das Display gibt es verschiedene Rasten. Wenn dein Plektrum während des Displayausbaus stecken bleibt, hast du es wahrscheinlich zu tief in das Display eingeschoben.
"During the removal procedure, make sure to insert your opening picks in the right position"
But then don't share what that position is, or even how to start.
Great way to start the guide. Fills me with so much confidence in doing a $150 repair.
Off tonyoutube to find someone who did q better job at a guide.
Hi there! I apologize that the instructions were not clear. I have updated the guide to clarify where the right place to insert the opening picks.
-
-
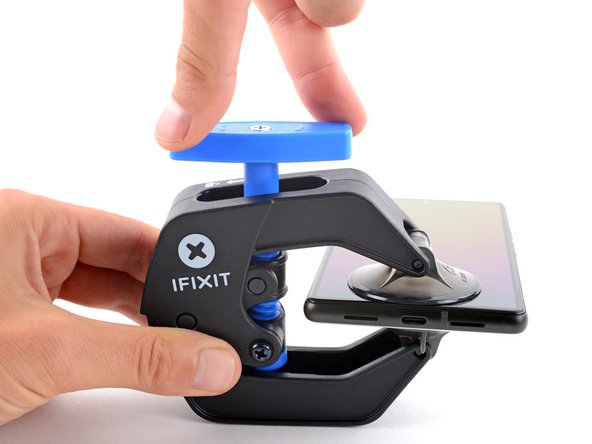
In diesem Schritt verwendetes Werkzeug:Clampy - Anti-Clamp$24.95
-
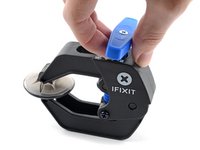
Ziehe den blauen Griff nach hinten, um die Arme der Anti-Clamp zu öffnen.
-
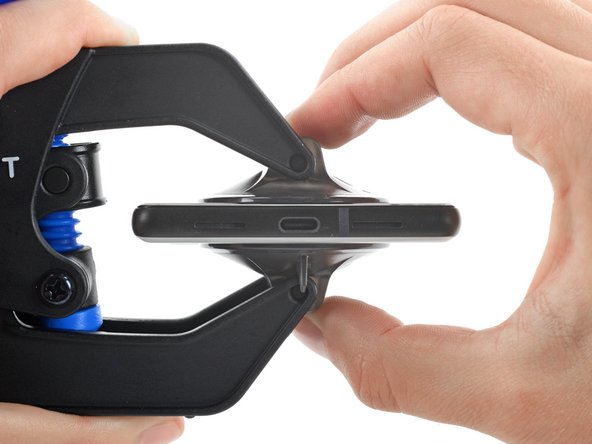
Schiebe die Arme entweder über die linke oder rechte Kante deines Smartphones.
-
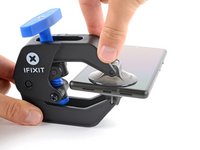
Positioniere die Saugheber nahe der unteren Kante deines Handys, einen auf der Vorderseite, den anderen auf der Rückseite.
-
Drücke die Saugheber zusammen, um sie auf dem Display zu befestigen.
-
-
-
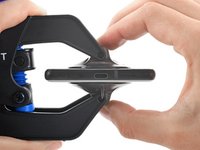
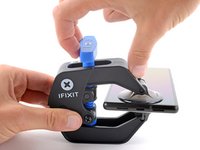
Drücke den blauen Hebel nach vorne, um die Arme zu arretieren.
-
Drehe den Hebel im Uhrzeigersinn um 360 Grad oder so weit, bis die Saugheber anfangen sich zu dehnen.
-
Stelle sicher, dass die Saugheber weiterhin korrekt zueinander ausgerichtet sind. Falls sie zu rutschen beginnen, löse sie leicht ab und richte sie wieder korrekt aus.
-
-
-
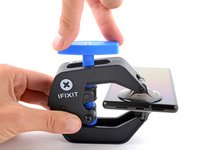
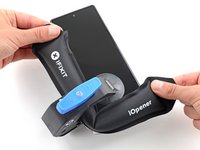
Erhitze einen iOpener und schiebe ihn durch die Arme der Anti-Clamp.
-
Falte den iOpener, sodass er auf der unteren Kante des Smartphones liegt.
-
Warte eine Minute, sodass sich der Kleber durch die Hitze aufweichen kann, und sich eine kleine Lücke bildet.
-
Schiebe ein Plektrum unter den Displayrahmen, sobald die Anti-Clamp eine ausreichend große Lücke erzeugt hat.
-
Überspringe die nächsten zwei Schritte.
-
-
-
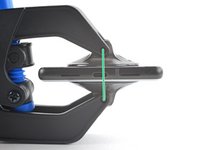
Lege einen erwärmten iOpener zum Lösen des Klebers mindestens drei Minuten lang auf das Display.
This guide is a bit all over the place. Most of the previous pictures show the iOpener being placed on the left side first (with the device having the camera facing upwards)
However this pictures shows placing the iOpener on the right side. Does it matter? Is there a best practice side to pry first?
-
-
-
-
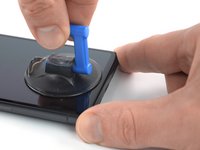
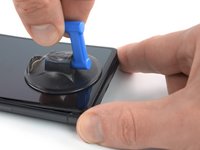
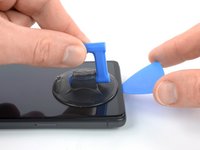
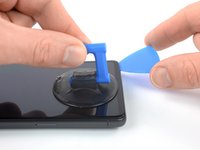
Wenn sich das Display warm anfühlt, dann bringe einen Saugheber am unteren Displayrand an.
-
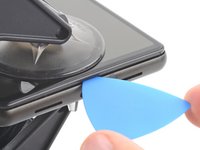
Hebe das Display zusammen mit dem Schutzrahmen mithilfe des Saughebers hoch, bis ein kleiner Spalt zwischen dem Display und dem restlichen Smartphone entstanden ist.
-
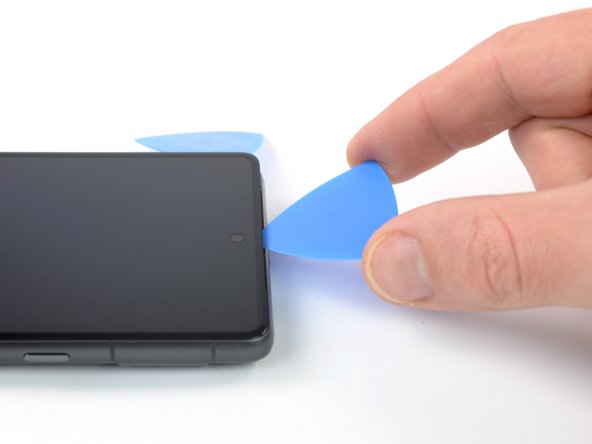
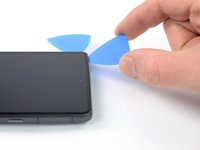
Setze ein Plektrum in den Spalt ein.
If you're having trouble getting the first pick in, try a different hand position than what is shown. Grip the suction cup's handle with your index finger, and keep your thumb and middle finger on either side of the screen. Choose a forgiving surface underneath in case you slip. Then hold firmly and keep it stable (no need to really push down). Just be prying it open deliberately and evenly. Then take your pick and use gentle prodding, experimenting with your angle and pressure, feel around. That should be all you need to get in.
-
-
-
Das Displaykabel befindet sich etwa auf halber Höhe (ein wenig darunter) an der linken Kante des Handys. Achte darauf, das Kabel nicht zu zerreißen.
-
Rund um die Einfassung des Handys gibt es mehrere Federkontakte. Achte darauf, dass du sie nicht verbiegst.
-
-
-
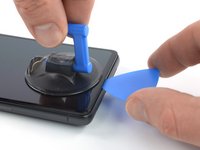
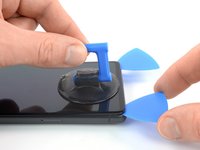
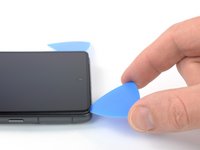
Schiebe das Plektrum zum Auftrennen des Klebers zur unteren rechten Displayecke hin.
-
Lasse das Plektrum stecken, damit sich der Kleber nicht wieder verbinden kann.
-
-
-
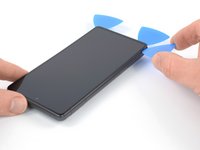
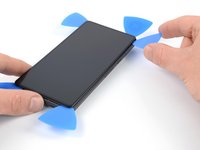
Setze ein zweites Plektrum an der Unterkante ein und schiebe es zum Auftrennen des Klebers zur unteren linken Displayecke hin.
-
Lasse das Plektrum stecken, damit sich der Kleber nicht wieder verbinden kann.
-
-
-
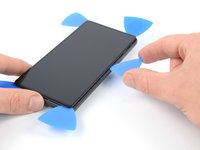
Setze ein drittes Plektrum unter die linke untere Displayecke ein.
-
Schiebe das Plektrum zum Auftrennen des Klebers und Lösen der Rasten an der linken Displaykante entlang .
-
Lasse das Plektrum in der linken oberen Displayecke stecken, damit sich der Kleber nicht wieder verbinden kann.
-
-
-
Setze ein viertes Plektrum in die obere linke Ecke des Displays ein.
-
Schiebe das Plektrum zum Auftrennen des Klebers an der Oberkante entlang.
-
Lasse das Plektrum in der oberen rechten Ecke stecken, damit sich der Kleber nicht wieder verbinden kann.
This is the only slice that makes me nervous. Never had a problem, but yeah... extra care because of the camera.
-
-
-
Setze ein fünftes Plektrum in die rechte Displaykante ein. Schiebe es unter der rechten Kante zum Auftrennen des restlichen Klebers und Lösen der Rasten an der rechten Kante entlang.
-
-
-
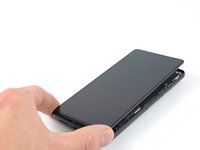
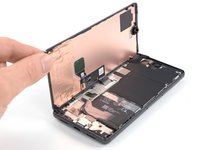
Klappe das Smartphone behutsam wie ein Buch von der rechten Displayseite her auf.
-
Lege das Display mit dem Bildschirm nach unten parallel zum Rahmen ab, bevor du fortfährst.
The adhesive still sticking to the screen might trip you up... don't let it pull the screen in weird ways. Just pick that stuff off and the screen sits perfectly next to the phone, as pictured.
-
-
In diesem Schritt verwendetes Werkzeug:Tweezers$4.99
-
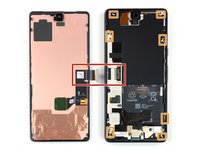
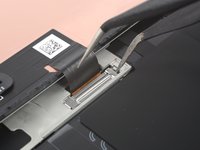
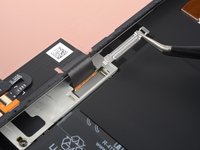
Setze eine Pinzette mit einer Spitze in die Öffnung am oberen Ende der Displaykabelhalterung ein.
-
Drücke die Pinzette nach innen, heble nach oben und löse die Halterung ab.
The way this piece is wedged in there can be a difficult to imagine, so you may need to apply force at a different angle than you expect. I bent mine a few times, but just bent it back into shape with no issue.
This was a pain to get out! Felt like I was going to rip the whole cable out. But it popped out eventually.
-
-
-
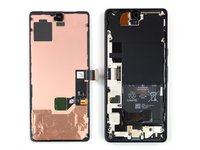
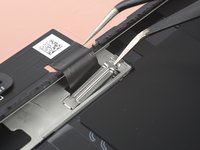
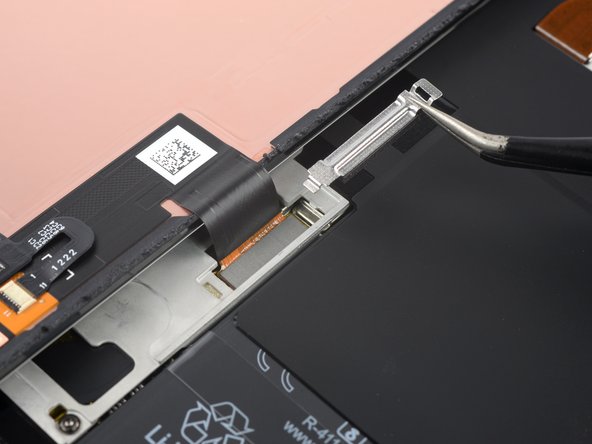
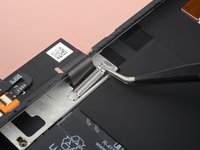
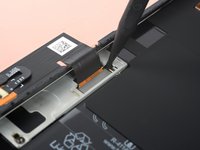
Ziehe die Displaykabelhalterung mit einer Pinzette unter dem Mittelrahmen heraus in Richtung der Kameras und entferne sie.
I forgot to replace this the first time. It's not a dealbreaker (phone works fine without it), but if you ever open your phone again you must be super-extra careful -- nothing is securing the connection.
-
-
-
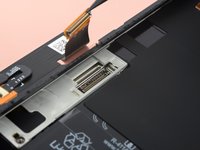
Heble den Displaykabelstecker mit einem Spudger senkrecht nach oben aus seinem Anschluss heraus und löse ihn ab.
Getting the press connector aligned properly is a very fiddly task and impossible without a light touch and several tries. My only advice is to take a break if you get frustrated. There's no 'click' or anything to help you notice that you've got it right. But when you do, it'll just... fit. And you'll probably think, "wait I did it? oh, not as hard as it sounded. just took awhile."
Beware! I tried using the forceps instead of my finger and I ended up tearing into the ribbon cable. So be careful and use your finger if possible. I wouldn't use a sharp tool like I did. There are a couple Youtube videos that probably can help if you search "pixel 7 screen replacement". Sadly I didn't do that first.
Be careful not to hit any circuitry or jumpers in the process. They are so tiny that I did and now sound doesn't work on my bottom speaker. There's a YouTube video on this topic. Take your time!
-
-
-
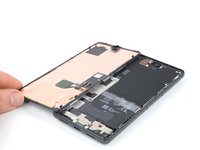
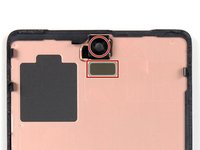
Entferne das Display.
-
Wenn du das Display ausgetauscht hast, dann kontrolliere die Öffnung für die Frontkamera und den Ausschnitt für den Sensor. Entferne alle noch vorhandenen Schutzfolien.
-
Vergiss nicht die Halterung des Displaykabels zu befestigen.
-
Jetzt ist eine gute Gelegenheit, um das Smartphone ausgiebig zu testen, bevor du es wieder zuklebst. Schließe das Display zeitweise an, schalte das Gerät ein und überprüfe, ob alles funktioniert. Bevor du weiterarbeitest, musst du das Smartphone wieder ausschalten und das Display abtrennen.
-
Wenn du beim Zusammenbau vorgeschnittene Klebestreifen verwendest, dann folge dieser Anleitung.
-
Wenn du beim Zusammenbau vorgestanzte Klebefolien verwendest, dann folge dieser Anleitung.
-
Wenn du ein neues Display eingebaut hast, führe eine Kalibrierung deines Fingerabdrucksensors durch.
That's super strange. There's certainly a middle ground of not being too hot, but I've done this job 3 times now, I can really tell if it needs a little more warmth.
IMO this really needs some kind of jig to align the new adhesive. It is nigh on impossible IMO to align properly, and you'll end up with bunched-up sections of stretched adhesive all over the place. It is beyond frustrating, after taking ones time and being so careful.
It seems that it should be possible to cut the plastic backing that the new adhesive comes on into a shape that would fit in the phone, and index it on some of the existing pins by making accurate holes. That might at least make it possible to get all of the new adhesive in a useful place.
Otherwise pretty good. Thank you to the people who have taken the time to put this together.I would have liked to know I had to put the adhesive card before connecting the new screen (which took me 15mn just to connect the wire to the motherboard) because the flat cable makes it very hard to do so...
Otherwise, tutorial is good, although it misses the fingerprint sensor recalibration as said in other comments
I agree, i wish there was an adhesive tutorial, I messed mine up and lost half the adhesive :(
When testing the new screen, it DID work previously. Now it does not. What could be wrong? Did I break a pin? How can I troubleshoot further?
That display cable was tricky wish I had a guide I found a dependable way in the end by moving the screen to the right of the port. but wow that was frustrating. Also wish I had realized I didn't remove the digitizer and only removed the adhesive before wasting the only adhesive I ordered for the new screen.
-


Vergleiche das Ersatzteil mit dem Originalteil. Eventuell musst du fehlende Teile übertragen oder Schutzfolien vom Neuteil abziehen, bevor du es einbauen kannst.
Um dein Gerät wieder zusammenzubauen, folge den Schritten dieser Anleitung in umgekehrter Reihenfolge.
Das Gerät ist mit einem eingebauten Diagnosetest ausgestattet. Hier siehst du, wie du das Pixel Diagnostic Tool starten kannst.
Entsorge deinen Elektromüll sachgerecht.
Hat die Reparatur nicht ganz geklappt? Versuche es mit ein paar grundständigen Lösungen, ansonsten findest du in unserem Forum Hilfe bei der Fehlersuche.
Rückgängig: Ich habe diese Anleitung nicht absolviert.
83 weitere Personen haben diese Anleitung absolviert.
Besonderer Dank geht an diese Übersetzer:innen:
100%


Diese Übersetzer:innen helfen uns, die Welt zu reparieren! Wie kann ich mithelfen?
Hier starten ›


43 Kommentare
This guide was excellent. And the most tedious bit of the repair was removing the remaining adhesive before installing the new screen. Very easy repair for anyone with some patience.
If the fingerprint unlock does not work after this, you may get a message on the lock screen indicating that you need to go to a google website to fix it.
What you actually need to do is:
o Install the Google USB driver for Windows from here: https://developer.android.com/studio/run...
o Put your phone in fast-boot (turn off, then turn on while holding volume down)
o Connect the Pixel to your PC
o Using chrome, visit this site, which will reset the fingerprint reader: https://pixelrepair.withgoogle.com/udfps
I had to reboot twice after this to actually get it to work, but it's all good now.
Thank you for this. Since the message on the phone is unhelpfull, this info should really be added to the manual.
Thank you! No driver needed on a Mac (as it says at the first link.) Just go to the withgoogle pixelrepair page and follow the instructions. Worked on the first restart for me.
Chris K. -
Ohhh thank you so much for this, I was about to give up on the fingerprint reader ha
The above instructions are not complete. These are the full instructions that work for me:
1.Before you turn your phone off, go to the developer options and enable USB debugging.
Go to: Settings, About phone then tap Build number 7 times.
2. Go here Get the Google USB Driver | Android Developers and download the google USB zip file (this is for windows BTW)
3. Unzip however you want it
4. Open the folder usb_Driver and rightclick "android_winusb" and install
5. To make sure it installed, connect your pixel (with USB debugging still enabled) to your PC and open "device manager". You should see "Android Devices > Android Composite ADB Interface".
6. Disconnect pixel from PC
7. Go here Google Fingerprint Calibration website and follow the instructions.
Thank you so much. This has worked for me :)
Thank you for the extra help. Bradapple pointed me in the right direction and you guided me in for the landing... so to speak. 😏
I did all that but when connecting my computer the monitor shows "Unsupported device
To use this tool, your device must be a Pixel 3, 3 XL, 3a, 3a XL, 4, 4 XL, 4a, 4a (5G), 5, 5a, 6, 6 Pro, 6a, 7, 7 Pro, 7a, Tablet." That is very confusing because I have the Google Pixel 7.
OMG thank you so much for this information, i've spent such a long time on various forums and threads, i even talked to google support they said factory reset would work.. no one mentioned the developer options and enabling USB debugging. Thanks again this finally worked!
thanks so much. I think these steps should have been included in the guide. it doesn't seem like the system lets you do a straight swap without it (which makes sense given it is an important security feature)
Can I use a used screen and still have fingerprint scanning work or can it only be calibrated once?
I found attaching the press cable the most difficult, it eventually went in after a few hours trying on and off, but I couldn't tell you why. Once that was done everything was easy
Yes i agree, this was fiddly and I was very worried about breaking pins.. though for me it was 10mins, not hours :(
Really good guide. Had some trouble with the removal of the display cable branket and the adhesive, but after an hour in the end, the screen turnee on. Also had to reinstall the fingerscanner….
guys my screen turn on but the touchscreen doesnt work, can anyone tell what do wrong?
I have the same problem, did you solve it somehow?
How to order the parts if im outside of shipping region, im in indonesia
Great quality kit. I underestimated how fiddly cleaning off the old adhesive would be but otherwise this was straightforward and there were some really good pointers for things to watch out along the way. Glad I took the time to do this as now my screen is perfectly readable again. A couple of lessons learnt from me: 1/ impressed at how quickly the microwave heat pack gets super hot. one application was enough for me to get the screen off. 2/ The clips along the outside edges are very fragile.. be very careful when cleaning out the adhesive. 3/ Speaking of adhesive cleaning/removal.. I understimated this step. It took a looong time. Take breaks if getting tired/frustrated. Probably spent over an hour just on this step. Maybe more heat would have helped, but I was worried about damaging components 3/ As others have mentioned there are issues with the fingerprint sensor post install, the instructions above worked perfectly for me re/ windows driver, developer mode, google software update tool.
I followed this guide to open the phone and try to fix my broken glass: not screen, glass only. I decided to post here some advices.
Resources:
- This guide
- Video on how to open and apply OCA Glass
- Video on how to apply OCA without machines
Where I bought things and what I used?
- IFixIt Pro Tech Toolkit
- Glass replacement with OCA
- Molybdenum string
- Isopropyl alcohol
- Heat Gun / Hairdryer
Advices:
- you need to have something that will hold your screen still. It will move a lot, adhesive is strong as hell
- do not apply too much heat: if it's hot to touch, probably is too much (max 80°C)
- make sure to have A LOT of time, a LOT of patience and a LOT of molybdenum
- do not push on the internal screen and its components: go against glass, not the "LCD"
- screen-frame adhesive cannot be reused, you need a new one
At this point I need to tell you that I failed and ordered a new screen from iFixIt.
I managed to get half of the work done, but then my string started to eat the internal screen :(
Should I remove the thin blue backing off(has what look like serial number stickers on it) the new screen before install? Thanks
When installing a replacement screen be sure to remove the black plastic cover that obscures the selfie camera hole, otherwise you won't be able to take selfies!
I didn't notice this cover when closing it up, so it didn't want to close at the top edge. Still doesn't close snugly, and the front camera doesn't work now, but idk if it's worth trying to get the screen off again and risk breaking the new display. T_T It would have been helpful to have some information on what to remove from the new screen in the article.
Hitch -
Update, a few minutes later: I was able to fix it! The adhesive was fresh enough that a little heat was enough for me to get just the top edge open enough to slip in a pair of tweezers and remove the covering. Camera is now functioning.
Hitch -
Thank you Hitch!
I encountered the same situation and could solve it just as you did.
mikg -
how important is it to put the display cable bracket back on?? I forgot then sealed up
Hi Kyle,
The display cable bracket with the piece of foam holds the connector in place. Without it, the connector just holds with a little friction and is likely to come off by vibration or shock. Your mileage may vary. At least you know how to fix it, should it come off. Keep the bracket in a safe place.
What I do not know is, if there is a possibility for electrical damage on the screen or the mainboard, should the connector not come off completely, leaving just some contacts connected. But given the low currents, damage seems not very likely. At least in my experience, these things are relatively robust.
mikg -
Hello! Does anyone know if it is possible not to change the whole screen of the phone but somehow to reattach the upper glass only? My problem is that the screen itself is fine but the glass goes off a bit in the left upper corner and now there's a several mm whole in between the glass and the screen. Is it possible somehow to fix it without changing the whole screen? Thanks a lot for your replies!
The replacement screen isn't sitting flush with the phone. What have I missed?
Thanks
Hi Jon,
If it is on the top, you likely didn't remove the cover that obscures the selfie camera, which will prevent you from taking selfies too (see comments above). Happened to me and solved it, like Hitch described.
Other possibilities include incomplete cleaning of the old adhesive, torn application of the new adhesive or having some other 'body' lodged between frame and screen.
Best of luck!
mikg -
le tuto est genial tout fonctionne merciiiiiiii
Having issues with the proximity sensor after replacing display. Screen no longer turns off when against face on calls, nor does flip to shh work. I checked for all protective films, nothing present (looked just like the original display and even just like what's pictured above). What do I need to do?!
I have used iFixit guides to repair phones/tablets numerous times over the years, and this is yet another thorough, well put together guide that led to another successful repair.
One thing to pay attention to is the additional hyperlinks/steps needed to reinstall the fingerprint sensor and follow them carefully. For anyone who hasn't messed around with installing custom ROMs on phones/tablets, this might seem a bit daunting, but it's just a matter of following the steps carefully and you should be able to get it done - make sure that you are using the Chrome browser too - I wasn't able to get this to work with Firefox.
One last note on the Pixel 7 driver installation if you're on Windows and have already downloaded the driver - make sure to extract it somewhere easy to find (like the Downloads folder). In Device Manager, Pixel 7 was located under "Universal Serial Bus devices". Once you're ready to select the file to install, you only need to select the folder - it will install the correct driver file.
Just did this! I appreciate the guide! If I had to write a caution to anybody below are things I think I could have done better.
-I put the pick in too deep and bent a spring
-I rushed myself to remove the adhesive, hindsight I should have some solvent or brake cleaner and a wooden toothpicks
- I rushed to try and put the adhesive on, it felt like I took my time but I didn't.... #hindshight...
Hi, Im from Ecuador and my Google Pixel 7 has a broken screen. There's no place here that sells the screen and can fix it. Do you really recommend that I buy the screen or buy another phone?
Just replaced the screen. All was good, including the fingerprint sensor (for that you have to go through the steps outlined in many other comments, and use a good USB cable) but what's missing from this guide is the part on how fix the adhesive, which is quite critical and delicate. I recommend this video, also from iFixit (even if it's for the Pro version the steps are the same): https://www.youtube.com/watch?v=Uag55fu5...
Moin, ich versuche bei euch mein Glück.
Ich suche ein defektes aber noch funktionierendes Display für ein Goggle Pixel 7. Es wird nur zur Datenrettung benötigt, weil meins komplett schwarz ist nach einem Wasserschaden. So das ich den Datenmodus aktivieren kann.
Vielleicht habt ihr noch nicht alle entsorgt.
MfG R. Gierth
ragie@freenet.de
This mainly worked and i was able to extract the data from the phone. However after glueing in the new screen it is not seamless woth the housing and standing out like almost 1mm. It looks like the screen did not fit into the inner clamps and is now only attached by the glue. Any ideas?
Moin zusammen,
mein Google Pixel 7 hat einen Wasserschaden erlitten und funktionierte danach nicht mehr. Ich habe es zur Reparatur gegeben, aber es wurde nur gereinigt und unrepariert zurückgegeben.
Ich habe dann herausgefunden, dass offenbar nur das Display defekt ist – alles andere scheint zu funktionieren. Ich habe eine Maus und Tastatur per USB angeschlossen und mich über die Microsoft Smartphone-Link-App mit Screenshots behelfen können. Mit TalkBack konnte ich die Eingaben besser verstehen und bin zu dem Schluss gekommen, dass bis auf das Display alles funktioniert (es gibt nur kleinere Darstellungsfehler, wahrscheinlich durch das defekte Display).
Jetzt überlege ich, ob es sich lohnt, das Display selbst zu tauschen. Hat jemand Erfahrungen damit oder würdet ihr eher empfehlen, sich ein neues Gerät zu kaufen?
Vielen Dank schon mal für eure Hilfe!
Jakob
Great guide! The most annoying part was removing the old screen adhesive, so make sure to have some isopropyl alcohol on hand for a repair – only a sad little wipe is provided in iFixit's kit. Other than that, everything else went as intended.
I was apprehensive to begin with but the kit is really helpful. Some patience, common sense and work is all that is needed. Just like other posts, scraping off the old adhesive was the most time consuming step. And fingerprint calibration is super easy - just takes a couple minutes and it is done.
One more thing I want to add is that it is easy to miss the adhesive fixing steps in this tutorial - there is a small link which takes you to a different page. I kind of missed it and ripped out the entire adhesive before applying on the phone. It is clearly shown in the video tutorial though.
Thanks to this guide and ifixit in general, I do not need to purchase a new phone! I was worried when my phone had signs of water damage/screen failure; but took the screen off and had a more knowladgeable friend take a look and say the internals were fine.
The money spent on the fixit kit was reasonable but a bit nervewracking because there was no guarantee the phone would work, but ifixit does accept returns and I do value repairability so I decided to go for it.
This guide was excellent and helped with being able to safely take the screen off without puncturing anything. The trickiest part was removing and adding the adhesive. I do wish the guide went into a bit more depth as far as re-assembly; specifically tips on applying the adhesive. But the linked guide was good at giving general directions and the included strip was well designed.
10/10 would recommend.
I do not currently have the fingerprint reader working; I have a modified version of android flashed on my phone so am not sure how to proceed there.
Worked like a charm, it even made my fingerprint reader work better after having to calibrate it twice. My only gripe is that the inserting of the screen is almost impossible, I spent a good hour at least just trying to press this connector in. After looking on YouTube for a bit to see how others do it I attempted to kind of approach it from the side and let the connector "roll" onto the other connector. After which I was able to press it in.
i replaced my pixel 7 screen, I noticed that my proximity sensor is no longer working, I have tried to calibrate it using 3rd part apps and it ddisnt work,i tried using developer settings to switch the proximity sensor and i also updated my android version...all these didnt work
Ian - Antwort
If you can't power down your device because the screen is cracked (in my case, the AMOLED didn't light up at all anymore) and the touch is broken, you can also press power, volume up, and volume down all at the same time for 20-30 seconds. This will actually power off the phone, and not restart it (for that, you would hold the power button and volume up for a while).
Max - Antwort