Einleitung
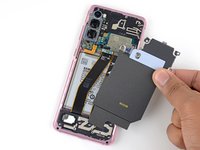
Diese Anleitung zeigt, wie der Akku im im Samsung Galaxy S20 ausgetauscht werden kann.
Der Akku ist stark verklebt. Du benötigst hochkonzentrierten Isopropylalkohol (mindestens 90%ig), um den Kleber aufzuweichen und zu lösen.
Wenn der Akku aufgebläht ist, musst du geeignete Vorsichtsmaßnahmen treffen und darfst das Smartphone nicht erhitzen.
Entlade zur Sicherheit den Akku auf unter 25%, bevor du das Gerät öffnest. Du verringert so das Risiko eines Brandschadens, wenn der Akku versehentlich während der Reparatur beschädigt wird.
Um die Reparatur abzuschließen, benötigst du Ersatzklebestreifen.
Was du brauchst
-
-
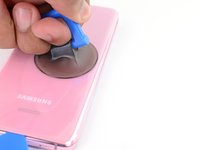
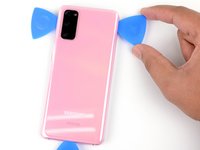
Erwärme einen iOpener und lege ihn zwei Minuten lang auf die Unterkante der Rückabdeckung.
-
-
-
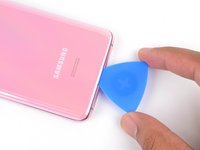
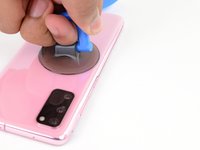
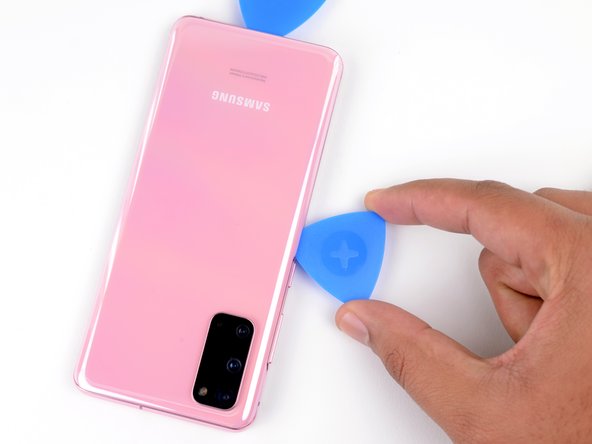
Setze einen Saugheber auf die Rückseite des Smartphones, und zwar so mittig auf die Unterkante wie möglich
-
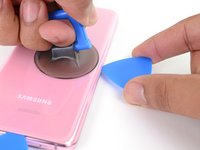
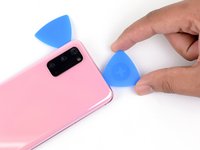
Ziehe gleichmäßig und fest am Saugheber, um einen Spalt zwischen Rückabdeckung und Rahmen zu erzeugen.
-
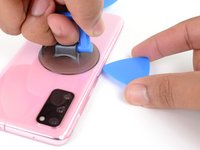
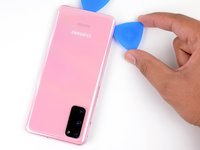
Setze die Spitze eines Plektrums in den Spalt.
While pulling on the back glass with the suction cup, I found it helpful to use something like the opener tool to press down on the frame. Made it easy to pull open even with the iOpener.
-
-
-
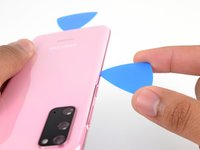
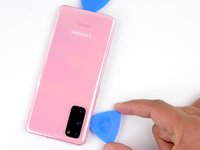
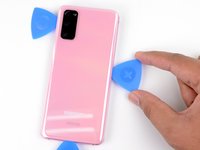
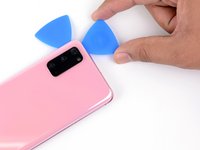
Schiebe das Öffnungswerkzeug ein paar Mal an der Unterkante hin und her, um den Kleber aufzutrennen.
-
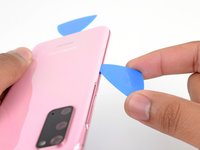
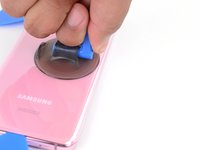
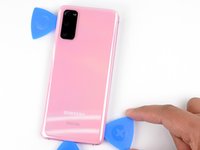
Lasse ein Plektrum in der Fuge stecken, damit sich der Kleber nicht wieder verbindet.
-
-
-
Lege einen erwärmten iOpener zwei Minuten lang auf die linke Kante der Rückabdeckung.
-
-
-
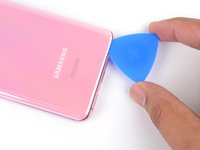
Setze einen Saugheber auf die Rückseite des Smartphones, und zwar so mittig auf die linke Kante wie möglich.
-
Ziehe gleichmäßig und fest am Saugheber, um einen Spalt zwischen Rückabdeckung und Rahmen zu erzeugen.
-
Setze die Spitze eines Plektrums in den Spalt ein.
-
Du kannst auch ein paar Tropfen Isopropylalkohol (mehr als 90%ig) auf die Fuge träufeln, um den Kleber etwas aufzuweichen.
-
-
-
Wenn das Plektrum weit genug unter die Kante des Glases eingesetzt ist, kannst du es nach unten kippen und weiter hineinschieben, um so den Kleber der Rückabdeckung ganz aufzutrennen.
-
-
-
Schiebe das Plektrum an der linken Kante des Smartphones entlang, um den Kleber der Rückabdeckung weiter aufzutrennen.
-
Lasse ein Plektrum unter der linken Kante nahe an der linken oberen Ecke stecken, damit sich der Kleber nicht wieder verbindet.
-
-
-
Erhitze einen iOpener und lege ihn zwei Minuten lang auf die rechte Kante der Rückabdeckung.
-
-
-
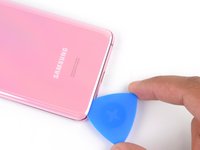
Setze einen Saugheber auf die Rückseite des Smartphones, und zwar so mittig auf die rechte Kante wie möglich.
-
Ziehe gleichmäßig und fest am Saugheber, um einen Spalt zwischen Rückabdeckung und Rahmen zu erzeugen.
-
Setze die Spitze eines Plektrums in den Spalt ein.
-
-
-
Schiebe das Plektrum an der rechten Kante entlang, um den Kleber der Rückabdeckung aufzutrennen.
-
Lasse das Plektrum unter der rechten Kante des Glases oben am Gerät stecken, damit sich der Kleber nicht wieder verbindet.
-
-
-
-
Lege einen erwärmten iOpener zwei Minuten lang auf die Oberkante der Rückabdeckung.
-
-
-
Schiebe das Plektrum von der rechten Kante des Gerätes allmählich um die obere rechte Ecke herum.
-
Fahre mit dem Auftrennen an der Oberkante bis zur oberen linken Ecke hin fort, bis der Kleber der Rückabdeckung ganz abgetrennt ist.
-
-
In diesem Schritt verwendetes Werkzeug:Tweezers$4.99
-
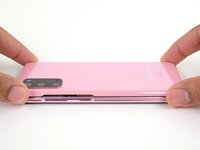
Hebe die Rückabdeckung langsam an. Benutze Plektren, um den restlichen Kleber zu durchtrennen.
-
Entferne die Rückabdeckung
-
Jetzt ist eine gute Gelegenheit, um zu testen, ob die Reparatur funktioniert hat. Achte darauf, dein Smartphone wieder ganz auszuschalten, bevor du weiterarbeitest.
-
Entferne Ansammlungen von altem Kleber mit einer Pinzette oder deinen Fingern. Wenn es schwer geht, dann erwärme die betreffende Stelle.
-
Folge dieser Anleitung, wenn du fertig zugeschnittene Klebestreifen verwendest.
-
Wenn du doppelseitiges Klebeband einkleben willst, dann folge dieser Anleitung.
-
-
In diesem Schritt verwendetes Werkzeug:Magnetic Project Mat$19.95
-
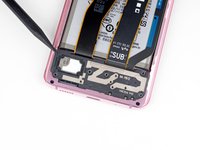
Entferne die fünf 4 mm langen Kreuzschlitzschrauben #00, mit denen die Halterung der Hauptplatine befestigt ist.
-
-
In diesem Schritt verwendetes Werkzeug:Tweezers$4.99
-
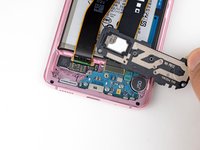
Ziehe die Halterung der Hauptplatine behutsam mit einer Pinzette hoch und lasse sie aus dem Plastikmittelrahmen ausrasten.
-
-
-
Löse die Spule für das drahtlose Laden behutsam vom Gerät ab.
-
Entferne die Spule für das drahtlose Laden.
-
-
-
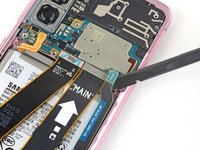
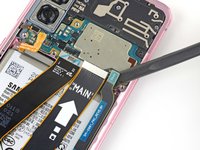
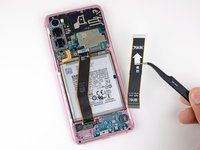
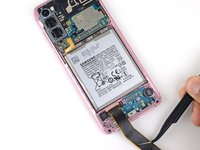
Heble den Akkustecker mit einem Spudger hoch und trenne den Akku ab.
-
-
-
Entferne die fünf 4 mm langen Kreuzschlitzschrauben #00, mit denen der Lautsprecher und der untere Mittelrahmen befestigt sind.
-
-
In diesem Schritt verwendetes Werkzeug:Tweezers$4.99
-
Setze die Spitze eines Spudgers oder einer Pinzette in die Einkerbung in der oberen linken Ecke des Mittelrahmens ein. Heble nach oben, damit sich die Rasten lösen, mit denen er befestigt ist.
-
Entferne den Lautsprecher und den unteren Mittelrahmen.
-
-
-
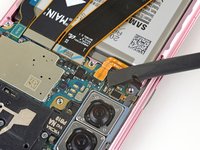
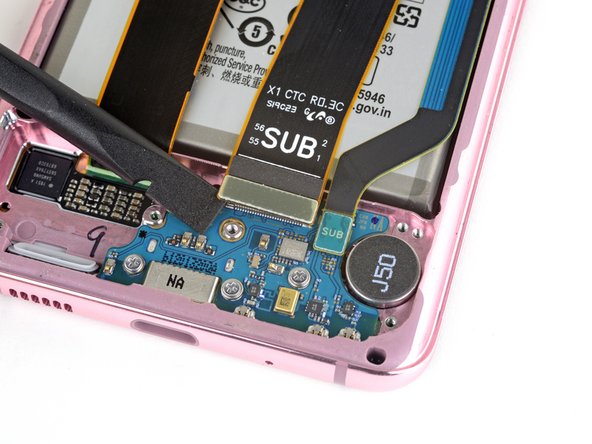
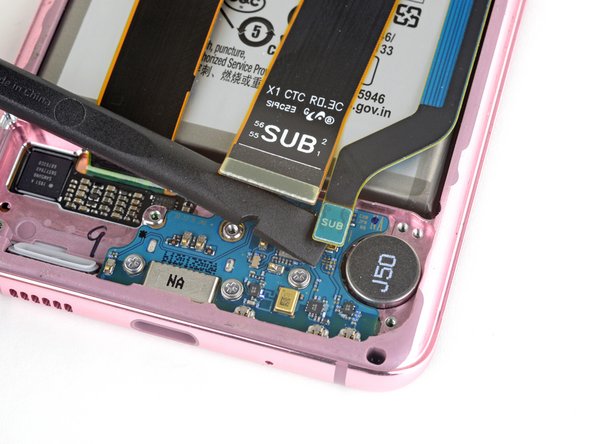
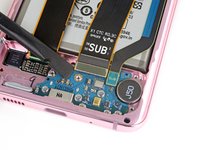
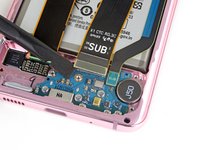
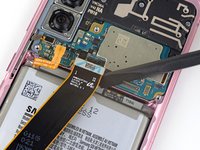
Heble das Haupt-Flachbandkabel und das kleinere Flachbandkabel mit dem Spudger hoch und löse sie von der Tochterplatine unten am Gerät ab.
-
-
-
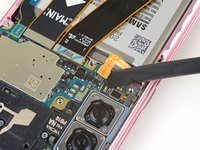
Heble das Haupt-Flachbandkabel und das kleinere Flachbandkabel mit dem Spudger hoch und löse sie von der Hauptplatine ab.
-
-
-
Löse behutsam das Haupt- und das kleinere Flachbandkabel ab und entferne sie.
-
-
-
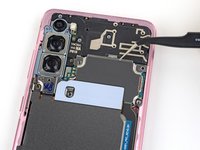
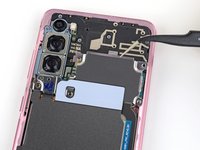
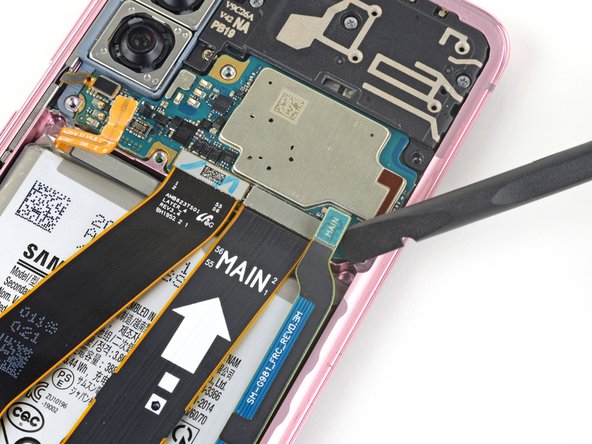
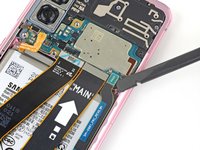
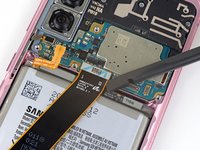
Heble das Haupt-Displaykabel mit einem Spudger hoch und trenne es von der Hauptplatine ab.
-
-
-
Löse das Displaykabel behutsam ab und biege es weg, so dass der Weg für die Hauptplatine und den Akku frei ist.
-
-
-
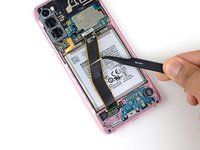
Tröpfle 1 - 2 Tropfen hochkonzentrierten (über 90%) Isopropylalkohol auf den oberen Rand des Akkus.
-
Warte eine Minute, damit der Isopropylalkohol den Klebstoff aufweichen kann.
-
-
-
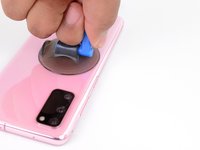
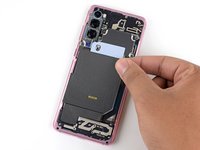
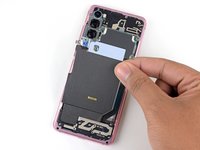
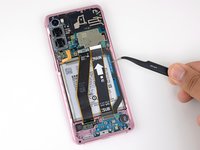
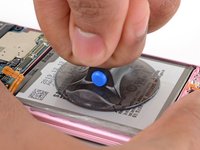
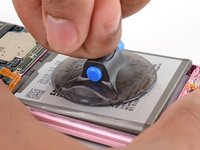
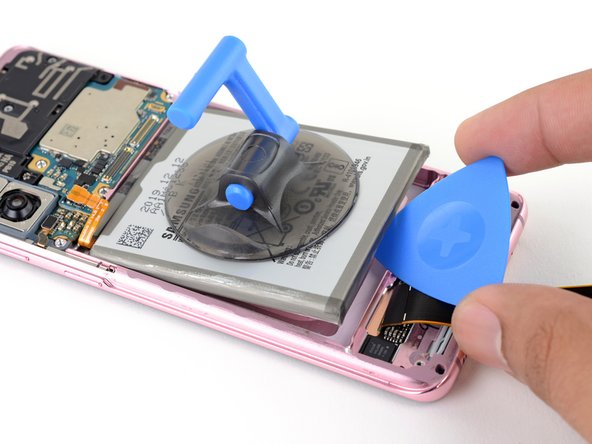
Bringe einen Saugheber in der Mitte des Akkus an.
-
Klemme den oberen und unteren Rand des Smartphones mit einer Hand fest gegen die Arbeitsfläche und ziehe den Saugheber mit der anderen Hand kräftig nach oben.
-
Der Klebstoff lässt sich nur langsam und durch wiederholtes Ziehen lösen, nicht durch starken Druck. Ziehe jeweils 15 Sekunden lang mit gleichmäßiger Kraft am Saugheber.
-
Wenn sich der Akku nicht löst, gib 1-2 Tropfen Isopropylalkohol auf den oberen, linken und rechten Rand, warte eine Minute und ziehe erneut.
-
Wenn sich der Akku zu lösen beginnt, dann fahre mit dem nächsten Schritt fort.
-
-
-
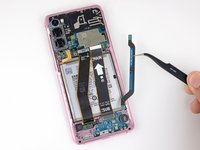
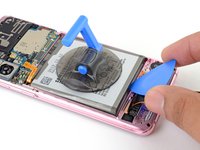
Setze ein Plektrum unter die Unterkante des Akkus ein und verdrehe es, bis sich der Akkukleber ablöst.
-
-
-
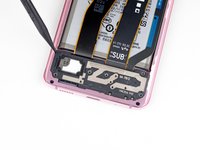
Entferne den Akku.
-
Ziehe die Kleberreste nach oben ab und schabe sie weg, bevor du das Akkufach mit Isopropylalkohol und einem fusselfreien Tuch reinigst.
-
Wenn du Isopropylalkohol verwendet hast, dann warte zehn Minuten lang mit dem Einbau des Akkus, bis der Alkohol vollständig verdunstet ist.
What is the piece behind the battery that looks like its circled called? Is it normal to see this piece when shining a flashlight onto the screen when the phone is off?
That’s the fingerprint sensor! Because it’s embedded in the screen, if you shine a light behind it, you can see it through the front glass.
-


Vergleiche dein Ersatzteil mit dem Originalteil - möglicherweise musst du fehlende Bauteile übertragen oder Schutzfolien am Neuteil abziehen, bevor du es einbauen kannst.
Um dein Gerät wieder zusammenzubauen, folge den Schritten dieser Anleitung in umgekehrter Reihenfolge.
Folge dieser Anleitung, um einen Akkuzyklus-Reset durchzuführen und den neuen Akku zu kalibrieren.
Entsorge deinen Elektromüll fachgerecht.
Lief die Reparatur nicht wie geplant? In unserem Forum oder S20 Wiki für Akkuprobleme findest du Hilfe bei der Fehlersuche.
Rückgängig: Ich habe diese Anleitung nicht absolviert.
29 weitere Personen haben diese Anleitung absolviert.
Besonderer Dank geht an diese Übersetzer:innen:
100%


Diese Übersetzer:innen helfen uns, die Welt zu reparieren! Wie kann ich mithelfen?
Hier starten ›

25 Kommentare
I had a huge amount of difficulty removing the battery during this repair. The adhesive is really strong, the suction cup doesn't stick to the battery very well and if you lever it out you run the risk of puncturing the battery. It's also really difficult to pull up on the battery while holding the phone down, especially because you want to avoid touching the circuits.
Eventually I succeeded and everything seemed to work but the next day the phone wouldn't switch on. I think maybe the adhesive remover got somewhere it shouldn't have. If I could add something to this guide, it would be "once battery is removed, allow phone to sit for 30 mins to ensure all adhesive remover has evaporated". If I was allowed a do-over I would try to heat the adhesive instead. Or use the string trick. I'm switching to an iphone now because apparently they don't glue their batteries.
Good point! I would suggest to use pure isopropyl alcohol and not something below 99%. The residual water might be not much but still there is a slight chance of it getting somewhere inside. Also the 99% pure alcohol evaporates much faster and leaves no traces. Apple batteries are also glued in with adhesive. What apple does right are the pull-strings to remove the sticky tape between chassis and battery.
Followed every step and managed to complete it but after a couple of minutes the phone screen stopped working and turned black.
I'm pretty sure that happened because the isopropyl alcohol went through the phone into the screen through the gap right under where the battery seats.
If you attempt this at home be aware this might happen, so disconnect the display too or look into using a different method for removing the battery.
I don't think this repair is worth attempting. I also killed my screen with this one, similar to the two commenters above. Whether it was isopropyl alcohol getting into the LCD or whether it was some issue with flimsy connectors I don't know. I was super careful and I've still bricked it, so I'd rate this repair as 'too risky'.
i typically use an iPlastix opening tool, a heating pad and lots of alcohol, get the very tip of the opening tool to sort of bend or roll into a curve, then slip the bent tip into the gap between frame and battery dripping some alcohol onto the tool, eventually you can get the rolled end to slip underneath the battery. then just slide the tool around the perimeter of the battery, cutting the adhesive, eventually, once all the adhesive is cut the battery will easily pry out of the phone. continually apply alcohol to the surface of the tool once you get the curved end under the battery, the alcohol will drip down the tool and find its way under the battery more easily weaking the adhesive.
since the tool is made of plastic, its almost impossible to scratch, bend or puncture the battery during the removal process by using this method, this is also my preferred method for removing bulged batteries that a suction cup wont stick to, or batteries where putting any unnecessary pressure could cause them to burst.
As with other comments, battery swap went fine, but after a bit of use I connected the phone to a charger and screen went black. Strange experience, feels like it's booby trapped.
I used this repair guide to change my battery in my S20. All went well and successfully especially after using this guide. IPA helped massively to remove the battery but I DO NOT RECOMMEND USING IT. i read the comments about the screen going blank etc. i used a heat gun to evaporate the IPA before reassembling the device thinking this would eliminate any issues. I WAS WRONG. DO NOT USE IPA to remove the battery. I turned my phone back on ant it was okay for a few minutes. Then the screen started flickering and turned completely green then went black. The phone still works as i can hear the notification sounds etc but no screen. Again DO NOT USE IPA TO REMOVE BATTERY
When the alcohol gets into the screen, the screen becomes black, it dies. Do not try this guide.
Did this repair to a T, it killed my display about 30 mins later. DONT USE IPA
I even used my heat gun to evaporate all of it off, let the phone sit for an hour too. still killed it!
Hi Bradley,
I'm really sorry to hear of your repair experience. I think the IPA may have seeped through the fingerprint sensor cutout and into the OLED panel.
When the battery adhesive is still intact, it should seal against moderate use of IPA along the top and side edges. I looked over the guide and changed the wording to give clearer guidance and warnings on how much to apply, where to apply it, and when not to use IPA.
Is there any procedure needed to reset the battery stats or charging levels? I replaced without problem but my battery life is not as good as my old battery! Wondering if there is a step on the software side?
Did you figure it out? I have the same issue. Looks like an original battery, but batt life is weak and Samsung Members diagnostics shows battery needs replacement...
Slawek -
The screws are more likely to be #0 JIS rather than #00 Phillips. Certainly my JIS screwdriver fits much better than my Phillips one.
I haven't had a problem with IPA use yet, but the battery adhesive is stupidly strong. Just use a mechanical clip, Samsung. My Blackberry is: slide back off, lift up battery, insert new battery, slide on back cover. Probably five seconds. Things weren't so bad in the 2010s.
The Samsung battery reset app doesn't recognise the QR code on the packaging so far.
As well i killed my screen, i turned up and and worked a few minutes, later I left it charging, and when I came back the screen was completely black, I plug it to my monitor, and the phone is still working but no the screen. Anyway his method did not help me to remove the battery
After all these comments concerning a screen-blackout after using alcohol I didn't dare to use that. Just pulled with the suction handle and pried with different tools from the bottom. That took a lot of time, sweat, fear to break the battery and quite some force. Why do manufacturers glue in the batteries?!
Worked out fine and I'm happy with the new battery.
why does it needs to be below 25%? I understand it being at maximum 60%, but for what I learned Li-ion batteries are unstable at 0% too. Maybe it needs to be better specified?
Toller Guide!
War mein erster Akkutausch.
Statt dem Alkohol hab ich aber den Akku bzw Kleber mit einem Föhn über die Displayseite erwärmt. Hat wunderbar funktioniert.
Klebereste hab ich dann mit 2 Tropfen Desinfektionsgel und nem Wattestäbchen gelöst. Rückbau hat auch ohne Probleme funktioniert.
I completed the swap without affecting the screen. To avoid killing the screen as others have done, I used 2 tiny drops of acetone from a needle behind the battery then applied constant even pressure to the battery over a long period of time. If you do not have a way of getting the solvent accurately only onto the glue, use the constant pull method alone. Be careful about putting tools behind the battery as there is an area behind the battery with a soft membrane.
I completed the swap without obvious issue. However if I unplug the phone from a charger it immediately turns off as if there is no battery at all. I re-opened the phone and disconnected and reconnected all the upper and lower flex cable connectors carefully. This did not resolve the issue. The battery shows 4000 mAh at 100% or 99% charge when connected to USB and powered on. I don't know if there is something I am missing of if I possibly revived a bad replacement battery.
Thanks for this informative instruction manual. What I would like to ask is, where can I find a genuine S20 battery?
Found that using the iOpener did not provide enough heat to weaken the adhesive, went with a hairdryer instead. Make sure to never keep the hairdryer still, and apply heat on high for 30 seconds to 1 minute per side did the job for me. iOpener just did not get hot enough
Phil R - Antwort