Diese Übersetzung enthält möglicherweise noch nicht die neuesten Änderungen der Original-Anleitung. Hilf mit, die Übersetzung zu aktualisieren oder sieh dir die Original-Anleitung an.

Google Pixel 3 XL Display austauschen

Einleitung
Zu Schritt 1 der AnleitungDiese Anleitung wurde von iFixit-Mitarbeitern erstellt und nicht von Google unterstützt. Erfahre hier mehr zu unseren Reparaturanleitungen.
Folge dieser Anleitung, um ein kaputtes Display an deinem Google Pixel 3 XL auszubauen und zu ersetzen. Diese Vorgehensweise gilt für Ersatzdisplays, die nicht auf einem Rahmen vorinstalliert sind. Das Design des Pixels erfordert den Ausbau der Rückabdeckung, damit der Displaystecker abgetrennt werden kann.
Bevor du anfängst, solltest du sicherstellen, dass du Ersatzklebestreifen sowohl für die Rückabdeckung als auch für das Display hast.
Bei dieser Vorgehensweise wird das Display des Pixel 3 XL auf jeden Fall zerstört. OLEDs funktionieren nicht mehr, wenn sie Sauerstoff oder Feuchtigkeit ausgesetzt werden, und sie sind daher luftdicht eingekapselt (das ist auch der Grund weshalb OLED Panels unter einem Riss im Bildschirm schwarz werden). Es ist sehr schwierig, nur das Glas auszutauschen, denn die OLED Schichten des Pixel sind mit dem Glas verklebt.
Was du brauchst
Fix Kit
Dieses Kit enthält alle Ersatzteile und Werkzeuge, die für die Anleitung benötigt werden.

Ersatzteile


Werkzeuge


Mehr anzeigen …
-
-
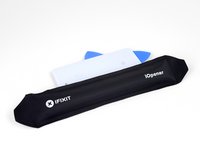
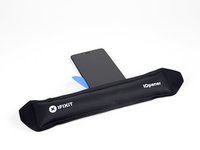
Erwärme einen iOpener und lege ihn eine Minute lang auf die rechte Kante der Rückabdeckung.
-
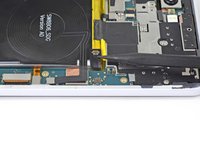
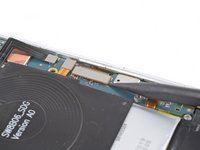
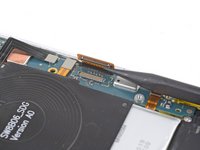
Während der Wartezeit kannst du Kenntnis von folgenden Bereichen nehmen:
-
Starker Kleber - unten am Gerät befinden sich große Bereiche mit Kleber.
-
Kabel des Fingerabdrucksensors - achte darauf, beim Hebeln dieses Kabel nicht zu durchschneiden
-
-
-
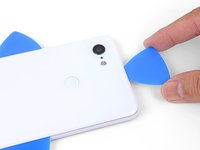
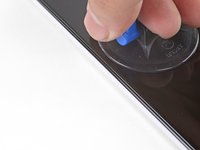
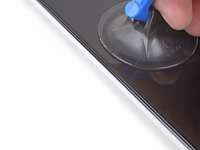
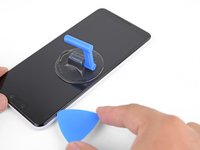
Setze einen Saugheber auf die erwärmte Kante der Rückabdeckung, und zwar so nah wie möglich am Rand.
-
Ziehe fest und gleichmäßig am Saugheber, um eine Lücke zu schaffen.
-
Je nach Alter deines Smartphones kann das unter Umständen schwierig sein. In diesem Fall ist es hilfreich, die Kante erneut zu erwärmen.
-
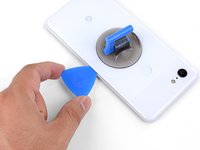
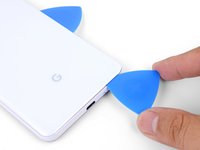
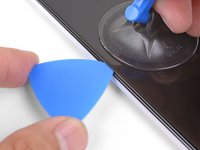
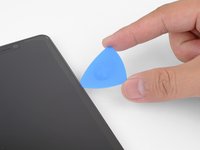
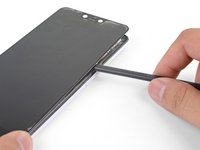
Setze die Spitze eines Plektrum in die Lücke.
Suction cup doesn’t work on severely cracked glass.
Step 1 - 2 took me about 50 minutes. Back and forth with heat and trying with suction cup. I could get my finger nail in but not the pick. Took two people, but we finally got a pick in. 2 year old phone.
I also struggled here for a while. I ended up working my way around the entire edge of the phone until I found one spot where I could pry up the back panel. I used a jimmy instead of the opening pics. I also used a hairdryer on lower heat instead of the iopener. 3 year old phone.
Took 30 minutes + to get the back cover off. Used another suction cup to grip from the busted screen and the ifixit suction cup for the back. A thinner Acoustic guitar pick was required opposed to the standard Blues picks provided in the kit (har-har). Would HIGHLY suggest getting a pick into both the back and the front before removing the panels as it will give you more surfaces to pry from. Made that mistake...
Over 2 hours of trying, I keep reheating the pouch and let it sit on the edge for sometimes up to 10 minutes since the directed 1 minute wasn't working. Physically cant get enough leverage on the back of the phone; picks are too thick to get under the crack, and the suction cup pops off before I can get enough force to see any gap open. Phone is 5 years old. I really need some help
Hey Grant!
I hear your pain—the adhesives on this phone are very strong. The initial gap is one of the hardest parts of the procedure. Here are some suggestions:
* If you have a hair dryer, give that a shot. Heat the edge until it is slightly too hot to the touch.* These adhesives separate not with extreme force, but with constant steady force and time. Try heating the edge and pull on the suction cup with firm force for about a minute to let the adhesive separate.
* If you have an opening tool, you can try this procedure to get the initial gap.
-
-
-
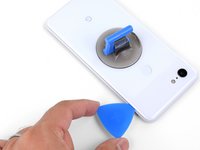
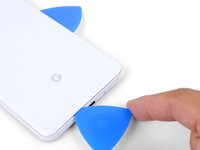
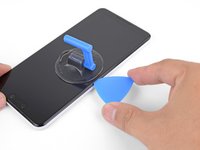
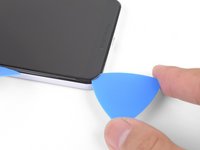
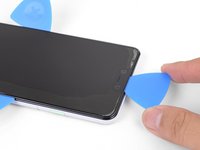
Schiebe ein Plektrum an der rechten Kante entlang, um den Kleber durchzuschneiden.
-
Der Kleber verklebt beim Abkühlen wieder, dadurch wird das Schneiden schwieriger. Wenn das passiert, musst du die Kante erneut erwärmen.
-
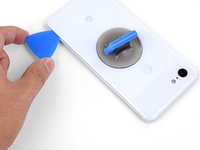
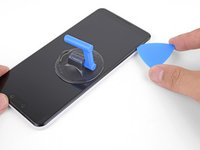
Wenn du die Kante durchgetrennt hast, dann lass ein Plektrum stecken, damit der Kleber nicht wieder anhaftet.
-
-
-
Lege einen erwärmten iOpener eine Minute lang auf die Unterkante der Rückabdeckung.
-
-
-
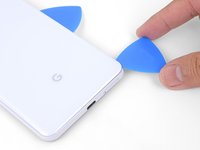
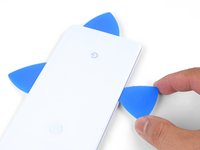
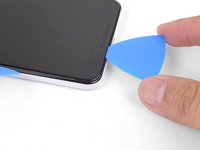
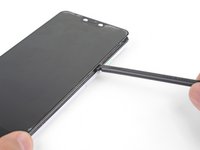
Schiebe ein Plektrum um die untere rechte Ecke und an der Unterkante entlang, um den Kleber zu durchtrennen.
-
Lass das Plektrum in der Kante stecken, damit sich der Kleber nicht wieder verbindet.
-
-
-
Erwärme und durchtrenne den Kleber an den restlichen Kanten.
-
Sei besonders vorsichtig, wenn du die linke Kante durchtrennst. Wenn du das Gefühl hast, dass dein Plektrum im oberen Bereich festhängt, hast du vielleicht den Fingerabdrucksensor erwischt. Ziehe das Plektrum etwas weiter heraus und versuche es erneut.
-
Achte darauf, die dicken Klebestellen im unteren Bereich und an der rechten Kante zu durchtrennen.
The back cover is Glass!!!!. DO NOT PRY HARD, IT WILL BREAK!!!!!!!
You must go slowly and let the heat do the work, if you force the cover off, it will shatter.
-
-
-
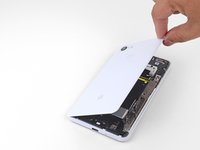
Heble die rechte Kante der Rückabdeckung vorsichtig hoch.
-
Zertrenne alle Klebereste an den Kanten mit einem Plektrum.
-
-
-
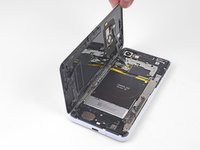
Klappe die rechte Kante der Rückabdeckung hoch und lege das aufgeklappte Panel auf die linke Seite des Smartphones.
-
Wenn du einen neuen Fingerabdrucksensor eingebaut hast, musst du mit Hilfe dieser Software dafür sorgen, dass das Smartphone den neuen Sensor erkennt.
Reassembly is way harder. The adhesive guide is generic and not super helpful, so don't be surprised if things went smoothly until you get to this step and then everything starts sticking to things its not supposed to.
This is great but how you address that fact that the phone is tied to a particular fingerprint sensor and after replacing, the new sensor is not recognized by the original phone?
Hi Dave!
There's a software calibration tool that you can use to calibrate your new fingerprint sensor. I've updated this step to include a link to the tool.
I have a pixel 3 xl and I can't get the tool to work. I finally got the driver's installed after several hours and it says it's for pixel 6 and up basically. So I tried the other option and it's basically saying to do a factory reset? Did I mess something up on the install or what am I doing wrong here? Thanks
Uhhh
So, apparently the connector on the motherboard for the fingerprint sensor is just ridiculously fragile, because after plugging and screwing everything in (pretty much reassembled except for the adhesive), I closed up the phone and powered it on to test if everything was working, and when I opened it back up and let the top hang off to the side, it just snapped off. I didn't even have it tensioned that much, it was just hanging off to the side and snapped. So now I've traded a non-functional camera with a non-functional and irreparable (unless I get a new motherboard) fingerprint sensor.
The guide really ought to emphasize how delicate that connector really is. I have a google drive link here to a photo of the remnants of my poor fingerprint sensor connector :( link
Wasted a ton of time and effort (and money) trying to use this guide to repair my Pixel 3XL. Then I get to the software calibration tool and find:
Unsupported deviceThis is not a compatible device. Only Pixel 6, 6 Pro, 6a, 7, 7 Pro, 7a devices can install this software.
I cannot say how frustrating it is when a guide and website that tried to be so helpful ends up like this. Failure due to referencing tools not on the site and not suitable for the job.I too want to stress just how sensitive the fingerprint sensor cable is. Be sure you are only lifting the back away a very small amount until you are able to disconnect the cable. I thought I was being careful and ended up still putting a small tear in the cable!
The good news is that a replacement sensor is well under $10 shipped. Also, I'm not sure why this guide recommends the use of the software tool.
It is not compatible with the 3XL (and I'm not sure it ever was). I had some reservations when I read this when I had to replace my sensor, but I found comments else where stating that nothing was needed. Sure enough, when I got my new sensor installed, it worked with no issues. I didn't need to calibrate, or reset my device. I just needed to set my fingerprints up again.
-
-
-
-
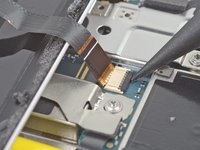
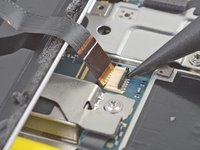
Benutze eine Pinzette, um das gelbe Klebeband auf dem Stecker des Fingerabdrucksensors abzulösen.
This step is utterly unnecessary. It achieves nothing, and the tape is there for a reason (I'm not sure why, maybe to prevent short circuits). I didn't remove this tape while disassembling and it didn't change anything.
The Kapton tape should adhere to both the cable and the connector. It helps prevent the cable from slipping out of the ZIF connector. You're right in that you don't have to completely remove the tape—I've adjusted the step to reflect this.
I just finished this guide, thank you. It would be nice to have a "before ribbon removed" reference picture that's also without the Kapton tape in place if possible. I was no longer certain how far back into the ZIF connector I had to place the ribbon cable as I simply forgot what it looked like before removing it. Basically, it "felt" like it was out too far, but since I had no reference I couldn't compare. Step 10 has good close up pics, but the ribbon cable is already out a bit so a bad reference.
-
-
-
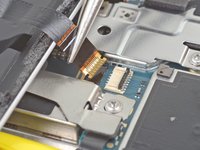
Klappe die schwarze Verriegelung am ZIF-Anschluss des Fingerabdrucksensors mit der Spitze eines Spudgers hoch.
-
Fasse die Lasche des Kabels mit den Fingern oder deiner Pinzette und hole das Kabel vorsichtig aus dem Anschluss heraus.
-
-
-
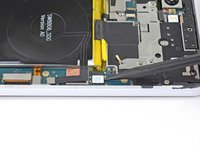
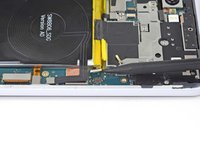
Entferne die Rückabdeckung.
-
Benutze diese Anleitung, um neue Klebestreifen korrekt auf der Rückabdeckung zu befestigen.
-
-
In diesem Schritt verwendetes Werkzeug:Magnetic Project Mat$19.95
-
Entferne die folgenden vier T3 Schrauben, mit denen die Abdeckungshalterung aus Metall befestigt ist:
-
Drei 4 mm lange Schrauben
-
Eine 3 mm lange Schraube
Be careful when putting the screws back in that you do not over tighten. This will cause you to destroy some pixels on your screen.
The long screw on my disassembly was adjacent to the lettering for the Qi inductive receiver, and not close to the silver exposed part of the battery as indicated
-
-
-
Setze das flache Ende eines Spudgers unter die rechte Kante der Metallhalterung und heble sie nach oben, um sie abzulösen.
-
Entferne die Metallabdeckungshalterung.
There is a small adhesive pad under the metal bracket, between the two middle screws that will provide some resistance when lifting the metal cover bracket
-
-
-
Heble den Akkustecker mit der Spitze eines Spudgers hoch und trenne ihn von seinem Anschluss.
-
Biege das Akkukabel so, dass der Stecker nicht versehentlich den Anschluss berühren kann.
-
-
-
Benutze die Spitze eines Spudgers, um das Displaykabel von seinem Anschluss auf dem Motherboard an der rechten Kante des Smartphones hochzuhebeln und abzutrennen.
-
-
-
Drehe das Smartphone so, dass das Display nach oben zeigt.
-
Erwärme einen iOpener und lege ihn zwei Minuten lang auf die lange Kante des Displays.
-
-
-
Setze einen Saugheber auf die erwärmte Seite des Displays, und zwar so nahe an der Kante wie möglich.
-
Ziehe gleichmäßig am Saugheber, um einen Spalt zwischen Rahmen und Display zu schaffen.
-
Setze die Spitze eines Plektrum in die Lücke.
So Im pulling up on the suction cup with enough force to pop it off and the screen is not budging. Ive heated the iOpener to max and let it sit for 2, 5, and 10 minutes. I cant seem to get the adhesive to release
I actually managed to snap part of an opening pick off trying to work it in there
Hey Alex,
The adhesive holding the screen is really tough. You may need to repeat the heating and pulling procedure multiple times to weaken the adhesive, or use a heat gun or hair dryer to weaken it.
Be sure to pry the top most layer only. there is a frame for the replacement kit that is meant to stay in tack that sits directly below the display. It cracks easily too if removed. Advise super glue...
-
-
-
Schiebe das Plektrum an der Kante des Displays entlang, um den Kleber durchzuschneiden.
-
Der Kleber verklebt beim Abkühlen wieder, dadurch wird das Schneiden dann schwierig. Wenn das passiert, musst du die Kante erneut erwärmen.
-
Wenn du die Kante durchgetrennt hast, dann lass ein Plektrum stecken, damit der Kleber nicht wieder anhaftet.
-
-
-
Lege einen erwärmten iOpener eine Minute lang auf die Unterkante des Displays.
-
Benutze ein Plektrum, um den Kleber durchzuschneiden.
-
Lasse ein Plektrum in der Fuge stecken, damit sich der Kleber nicht wieder verbindet.
-
-
-
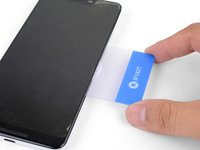
Setze einen Spudger oder eine Plastikkarte in die Kante und drücke sie hinein, um den tieferliegenden Kleber durchzuschneiden.
-
Schneide weiter bis das Display vom Rahmen abgelöst ist.
-
-
-
Drehe das Smartphone um, sodass das Motherboard nach oben zeigt.
-
Drücke das Displaykabel durch seinen Ausschnitt im Motherboard. Wenn du das Kabel so ausrichtest, dass ein Ende zuerst darunter rutscht, dann kannst du es leichter herausholen.
I had to partially loosen the motherboard. That guide is a little confusing because its an extract from the full removal of the motherboard. I loosened the motherboard and connecters and gently lifted it with a spider to make space to the connector to pass between the midframe and the motherboard.
-
-
-
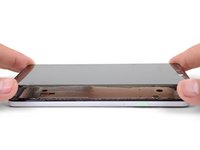
Drehe das Smartphone um, sodass das Display nach oben zeigt.
-
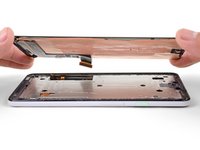
Hebe das Display vom Smartphone ab und durchtrenne dabei alle Klebereste.
-
Entferne das Display.
-
Achte darauf, deine Reparaturen zu testen, bevor du das Display wieder festklebst.
-


Wenn sich dein Pixel nach dem Austausch des Displays nicht anschalten lässt, könnte es sein, dass das Gerät sich unbemerkt angeschaltet hat, während die Batterie wieder angeschlossen wurde. Halte den An/Aus-Knopf für mehrere Sekunden gedrückt bis eine Vibration zeigt, dass das Gerät sich abschaltet. Verbinde danach das Display erneut und versuche es noch einmal.
Um dein Gerät wieder zusammenzubauen, folge den Schritten dieser Anleitung in umgekehrter Reihenfolge.
Entsorge deinen Elektromüll fachgerecht.
Lief die Reparatur nicht wie geplant? Dann versuche es mit einer grundlegenden Fehlersuche oder stelle deine Frage in unserem Pixel 3 XL Antwortenforum.
Rückgängig: Ich habe diese Anleitung nicht absolviert.
35 weitere Personen haben diese Anleitung absolviert.
Besonderer Dank geht an diese Übersetzer:innen:
94%


Diese Übersetzer:innen helfen uns, die Welt zu reparieren! Wie kann ich mithelfen?
Hier starten ›


23 Kommentare
What adhesive do you recommend for the screen? This would be my first time doing repair on a smartphone. The guide says to have adhesive for the screen and back, but only has a recommendation for the back adhesive.
Hi Vincent,
The screen itself has a large adhesive pad—what’s missing is the thin perimeter adhesive. For that, I would suggest using some Tesa tape (here are general instructions on how to apply Tesa tape). Some repair techs use E6000 adhesive, but doing so complicates further repairs, and it can get messy. As a reminder, be sure to thoroughly test your repair before you glue the screen in place! Good luck with your repairs!
Hi Arthur! Thanks a ton for putting this guide together, had no problem getting my old display out.
However, I’ve been having an issue I’m hoping you might be able to help with. When I plug the new display into the device, no amount of force-rebooting the device, or re-plugging the display and battery cables, will make the new display power on. I RMA’d the first display thinking it was the problem, but the replacement display I received is doing the same thing. The old display that was removed did work before removal, albeit with significant artifacting (due to the severely cracked display). Do you think there could be some step I’m missing? Perhaps the replacement display is also defective?
Thanks for your help!
Hey Taylor!
That is strange. I have heard scattered reports of other people having similar troubles over various Pixel models. I am assuming that you have the screen connected before you connect the battery. Did you purchase the screen from iFixit? If so, I can definitely check and test some of our screens to see if they are the culprit.
I replaced the screen but now I have 2 problems:
… wireless charging doesn't work
… fingerprint reader doesn't work
I am considering taking it apart again but don't know exactly what to look for.
Can anyone offer suggestions?
Hi Bryan,
The fingerprint reader is connected by a ZIF connector. Make sure that the fingerprint cable is fully inserted into the connector and properly locked down.
As for wireless charging, there is a chance that the connector was loosened during disassembly. Carefully pry up and re-seat the connector.
Hi I tried to change my display and the touchscreen is not working ,I don't no what to
Any help please
Hi Danny,
Does the display light up?
After completing this repair this past weekend I would like to comment on the removal of the back. I found it to be more difficult than expected. It worked better for me to use a blow dryer (hot) to heat the edges and then was able to pry the back off. I think I applied too little heat initially for fear of damaging the battery but found that I had to apply more than just the heat from an iOpener. Thanks for the great guidance! One other comment…The display connector is difficult to re-thread through the opening without moving the motherboard up to produce a bigger opening. Since I also replaced the USB connector at the same time I had loosened it and it was easier to thread it through.
Thanks again for all the pictures and the step by step!
Great tutorial, but I would definitely include (and not make it optional) motherboard removal as the display cable is extremely hard to slide out of that slot without doing that first. Luckily my display was shot so cutting the cable was the easiest way, but what if you wanted to save the part?
Hi Stephane,
Good point! I will adjust the step instructions. Situationally, I don’t think there is a reason to remove the display intact—the fragile nature of the Pixel displays usually results in damage when it is removed.
I’m Having the same issues where i bought a screen and it didn’t work so I bought a new one and that one isn’t working either. What are the steps to counteract that. I feel its not the screen at this point.
Very nice tutorial. After replacing the screen, I’m having an issue where the display doesn’t show anything, but the touchscreen portion is working as it provides haptic feedback on what I assume is the lock screen. The old sceen worked.
It’s possible the screen cable wasn’t seated properly. You could remove the back panel and reseat the cable. You can test whether it works without adding the rear panel.
Hi, If I buy your screen replacement (Item code: IF356-051-1), and Back Panel Adhesive (Item code: IF356-086-1) - do I need any further adhessive or Tesa tape to complete a screen replacement?
Thanks for the tutorial!
Hi Jason,
Unfortunately, you will still need some adhesive in order to reattach the screen to the frame. We currently don’t stock the custom adhesive for the screen, so a pre-cut adhesive card is the next best solution.
What about transferring the speaker and microphone screens from the old screen to the new screen?
Great tutorial. However, you missed a part about having to transfer speaker grilles to the new screen, as it does not come with them pre-installed. I did miss the step and realized that the speaker grilles are not installed after the screen was already glued back to the chassis.
Thanks for pointing that out! I’ll add a note in the last step.
Hey,
thank you very much for tutorial, it is well made. After I closed the phone everything is normal, but first it said that finger print hardware is not available and after wards, it doesn’t show the error but finger print sensor still not working. I tried to fiddle with ribbon cable to see if it is actually inside the socket and it was ok. I’m out of ideas. Thank you in advance,
I did this directions fully. It took me closer to 3 hours. This was my third screen replacement after my Pixel 1 and Nexus 5. Everything works great! The only issue is that there is about a 1mm gap between the screen and the frame at the bottom. I bought the ifixit screen kit, but the screen tape included just had nothing for the bottom, so I wonder if I did something wrong. Generally though, the screen and back cover both stick out which makes it uncomfortable to hold because those sharp edges dig into my finger pads as I hold it. I thought i did enough to remove the leftover old glue, but it seems there was still enough to cause a gap. It would be nice to include tips or links on how to best remove glue to reduce the chances of this.
The hardest part was warming the glue enough to remove the screen and rear cover. I had to use my Heaterizer XL-3000 Heat Gun to fully remove it- the iOpener wasn’t enough, but it did help to warm up the phone and limit use of the hot air gun, which is always scary.